
Developing embedded devices, especially for IoT applications, can be a very complex task and requires a lot of knowledge. In the last blog post of my colleague Thomas Kutz we introduced Eclipse Mita, a new programming language designed for developing embedded IoT devices. It comes with a concise syntax based on event-driven paradigms and abstracts from the underlying hardware.
Its two level architecture (application logic vs. platform specifics) allows to write easy-to-read application code without diving into hardware specifics. However, Eclipse Mita currently only supports the XDK platform as it was originally developed in the scope of Bosch’s XDK device.
In my master thesis I investigated how additional platforms can be integrated with Eclipse Mita and furthermore I implemented a prototype based on the popular Arduino Uno platform.
The prototype comes with support for time-depending events, buttons and LEDs. Additional features can be added later on, however, in this blog I want to show what’s possible with this extension.
Create Arduino platform definition
Eclipse Mita comes with a two level architecture, thus separating application logic from hardware specifics as much as possible. In order to integrate a new platform, one needs to contribute a platform definition as well as a bunch of platform specific code generators, the greenish parts of the picture below.
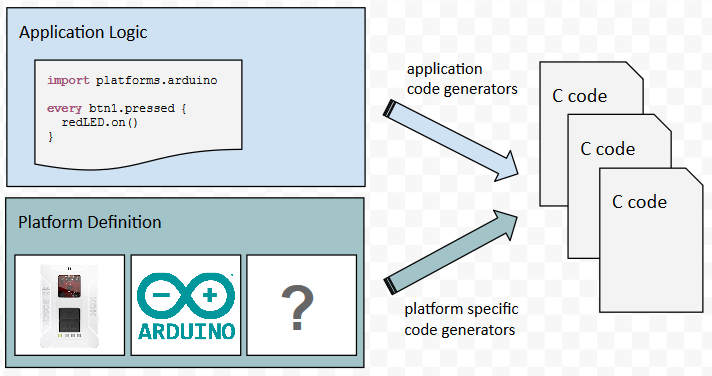
The platform definition specifies which sensors and connectivity channels are available. In general, it is divided into three parts:
- Sensor type definitions
- Connectivity type definitions
- Platform - collection of concrete sensors and connectivities
There are several options to specify the platform. This is a simple example to demonstrate how it could be done:
package platforms.arduino;

sensor Button {
    generator "com.yakindu.mita.platform.arduino.sensors.ButtonGenerator"
    modality is_pressed : bool
    event pressed
    event released
}

connectivity named-singleton LED {
    generator "com.yakindu.mita.platform.arduino.connectivity.LedGenerator"
    signal light_up(color : LedColor) : bool
}

enum LedColor {
    Red,
    Yellow,
    Orange
}

alias button_one for Button
alias button_two for Button

platform Arduino {
    has button_one
    has button_two
    has LED
}
Let’s go through it step by step. First, every platform needs to be specified within a package. This can be later imported in any user created Mita application.
package platforms.arduino;
After this we can specify the sensor and connectivity types. In this case it is the button as a sensor. A sensor type defines several so-called modalities as well as events. Modalities define the data or state of a sensor; here is_pressed represents the pressed status of our button. However, instead of polling this status in our application code, we want to be informed on a status change via events. For this, we define two different events, the pressed and the released event, which can later on be used within the user programmed application code to define corresponding reactions. Lastly, we need to specify a code generator that implements the hardware specific parts.
sensor Button {
    generator "com.yakindu.mita.platform.arduino.sensors.ButtonGenerator"
    modality is_pressed : bool
    event pressed
    event released
}
To use LEDs, we define a connectivity called LED. It contains a signal with which the LED can be controlled. Supported colors are declared as an enumeration here.
connectivity named-singleton LED {
    generator "com.yakindu.mita.platform.arduino.connectivity.LedGenerator"
    signal light_up(color : LedColor) : bool
}

enum LedColor {
    Red,
    Yellow,
    Orange
}
As our platform contains two different buttons, we need to instantiate them like this:
alias button_one for Button
alias button_two for Button
With this definition there are two buttons. Both of them can be used and have their own modalities and events (just like classes and objects, basically).
Last but not least, the platform itself must be declared. The platform defines which components are used, via the keyword has.
platform Arduino {
    has button_one
    has button_two
    has LED
}
With this specification the Arduino platform contains of two buttons, defined as a sensor and the LED defined as a connectivity. The buttons got two events, pressed and released and a modality is_pressed. They can be used within the application code. The LED can be controlled by changing the light_up signal.
Use Arduino platform definition in your own application
Once you have defined the platform, you can use it in your application code by importing the corresponding package. All components which are specified in the imported platform package can be used in your application code. This is demonstrated in the picture below:
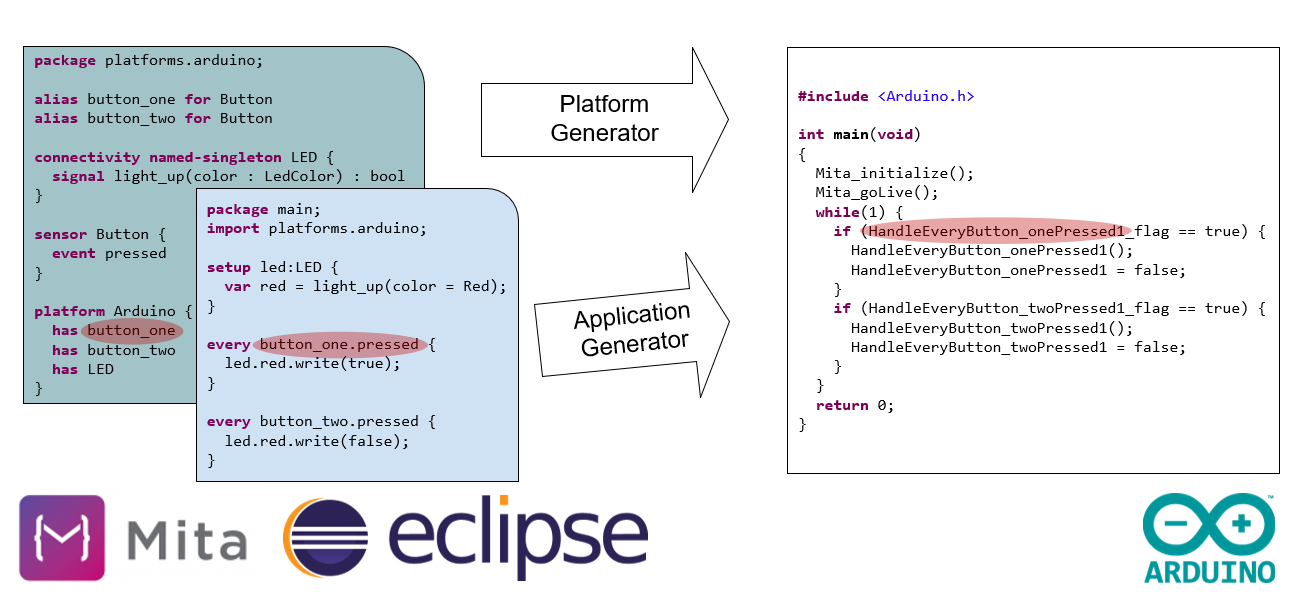
The button button_one that we have specified in the platform can be referred to in the application code, especially to its modalities and events, like the event pressed here.
After finishing your application, C code generators are used to generate C code, ready to be compiled and then written into Arduino’s flash memory. The code generators are split into two parts. The application generators are already predefined and don’t need to be adjusted anymore. The platform generators are implemented based on the used target platform, here Arduino. This is actually the heavy lifting part when contributing an own platform. However, since Eclipse Mita is open source you can have a look in already implemented platform code generators and start from there.
The following example demonstrates what a simple application could look like, for controlling a red LED with two buttons:
package main;
import platforms.arduino;

setup led : LED {
    var red = light_up(color = Red);
}

every button_one.pressed {
    led.red.write(true);
}

every button_two.pressed {
    led.red.write(false);
}
This simple example might not be technically sophisticated, but as the supported components expand, the complexity of the application grows. By adding connectivities and sensors like bluetooth, wifi, accelerometers, gyroscopes, writing custom C code becomes time and cost expensive. With generalized and common C code generators a reliable development can be achieved and your development process is extremely accelerated.
Do you think a certain platform should be supported by Eclipse Mita? Feel free to leave a comment or send a mail and let us know!

Comments