 Information: YAKINDU Statechart Tools Is Now itemis CREATE
Following our prior examples describing the usage of YAKINDU Statechart Tools on embedded platforms, this blog article aims to walk you through the process of using Statechart Tools to bring your Raspberry Pi to life.
Because the Raspberry Pi differs from smaller platforms and actually runs Linux itself, there are multiple ways to make this work. It should actually be possible to just plug your Pi into a monitor and execute YAKINDU Statechart Tools (SCT) on it. Because its processing power and especially the Java support is a bit lacking at times and I don’t want to connect a keyboard, a mouse and a screen to it, I will show you a remote way to do it.
What you’ll need:
- A Raspberry Pi equipped with…
- Network access
- SSH configured
- A RGB LED
- A host pc:
- I am working on Linux, using cross compilers and ssh is a lot easier there
- An installation of YAKINDU Statechart Tools
- Knowledge:
- Basic Linux
- Basic C
- You have worked with statechart tools before (see our tutorial and download YAKINDU Statechart Tools if you haven't yet)
- You have used ssh before
- All in all, I would say this tutorial is intermediate level
What we will do:
- Install a cross compiler for the Pi on Linux
- Install the TCF plugin into Statechart Tools and on the Pi
- Set up cross compiling in Statechart Tools
- Create a small statechart
- Use the GPIOs…
- ...and make a RGB LED switch colors!
Installing the cross compiler
Cross compiling means to compile code on a host with an architecture that differs from the target architecture. In our case, the host will be a regular PC with x86_64 architecture, whereas the Raspberry Pi’s heart is an ARM processor. The different generations of the Raspberry use different processors, but luckily that’s not important for us.
For the record: I’m running Ubuntu 16.10. For other distributions, the name of the package manager and the names of packages can vary slightly, but normally that’s easy to figure out.
We need to install two packages on the host PC, the first one should be installed already:
sudo apt-get install build-essential g++-arm-linux-gnueabihf
That’s all you need for cross compiling.
Install TCF
TCF seems to be an abbreviation for pretty much everything according to Wikipedia, but I am talking about Eclipse TCF, the Target Communication Framework:
It provides a very simple solution to automatically discover targets on the network, communicate with them, deploy binaries to them, inspect their file system, and much more. Also you can debug your applications out of the box.
To do all that, you’ll need to login on the Pi once, so now is the only time you will use ssh in this blog article.
If you cannot ssh into your Pi, just grab another screen and a keyboard.
For me, the IP of the Pi is 192.168.3.85, and nobody cared to change the standard user’s (pi) password (raspberry), so:

Great, it works!
If you haven’t already, you can install git now while you’re at it:
sudo apt-get install git
We’ll need it to clone the sources of the TCF agent that runs on the Pi and communicates with Eclipse on our host. If you want to know you can find a short article about installing TCF on the Pi on wiki.eclipse.org.
Just follow the sections “Building the TCF Agent” and “Installing the Agent for auto-start”, the latter for convenience.
You can now type exit into the ssh terminal and say bye bye.
Now launch YAKINDU Statechart Tools on your host PC.
Go to Help -> Install new Software, click on [Add…], and paste TCF’s update site into the field location.
You can find it on http://www.eclipse.org/tcf/downloads.php.
At the time of writing, the correct update site would be:
http://download.eclipse.org/tools/tcf/builds/neon/nightly
It should look like this:

Just select [OK]. After a short time of saying Pending… the install wizard should allow you to install the Target Communication Framework and the Target Explorer.
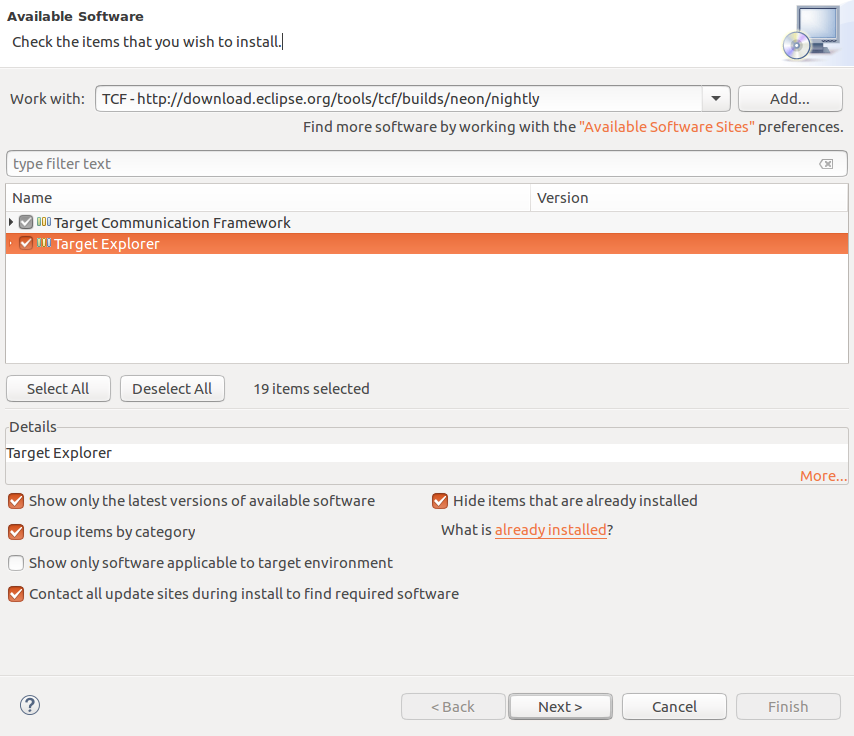
The installation will tell you that it has some issues because dependencies cannot be fulfilled and it will calculate a modified installation, which we’ll accept. Click on [Next > ] and just accept everything the wizard tells you to do.
The actual installation is a good time to grab another coffee. When it is done, you will need to accept a certificate and then restart Statechart Tools, that’s it.
Explore TCF
After Statechart Tools restarted, you can now go to Window -> Perspective -> Open Perspective -> Other… . Select Target Explorer.
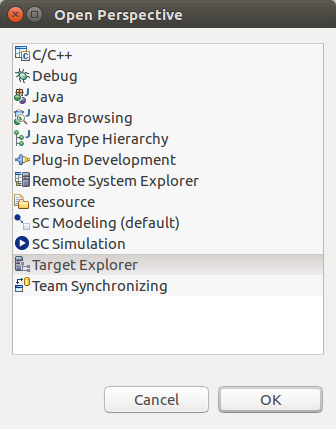
Click [OK].
Now you have got a new tab next to Project Explorer named “System Management”. In there, you will find “Neighborhood”, which lists all running TCF agents on your network.
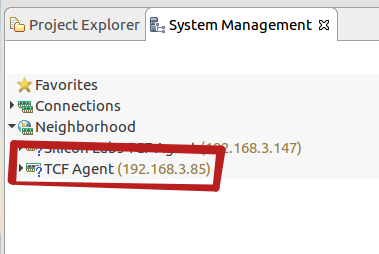
There is our little Pi! Right-click, select Connect, and confirm everything as-is. It should now show up under Connections.
The project
As usual, you can directly check out the project from Yakindu’s example repository using the built-in example wizard. Go to New -> Example -> Yakindu Statechart Examples to use it. The name is “Raspberry Pi Hello World”.
Another possibility is to visit our examples page. You can explore examples and even use a drag-and-drop button to directly drop examples into your running Statechart Tool.
There are four things I want to talk about:
Build configurations
Normally, when you set up a C project with Eclipse, two build configurations will be generated: Debug and Release. This mechanism of build configurations gives you a possibility to build the code with varying compilers, library settings, symbols – whatever you need. Here, I added a build configuration named “RPi_Cross”, which has the cross compiler set up that we installed in the first step. If you do not use Ubuntu, you might need to change something here, especially if you are working on a Windows machine.
Right click the project, select “Properties” all the way down in the context menu, and navigate to C/C++ Build -> Settings. You can select the configuration in the top and edit the values below.
GPIO helper functions
Because we want to use the GPIOs to change a RGB LED colors, we need a way to manipulate them.
On the Raspberry, one way is to use the interface provided by the OS itself - just writing to special places in the filesystem. To use a GPIO pin, it needs to be:
- Exported (writing the pin number to /sys/class/gpio/export does that)
- Set to the correct direction (Writing “out” or “in” to /sys/class/gpio/gpio[n]/direction)
- Written: (Writing “1” or “0“ to /sys/class/gpio/gpio[n]/value)
- Unexported after the program is done (writing the pin number to /sys/class/gpio/unexport)
The project comes with four functions that do exactly these tasks.
Threaded operation
Because the program works with user input directly read from the console, which is a blocking operation, the statechart is executed in another thread.We use the same thread runner here as in other examples (link auf example seite) which makes use of the standard pthread library. A pthread mutex makes sure the statechart is not accessed by more than one thread at once.
The hardware setup
I use a Raspberry Pi 3 Model B V1.2 here, but it should work with every version available. Furthermore, I found a Keyes RGB LED module and a ribbon cable suited for the Pi in our hardware box.
The RGB LED is actually made for 5V signals, but it still works on the 3.3V of the Raspberry Pi – it’s just a lot dimmer than usual. It has four pins: R, G, B, and ground. I connected these to red, green, blue and black ribbons, and on the Pi they are connected with GPIO 16, 20 and 21. You could use any other GPIO but these three have a ground pin directly next to them.
The statechart
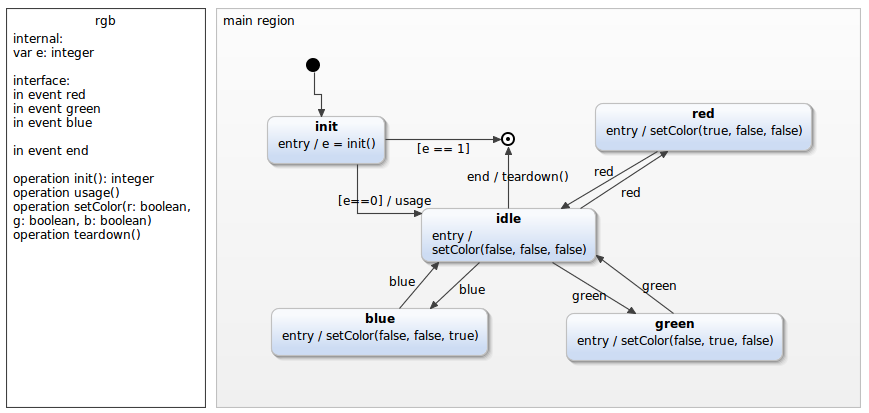
The statechart contains five states – init, idle, and red / green / blue. For each color, there is an incoming event which switches between idle and the respective color, so you cannot change from red to blue directly – a small example for changing the currently possible behavior depending on the current state. If you would write this logic directly in C, you might end up with a bunch of if-statements.
Compile it, test it, run it, love it
Running the software on your Pi is surprisingly simple with TCF. At first, make sure the code runs locally. Right click the project and navigate to Build Configurations and activate the Debug setting. Build the project, and then again right click and select Run as… and choose Local C/C++ Application. That should give you the following output:
Failed to open /sys/class/gpio/export for writing, aborting
Failed to open /sys/class/gpio/export for writing, aborting
Failed to open /sys/class/gpio/export for writing, aborting
Failed to open gpio direction for writing!
Failed to open gpio direction for writing!
Failed to open gpio direction for writing!
Surprise, these files do not exist in a regular Linux environment.
Now, change to the RPi_Cross build configuration, build the project, and run it as a “Remote Application”. Confirm the window that pops up (Your TCF agent should be listed and checked there) and the Eclipse console should show the following:

You should now be able to type in one of the given letters (confirm with enter) and the LED should light up in the respective color. Nice!
With this procedure, you can quickly develop your software for the Raspberry Pi, check if it works correctly, and so on. Statechart Tools combined with TCF is the perfect way to keep your iteration times as short as possible.
Summary
So, what did you do today?
- You installed a cross compiler in the blink of an eye
- You set up TCF to talk with the Raspberry Pi
- You learned how to use the GPIOs on the Raspberry Pi with C
...and all of this completely with open source software!
Now you want to program your own Raspberry Pi? Then download YAKINDU Statechart Tools!

Comments