Did you ever program an Arduino? Have you ever been worried about complex control flows written in pure C? Maybe you have already heard of statecharts and state machines? In this blog post, I will show you how to program an Arduino in just 5 minutes in a model-driven way with the help of YAKINDU Statechart Tools (SCT).
There have been several attempts to program an Arduino with YAKINDU SCT as described by Marco Scholtyssek or René Beckmann. However, when I tried to teach how to program an Arduino with YAKINDU SCT within the Automotive Software Engineering Summer School 2016 at the University of Applied Sciences and Arts in Dortmund I found out that it’s hard to understand and implement without appropriate tooling. So I sat down and implemented Arduino support for YAKINDU SCT to generate lots of the glue code that is needed to run state machines on the Arduino.
YAKINDU Statechart Tools for Arduino is based on Eclipse, YAKINDU Statechart Tools, and the Eclipse C/C++ Development Tooling (CDT). It sets up an initial project containing an empty statechart that you just need to fill with your own ideas. The only part that you still need to program on your own is the connection between the statechart and the hardware, i.e. initializing the hardware and updating the state of the hardware depending on the state of the statechart and vice-versa.
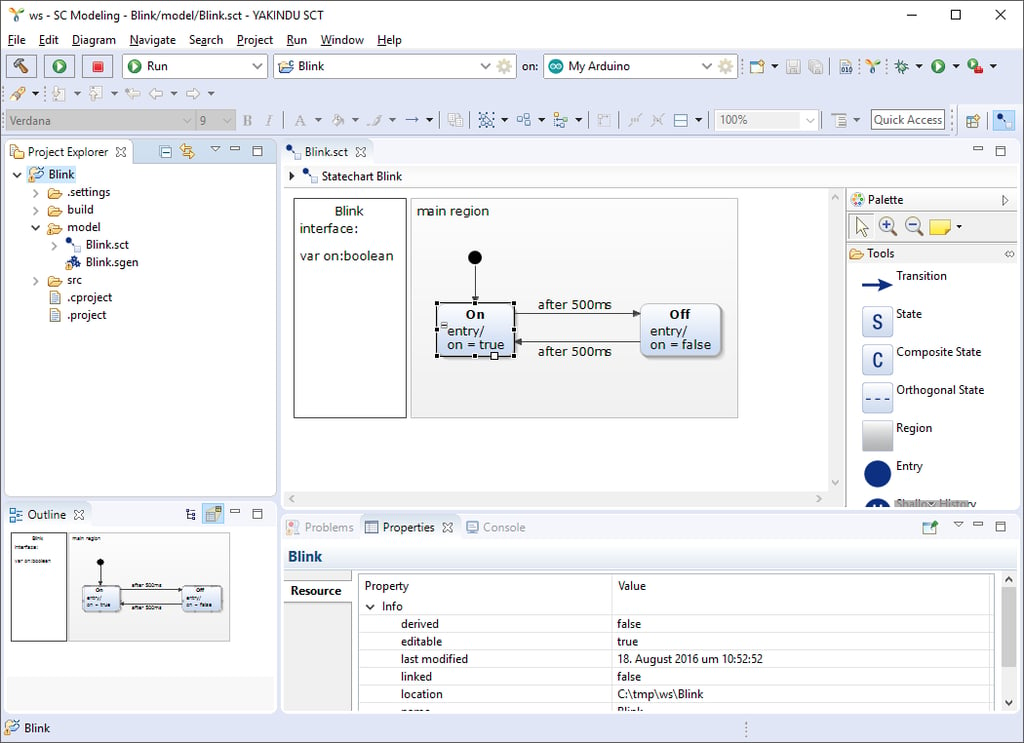
Now, let's have a look at the tooling. In the screenshot depicted below you'll find the well known Arduino "Hello World" example - a blinking LED - programmed as a statechart. I created an Arduino SCT project with the help of a wizard. It opened an empty statechart with an empty interface declaration. I will use this statechart to model a blinking LED and generate the state machine running on an Arduino Uno board.

The LED has two states, on and off. Therefore, I declare a boolean variable on representing on and off with its values true and false in the interface. Within the statechart, I create the two states On and Off. Once deployed to the Arduino, the program's execution starts by entering the statechart through the black dot - the Entry state - depicted in the statechart. After entering the statechart, it immediately changes its state through the first transition - it's the arrow from the Entry state to the On state. When entering the On state, the boolean variable on is set to true. After 500 milliseconds, the state changes to Off and the variable on is set to false. Again, after another 500 milliseconds, it switches back to On. This goes on and on and on .... until you pull the plug.
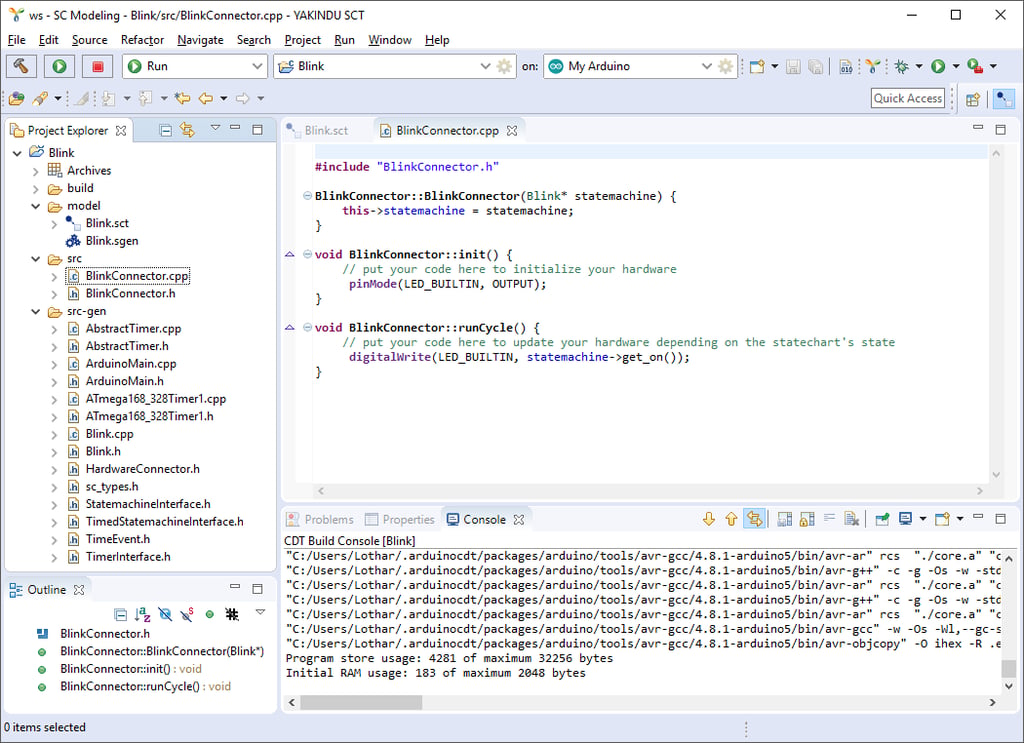
Once I finish the modelling I might want to simulate my model with YAKINDU SCT to find out if it works as expected. You will find more details about modelling and simulation in the YAKINDU SCT documentation. Based on this statechart, I generate a state machine in C++ code that executes the statechart on my Arduino. All that I still need to do is connecting the statechart with the hardware. I do this by editing the init() and runCycle() methods of the BlinkConnector class:
- In the
init()method I set up the LED built into the Arduino Uno board. This method is called once when starting the program's execution - analog to thesetup()function in a common Arduino sketch. - The
runCycle()method is the analogon for theloop()function of an Arduino sketch. It is called regularly, once in every cycle of the statechart's execution. Here, I set the LED's pin accordingly to the statechart's boolean variableon.
Now, I compile the code and upload it to my Arduino board. There it is, a blinking LED in five minutes!

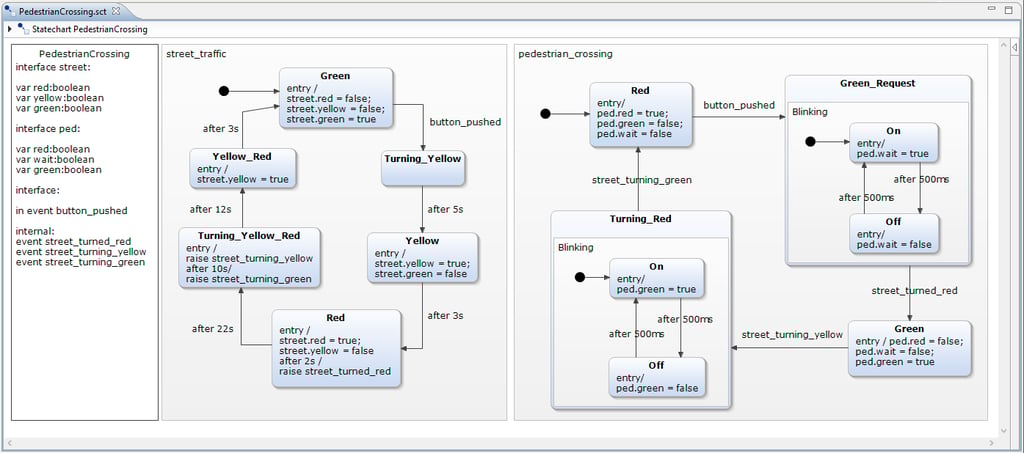
Ok, you’re right, this example may be implemented in plain C and uploaded to the Arduino in less than five minutes. It’s that simple. But could you imagine the effort of developing a state machine in plain C with the complexity of a pedestrian crossing light shown in the picture below? And even this example is still a simple one. By the way, you will find this example as well as the Blink example in the YAKINDU SCT for Arduino environment.

On my GitHub pages you will find a complete walkthrough starting from installation, through setup, modelling, simulation, code generation, and code deployment. It is also integrated into the online help of YAKINDU Statechart Tools for Arduino.
Currently, YAKINDU SCT for Arduino only supports the ATmega 168/328 microprocessors used for example on the widely adopted and well known Arduino Uno boards. Additionally, it uses Timer 1 of the microprocessor by default. If some library that you need is also depending on Timer 1, you’re in trouble. There are still various other limitations as well. So, in the near future I plan to extend the YAKINDU SCT for Arduino tooling to support more timer implementations and other microprocessors.
Stay tuned!


Comments