

 Information: YAKINDU Statechart Tools Is Now itemis CREATE
Maybe you read about the TypeScript code generator here before? Well, let’s talk about a real scripting language that you might have missed in our YAKINDU Statechart Tools code generation options: Python. The Python code generator is implemented and available as a beta version in YAKINDU Labs – and of course it needs review from some enthusiastic Python coders. So you’re invited to give it a try!
In this blog post we'll cover basic aspects of the Python code generator by example. All you need is an installation of YAKINDU Statechart Tools, including the Python code generator plugin (see section “Downloading and installing” near the end of this article), a Python installation (we recommend the latest 3.x version), about 10 minutes of your time, and at least one cup of coffee.
If you like to run the generated Python code inside YAKINDU Statechart Tools install the PyDev plugin.
Oh, you might ask if you need any third-party Python packages? No, everything is implemented using standard library packages. So, get your coffee and let’s dive in.
Creating the statechart
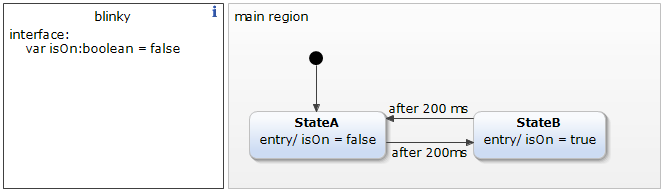
For our little walkthrough, we use a simple statechart, let’s call it blinky.sct. First, create a new empty Eclipse project named blinky and add a folder named model. Create the blinky.sct in this folder.
Generating Python code
Now let’s create the SGen model and set some features:
- In the main menu, select File → New → Other…. The New wizard opens.
- In the New wizard, select YAKINDU SCT → Code Generator Model, and click on Next.
- Select the model folder in your blinky project, enter a filename for the generator model, say blinky.sgen, and click Next.
- Select YAKINDU SCT Python Generator from the drop-down menu, select blinky.sct, then click Finish. If a prompt pops up, asking you to convert your project to an Xtext project, click Yes.
Now you can start modifying the SGen model.
GeneratorModel for yakindu::python {

	statechart blinky {

		feature Outlet {
			targetProject = "blinky"
			targetFolder = "src-gen"
		}
	}
}
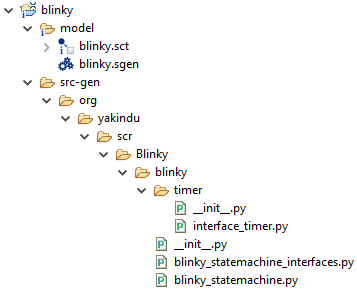
Clean your project by deleting the src-gen folder. Right-click on the .sgen file and select Generate Code Artifacts. Now the src-gen folder will be created in your project and should look similar to the picture below.
Ok, let’s add two new features to our SGen model now:
GeneratorModel for yakindu::python {

	statechart blinky {

		feature Outlet {
			targetProject = "blinky"
			targetFolder = "src-gen"
		}

		feature Naming {
			basePackage = "my.package"
		}

		feature GeneralFeatures {
			DefaultTimer = true
			RuntimeTemplate = true
		}
	}
}
After saving the .sgen file, your src-gen directory should be updated automatically. Let’s have a deeper look into the Blinky folder:
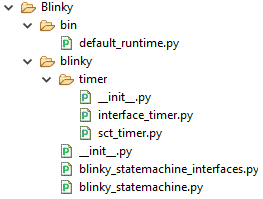
The blinky folder includes all generated files of interest: a module representing the statechart, a module representing the statechart’s interfaces, and a folder for the default timer. The bin folder is for your own modules that are using the generated state machine module. Maybe this structure doesn't seem familiar and not really fancy to you? Well, keep on reading.
The default_runtime.py file is a template that shows how to use the generated state machine module and it therefore waits for some customization from your side. Let's rename this file to my_runtime.py. Then delete the RuntimeTemplate option from the GeneralFeatures in your SGen model if you like. Remember: This is just a sample file for some kind of testing your generated code – or better: showing others how to use your code.
Since timed statecharts need some kind of timer in the generated code and the Python standard library doesn't include any proper timer module, we generated a default timer that can handle the requirements of the statechart model. Nonetheless, feel free to write your own timer – we hope you like to share it with us!
Now, let us inspect the blinky_statemachine and blinky_statemachine_interfaces modules. Like in the statechart model, the interface section is separated from the actual state machine in our generated Python code, too. Okay, not strictly, but this exception takes effect on the internal interface only. So, let’s not care about this for now and instead take a deeper look into the interaction of the state machine, interfaces, and runtime code.
Sharing is caring
Maybe you were surprised by the file structure before? The answer is (drum-roll) … packaging. Yeah, right! The code generator supports Python packaging (kind of). Let’s add a few new lines in our SGen model:
feature PyPackaging {
           		CreateFiles = true
           		Author = "Marty McFly"
           		Version = "0.1dev"
           		ShortDescription = "Something blinks."
           		License = "Your License text here."
		}
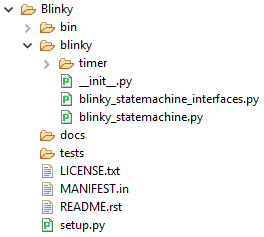
Save the SGen model, add a docs and tests folder, and your Blinky folder should look like shown below:
Now, adapt the files to your needs and start sharing your project! If you don't know anything about Python packaging, take a look at “The Hitchhiker’s Guide to Python” and at readthedocs.io. This should cost you another 10 minutes and a buck of coffee, but it’s worth it ☺
PS: You might wonder about the License option in the feature section of PyPackaging, because there is already another feature available, called LicenseHeader. The latter includes your license text in every generated Python file, the former just in the LICENSE.txt file. If you like to share your project via Python packaging, please use the LICENSE.txt only. If you're not sure which license to choose, omit the License option from the feature and see what happens.
Conclusion
Developing applications in Python is fast and fun. Adding the model-driven aspect could simplify the development process. Imagine all the fun you could have by experimenting with e.g. a RaspberryPi or a gadget of the pycom family!
I hope you like this short introduction and give the Python code generator a try. Don't forget to leave some feedback! 😉
Downloading and installing
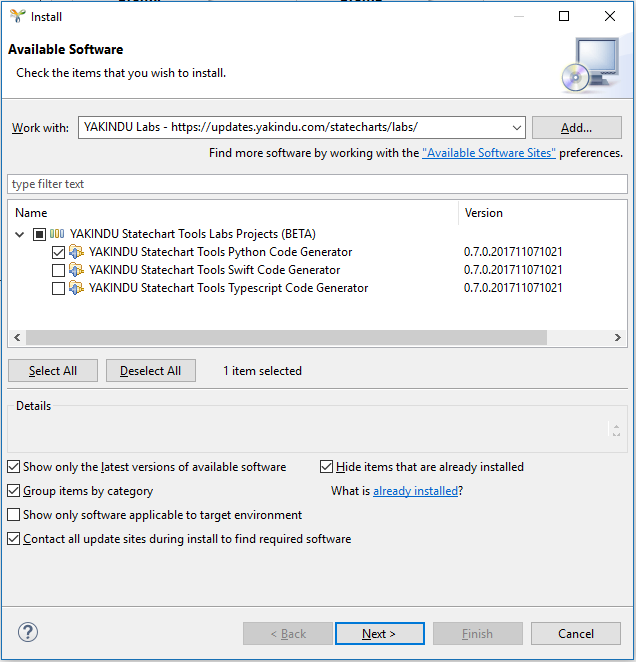
The demonstrated example is available in full in the example wizard of YAKINDU Statechart Tools. Remember the Python code generator is just a beta version? So you have to install it manually. To do so, please go to Help → Install New Software … and select YAKINDU Python Generator from our update site, as shown in the screenshot below.
Once you have installed the generator, you can import the project TrafficLight (Python) from our example wizard, which you can invoke using File → New → Example… from the main menu and then selecting YAKINDU SCT → YAKINDU Statechart Examples. Have a look at the src folder and run the main module (right-click, Run As → Python Run). You can also look for the TrafficLight (Python) Raspberry example, if you like to run it on a Raspberry Pi.
What’s next?
Did you miss something? We do! For example, when looking at our project folder, we miss the test section. With the release of the SCTUnit testing framework in the current YAKINDU Statechart Tool release, we’ll integrate the SCTUnit feature also as a Python code generator soon, making unit tests of your code much easier. Stay tuned for more information on SCTUnit for Python and much more!
Comments