
 Information: YAKINDU Statechart Tools Is Now itemis CREATE
YAKINDU Statechart Tools (now itemis CREATE) provide a versatile way for modeling and testing finite-state automata. However, what if you want to combine your state machine with some “outside” functionality? Something you want to make available to your statechart and use it from there? Or, what if you want to integrate your statechart as a component into another application?
In this two-article series, I am going to explain both these aspects. My programming language of choice is Java. However, using YAKINDU Statechart Tools (now itemis CREATE), you can do the same with C and C++.
The “dice throwing” scenario
The sample scenario that I am going to develop is throwing a dice. If a dice is rolled very often, all face values in the range of one to six should occur roughly with the same frequency. If you want to model that with a statechart, you’ll encounter the problem that the statechart language has no functionality for generating random values. Thus, the question arises where to get randomness from and how to make it available to the state machine.
Generating random values represents the general case of some business logic that is external to the statechart.
In principle, there are two different approaches to integrate a statechart with business logic:
- The business logic is available to the state machine, and the state machine actively calls it and uses its results.
- An application calls the business logic, hands the result over to the state machine, and observes what the state machine does.
We will model and implement both scenarios. Actually, they are quite similar. The external “business logic” is a Java method that upon each call generates a random number between one and six – something that is not possible in the statechart language.
In a first approach, we will call that Java method from within the statechart. In a second approach, we will write a little Java program that retrieves a random number and passes it to the statechart.
I am now going to develop the first scenario step by step.
Figure 1 shows a first version of the statechart. Its name is Dice_rolling, and it is located in a file called dice.sct. The statechart has a starting state Rolling_the_dice where we throw the dice. Depending on the result, we’ll transition to one of six successor states. Simple, isn’t it?
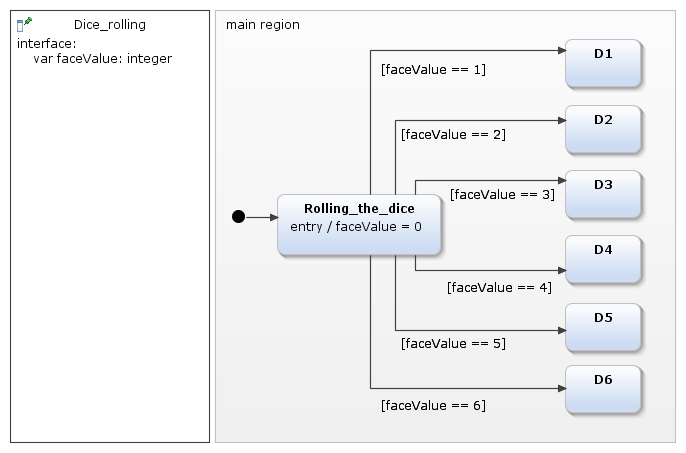
Figure 1. Initial statechart modeling dice throwing
The problem here is, of course, that the Rolling_the_dice state sets the faceValue to zero, not to any random value. This will cause the execution to get stuck, because there’s no transition leading away from that state as long as faceValue does not equal 1, 2, 3, 4, 5, or 6. In the YAKINDU Statechart Tools (now itemis CREATE) simulator, we can overcome this problem by manually modifying faceValue. If we set the variable to, say, 5, the guard condition [faceValue == 5] becomes true, and the state machine transitions to the D5 state.

Figure 2. Simulation result after manually setting the faceValue variable to 5
Manually setting variables is of course anything but a solution, even less for retrieving random numbers. Thus, our most urgent need is to implement the randomness functionality. In the Java programming language, this can be achieved easily. I will show the source code below, but before I can do so, we’ll first have to set up an appropriate development environment and "java-ify" our project.
Developing statecharts in a Java project
You can use YAKINDU Statechart Tools (now itemis CREATE) not only for developing statecharts, but also for developing Java applications as well as for developing both in combination. A requirement is, however, that you have to manage everything in a Java project. If you create your statecharts and your Java code in a Java project, they can play in concert.
To create a Java project, select File → New → Project … in the main menu, then select Java → Java Project. The Java project wizard prompts you to specify subdirectories for your Java sources and for the compiled binaries. By default, the folder names are src and bin.
Turning a plain project into a Java project
What if you already have an existing statechart in a plain, non-Java project? Can you turn it into a Java project?
Yes, you can, but it is a little tricky. You have the following options:
- The easiest way is of course to create a Java project in the first place and then start developing your statecharts within that project.
- You can create a new Java project, create a dummy statechart within it and then copy your existing statechart into the new project. After that, remove the dummy statechart.
- You can modify the .project file of your existing project by hand and add to it what is needed to turn your project into a Java project. You will also have to add some other files and directories, which are part of a Java project.
Let me elaborate on the latter approach. Immediately after creating a plain project, its .project file looks like this:
<?xml version="1.0" encoding="UTF-8"?>
<projectDescription>
    <name>my_plain_project</name>
    <comment></comment>
    <projects>
    </projects>
    <buildSpec>
    </buildSpec>
    <natures>
    </natures>
</projectDescription
Creating a statechart within that project changes the .project file as follows:
<projectDescription>
    <name>my_plain_project</name>
    <comment></comment>
    <projects>
    </projects>
    <buildSpec>
        <buildCommand>
            <name>org.eclipse.xtext.ui.shared.xtextBuilder</name>
            <arguments>
            </arguments>
        </buildCommand>
    </buildSpec>
    <natures>
        <nature>org.eclipse.xtext.ui.shared.xtextNature</nature>
    </natures>
</projectDescription>
YAKINDU Statechart Tools (now itemis CREATE) have added the Xtext builder and the Xtext nature to the project, which is reflected in the .project file. By the way, you don’t need to know what “builders” or “natures” are, just take them as a given.
Similarly, a Java project also has its specific builder and nature. Here’s the .project file of a newly-created Java project:
<<?xml version="1.0" encoding="UTF-8"?>
<projectDescription>
    <name>my_java_project</name>
    <comment></comment>
    <projects>
    </projects>
    <buildSpec>
        <buildCommand>
            <name>org.eclipse.jdt.core.javabuilder</name>
            <arguments>
            </arguments>
        </buildCommand>
    </buildSpec>
    <natures>
        <nature>org.eclipse.jdt.core.javanature</nature>
    </natures>
</projectDescription>
Let’s look at how this .project file changes if you create a statechart in the Java project it belongs to. You guessed it: YAKINDU Statechart Tools (now itemis CREATE) amend the Xtext builder and nature to what is already there. That is, the .project file now has builders and natures for both Java and Xtext:
<projectDescription>
    <name>my_java_project</name>
    <comment></comment>
    <projects>
    </projects>
    <buildSpec>
        <buildCommand>
            <name>org.eclipse.xtext.ui.shared.xtextBuilder</name>
            <arguments>
            </arguments>
        </buildCommand>
        <buildCommand>
            <name>org.eclipse.jdt.core.javabuilder</name>
            <arguments>
            </arguments>
        </buildCommand>
    </buildSpec>
    <natures>
        <nature>org.eclipse.jdt.core.javanature</nature>
        <nature>org.eclipse.xtext.ui.shared.xtextNature</nature>
    </natures>
</projectDescription>
Now you know you can modify your existing project’s .project file: Copy the buildCommand block and the nature block for the Java stuff to the corresponding places in your .project file. You can use any plain-text editor to modify the file. However, please terminate YAKINDU Statechart Tools (now itemis CREATE) before you do so, in order to avoid any editing conflicts on the file!
You are not quite done, though. You will also have to add certain files and directories. The easiest way to put them in place is to copy them over from an existing Java project. Please create a new Java project, leave the defaults in the project wizard as they are, and copy the following files and directories to the corresponding locations in your statechart project:
- .classpath
- .settings/org.eclipse.jdt.core.prefs
- bin
- src
The directories bin and src are empty in a new Java project, but must be present.
Once everything is in place, you can restart YAKINDU Statechart Tools (now itemis CREATE). It should recognize your project as a Java project now. If it shows an error message, right-click on the project’s name in the project explorer view, and select Refresh in the context menu. After that, everything should be fine.
Creating random numbers in Java
Once we have set up a Java project, we can create a Java class containing the functionality we need. Right-click on the dice project in the project explorer and select New → Class in the context menu. In the New Java Class wizard, the source folder should be dice/src, which stands for the src folder in the dice project. Enter de.itemis.examples.dice as the package name (or whatever else you see fit) and Dice as the (class) name, then click on Finish. The Java file Dice.java is created and opened in an editor. Replace its default contents with the following source code:
package de.itemis.examples.dice;
import java.util.concurrent.ThreadLocalRandom;

public class Dice {

    public int dice() {
   	 final int MIN = 1;
   	 final int MAX = 6;
   	 return ThreadLocalRandom.current().nextInt(MIN, MAX + 1);
    }

}
The dice() method returns a random int value in the range of an ordinary dice each time it is called.
Connecting a Java method to a statechart
Now that we have implemented the Java method, let’s make it available to the statechart. This is achieved by declaring the Java method as an operation in the statechart’s definition section. The latter now looks as follows:
interface:
    var faceValue: integer
    operation dice(): integer
The operation’s signature must be exactly equivalent to the Java method’s signature, i.e., it must have the same name (here: dice), the same number and compatible types of parameters (here: none), and it must return a value of a compatible type (here: integer in the statechart, int in Java).
In the Rolling_the_dice state, we change the entry action from faceValue = 0 to faceValue = dice(). That is, the state’s entry action calls the dice operation each time the state is entered.
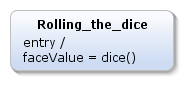
Figure 3. A state calling a (Java) operation
Do we want to see that in action? Of course we do! However, if we run the statechart as a usual simulation, the execution flow still gets stuck in the Rolling_the_dice state. The reason is that we haven’t told the simulator yet where to find the dice() method. And if it doesn’t know that, the simulator instead uses a stub method that always returns 0.
Please note: If you are reproducing the dice example on your computer, please execute the statechart using Run As → Statechart Simulation. Even if that simulation fails, YAKINDU Statechart Tools (now itemis CREATE) will create a so-called run configuration, which we are going to refine immediately.
Let’s change the run configuration and refer the simulator to the de.itemis.examples.dice.Dice class: Right-click on the dice.sct file in the project explorer view, and select Run As → Run Configurations … in the context menu. Enter the fully-qualified class name de.itemis.examples.dice.Dice into the operation class text field, then click on Run. Et voilá: The state machines passes the Rolling_the_dice state and ends up in one of the D… states. Re-run the statechart several times to observe that the D… state is indeed randomly chosen each time.
Rolling the dice over and over
The next step is to repeat throwing the dice in a loop. That means that after reaching one of the D… states, the execution flow should continue back to the Rolling_the_dice state, and everything is repeated over and over again.
I grouped the D… states into a composite state. This way, I only need a single transition from the Results state back to the Rolling_the_dice state – instead of six individual transitions. I also introduced counters for the possible face values. Each D… state now increments its corresponding counter, so that you can see how often each number came out as a result.

Figure 4. Repeatedly throwing the dice in a loop
When you start the simulation now, you can watch the D… states flicker briefly as the dice() operation returns their respective numbers. In the simulation view, you can also watch the count variables being incremented. You can (hopefully) also confirm that the counter values are indeed within the same order of magnitude.
You might wonder why execution is so slow. I mean, if your eyes can follow the state changes, execution isn’t fast. Well, that’s due to a default setting in YAKINDU Statechart Tools (now itemis CREATE)’ simulator: Unless you specify otherwise, the simulator executes the state machine in cycle-based mode and performs one run-to-completion step every 200 milliseconds only, i.e. only five per second.
If you want to speed things up, change the default of 200 ms by adding the @CycleBased annotation with a lower value, e.g., 50 ms, on a separate line at the top of the definition section: @CycleBased(50). You can even use @CycleBased(0), which will execute the state machine as fast as possible. Now you can no longer see the states changing. However the counter variables will update very fast now, subject to your hardware.
Now we have seen how we can call Java methods from a YAKINDU statechart, i.e., how to integrate Java functionality into a statechart. In the next part, I’ll explain how to do the integration the other way round, i.e., how to integrate a statechart into a Java program and make the latter use and control the statechart.
If you want to try YAKINDU Statechart Tools (now itemis CREATE) yourself in the meantime, get your free version here.
Information: YAKINDU Statechart Tools Is Now itemis CREATE
Comments