
 Information: YAKINDU Statechart Tools Is Now itemis CREATE
Swift is a programming languages made by Apple, mostly for their iOS and MacOS ecosystem, to replace Objective-C. However, using the official port, a stripped-down version of Swift can also be used under Linux, although it is lacking, for example, graphical libraries that are bound to Apple systems. Cross-compiling iOS or MacOS apps is therefore still not possible, due to missing ports of the required libraries. Working with Swift on Windows is only possible with an unofficial port and may or may not work properly.
In this example, we are going to have a look at using YAKINDU Statechart Tools (now itemis CREATE) and its Swift code generator.

![Yakindu_CREATE_300px]() Information: YAKINDU Statechart Tools Is Now itemis CREATE
Information: YAKINDU Statechart Tools Is Now itemis CREATE
![swift-example.gif]()
The application we are going to create, consists of one screen that iterates between three different buttons each second. Clicking on one of the buttons results in a change of direction.
Swift Code Generation with YAKINDU Statechart Tools (now itemis CREATE)
The underlying application model is based on a state machine model. It is generated as Swift code via a dedicated .sgen file for Swift.
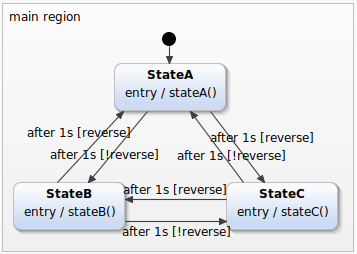
The state machine model represents each button as a state. From each state, transitions lead to each of the other states. Each transition has a condition, specifying the direction and a period of time after which the transition should be executed.
![swift-yakindu-statechart-tools.png]()
Operations in the default interface are used to notify the GUI of a change of state. The GUI should then change the highlighted button. Additionally, the variable reverse is defined to allow changing the direction via clicking on one of the buttons.
interface
var reverse: boolean = false
operation stateA()
operation stateB()
operation stateC()
Generating artifacts
In the next step, we are going to generate the Swift source code representing the state machine. To do that, we will create a .sgen file containing a generator model. The latter specifies the language (here: Swift), the state machine and the target project and folder. A right-click on that file in Eclipse’ project view allows us to “Generate Code Artifacts”, i.e. to generate the Swift source code.
GeneratorModel for yakindu::swift {

	statechart SwiftExample {

		feature Outlet {

			targetProject = "SwiftExample"

			targetFolder = "Sources"

			libraryTargetFolder = "Sources"

		}

	}

}
Implementing the GUI logic
The state machine is now generated and usable in Swift, allowing us to completely focus on implementing the GUI logic.
Dependencies
Using GUI with Swift and Linux requires a GTK port for Swift. In this example, we are going to use SwiftGTK, made by Tomas Linhart. Swift itself has a build-in package manager, therefore we only need to add the GitHub link pointing to the desired version to our Package.swift file. At the next build, Swift will download and compile it automatically.
// swift-tools-version:3.1import PackageDescription

let package = Package(
    name: "SwiftExample",
    dependencies: [
        .Package(url: "https://github.com/TomasLinhart/SwiftGTK", Version(0, 3, 1))
    ]
)
In addition to SwiftGTK, we will use Foundation and Dispatch. Both are standard libraries of Swift and can be used by simply importing them at the top of a Swift file.
import SwiftGtk
import Foundation
import Dispatch
Operation callback
The application code is very simple and consists of a class inheriting the state machine's operation callback. The constructor initializes the state machine and creates a timer to regularly call the runCycle method. The interface changes the opacity of the buttons using the operations defined previously.
class Window : SCInterfaceSwiftExampleOperationCallback {
    let statemachine = SwiftExampleStatemachine()
    let buttonStateA = Button(label: "StateA")
    let buttonStateB = Button(label: "StateB")
    let buttonStateC = Button(label: "StateC")
    let timer : DispatchSourceTimer = DispatchSource.makeTimerSource(queue: DispatchQueue.global())

    init(window: ApplicationWindow) {
        initUi(window: window)

        statemachine.getSCInterfaceSwiftExample().setSCInterfaceSwiftExampleOperationCallback(self)
        statemachine.setTimer(StatemachineTimerService())
        try! statemachine.initialize()
        try! statemachine.enter()

        timer.scheduleRepeating(deadline: .now() + .milliseconds(100), interval: .milliseconds(100), leeway: .milliseconds(0))
        timer.setEventHandler { timer in
            try! self.statemachine.runCycle()
        }
        timer.resume()
    }
    func initUi(window: ApplicationWindow) {}
    func buttonClicked(button: Button) {
        statemachine.getSCInterfaceSwiftExample().setReverse(
            !statemachine.getSCInterfaceSwiftExample().getReverse()
        )
    }
    func setOpacity(stateA: Double, stateB: Double, stateC: Double) {
        buttonStateA.opacity = stateA
        buttonStateB.opacity = stateB
        buttonStateC.opacity = stateC
    }
    func stateA() {
        setOpacity(stateA: 0.5, stateB: 1.0, stateC: 1.0)
    }
    func stateB() {
        setOpacity(stateA: 1.0, stateB: 0.5, stateC: 1.0)
    }
    func stateC() {
        setOpacity(stateA: 1.0, stateB: 1.0, stateC: 0.5)
    }
}
Setting up the GUI
The last thing to do is to create the GUI with its buttons. For this, we create a method called initUi. In this method, we define our window size and set ButtonBox as the layout to be used for the buttons. The buttonClicked method is used to change the reverse variable in the state machine, to alternate the button cycling direction.
   func initUi(window: ApplicationWindow) {
        window.title = "Swift Example"
        window.defaultSize = Size(width: 100, height: 66)
        window.resizable = true

        let column = ButtonBox(orientation: .vertical)
        let row = ButtonBox(orientation: .horizontal)
        column.add(buttonStateA)
        row.add(buttonStateB)
        row.add(Label())
        row.add(buttonStateC)
        column.add(row)
        window.add(column)

        buttonStateA.clicked = buttonClicked
        buttonStateB.clicked = buttonClicked
        buttonStateC.clicked = buttonClicked
    }
Running the SwiftGTK application now requires only to create an Application and a Window instance.
let app = Application(applicationId: "com.yakindu.swiftexample")
app.run { window in
   _ = Window(window: window)
}
Downloading and installing
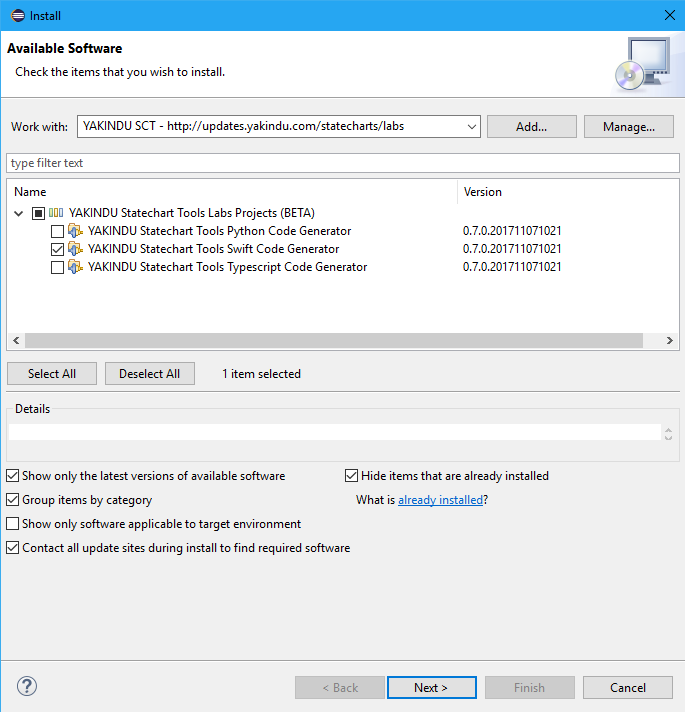
The demonstrated example is available in full in the example wizard of YAKINDU Statechart Tools (now itemis CREATE). Remember the Swift code generator is just a beta version? So you have to install it manually. To do so, please go to Help → Install New Software … and select YAKINDU Swift Generator from our update site, as shown in the screenshot below.
![update-site-yakindu.png]()
Once you have installed the generator, you can import the Swift Example project from our example wizard, which you can invoke using File → New → Example… → YAKINDU Statechart Examples.
Conclusion
In this post we created a Swift application on Linux, driven by a state machine. It shows how to extract application logic into a state machine to keep it separate. This not only removes complexity from the application but allows a reuse of the same model in a different language. Reusing a model is pretty nice in app development e.g. iOS and Android, where two apps use the same principle in different languages.
In this example, we are going to have a look at using YAKINDU Statechart Tools (now itemis CREATE) and its Swift code generator.
Information: YAKINDU Statechart Tools Is Now itemis CREATE
Swift Code Generation with YAKINDU Statechart Tools (now itemis CREATE)
var reverse: boolean = false
operation stateA()
operation stateB()
operation stateC()
let package = Package(
name: "SwiftExample",
dependencies: [
.Package(url: "https://github.com/TomasLinhart/SwiftGTK", Version(0, 3, 1))
]
)
import Foundation
import Dispatch
let statemachine = SwiftExampleStatemachine()
let buttonStateA = Button(label: "StateA")
let buttonStateB = Button(label: "StateB")
let buttonStateC = Button(label: "StateC")
let timer : DispatchSourceTimer = DispatchSource.makeTimerSource(queue: DispatchQueue.global())
init(window: ApplicationWindow) {
initUi(window: window)
statemachine.getSCInterfaceSwiftExample().setSCInterfaceSwiftExampleOperationCallback(self)
statemachine.setTimer(StatemachineTimerService())
try! statemachine.initialize()
try! statemachine.enter()
timer.scheduleRepeating(deadline: .now() + .milliseconds(100), interval: .milliseconds(100), leeway: .milliseconds(0))
timer.setEventHandler { timer in
try! self.statemachine.runCycle()
}
timer.resume()
}
func initUi(window: ApplicationWindow) {}
func buttonClicked(button: Button) {
statemachine.getSCInterfaceSwiftExample().setReverse(
!statemachine.getSCInterfaceSwiftExample().getReverse()
)
}
func setOpacity(stateA: Double, stateB: Double, stateC: Double) {
buttonStateA.opacity = stateA
buttonStateB.opacity = stateB
buttonStateC.opacity = stateC
}
func stateA() {
setOpacity(stateA: 0.5, stateB: 1.0, stateC: 1.0)
}
func stateB() {
setOpacity(stateA: 1.0, stateB: 0.5, stateC: 1.0)
}
func stateC() {
setOpacity(stateA: 1.0, stateB: 1.0, stateC: 0.5)
}
}
window.title = "Swift Example"
window.defaultSize = Size(width: 100, height: 66)
window.resizable = true
let column = ButtonBox(orientation: .vertical)
let row = ButtonBox(orientation: .horizontal)
column.add(buttonStateA)
row.add(buttonStateB)
row.add(Label())
row.add(buttonStateC)
column.add(row)
window.add(column)
buttonStateA.clicked = buttonClicked
buttonStateB.clicked = buttonClicked
buttonStateC.clicked = buttonClicked
}
Running the SwiftGTK application now requires only to create an Application and a Window instance.
app.run { window in
_ = Window(window: window)
}
Once you have installed the generator, you can import the Swift Example project from our example wizard, which you can invoke using File → New → Example… → YAKINDU Statechart Examples.
Comments