
 Information: YAKINDU Statechart Tools Is Now itemis CREATE
Using YAKINDU Statechart Tools (now itemis CREATE) is an effective way to describe reactive, event-driven systems. As part of my master thesis I took YAKINDU Statechart Tools (now itemis CREATE) and implemented a custom code generator for the new programming language Eclipse Mita. In this blog post I want to show you how it works and how you can use it in your development.![]()
Mita domain in YAKINDU Statechart Tools (now itemis CREATE)
In YAKINDU Statechart Tools (now itemis CREATE) (YSCT), each statechart has its own domain. Depending on the domain it is possible to use different features. Currently, there are two different domains: A default domain and a C domain (Professional Edition) for the deep C integration. In my thesis I’ve added a Mita domain, which allows you to import different platform packages and use the events, modalities and signals of each hardware component directly in the statechart model. But let’s start step by step.
Importing Mita packages
As a first step, you can import a platform package in order to specify the desired target platform and get access to all signals and connectivities. In this example, I chose the Arduino platform as described in my previous blog post. To sum up, my Arduino platform consists of multiple LEDs and two buttons.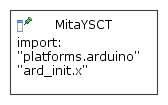
Additionally, it is possible to import further Mita application code. This is especially useful to extract the setup of your platform into own Mita files as well as defining utility functions that can be called from within the statechart:
package init;
import platforms.arduino;

setup led:LED {
    var red = light_up(color = Red);
    var yellow = light_up(color = Yellow);
    var orange = light_up(color = Orange);
}
With this implementation a new instance of the LED will be created. The signals are connected to the variables and can now be used to control the single LEDs.
Creating YAKINDU Statechart Tools (now itemis CREATE) models with Mita
Now it’s time to create a statechart by using the imported platform. Here, I will use the Arduino platform as mentioned before.
The connectivity LED defines a signal which can be accessed from within a state in order to turn the different LEDs on and off by writing a true or false value. This can be done as an action, for example an entry action. Also, it’s possible to read the actual value of an LED. The result is, as expected, a boolean flag indicating whether the LED is turned on or not. This can be used in a guard, for example.
The sensor Button defines a modality is_pressed, which returns the actual value of the button state. Additionally, each Button instance defines two events, pressed and released. And the great thing is: They are interpreted as native events in YAKINDU Statechart Tools (now itemis CREATE), so they can directly be used on transitions. This is because under the hood Eclipse Mita is based on YSCT’s expression language and hence shares the same meta-model.
The following simple example statechart puts everything together:
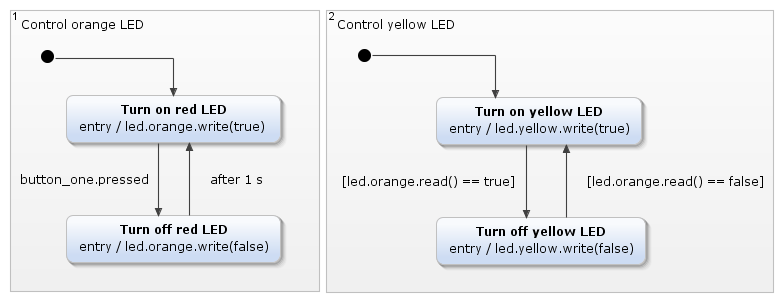
The statechart controls two LEDs – the orange and yellow one. The orange LED will be turned off by pressing the button one and will be turned on after one second. As you can see, timers are fully supported by YSCT combined with Mita, without any additional implementation. The event pressed is interpreted as an event in the model – no glue code or any APIs must be implemented. On the other side, in the second region, the yellow LED is controlled by the status of the red LED. Simplified, the yellow LED will always have the opposite status of the red LED. This is realized by reading the value of the red LED within a guard.
Of course, this is not a very comprehensive or technically sophisticated example, but the complexity that can be achieved is an open field. All modeling components, which are delivered with YAKINDU Statechart Tools (now itemis CREATE), can be used. For example: Orthogonal or composite states, history and deep history entries, multiple regions, choices and so on. And every hardware component, which is specified in the platform, can be used in the model, without spending time to implement any glue code or interfaces.
Generating Mita application code with YAKINDU Statechart Tools (now itemis CREATE) generators
At last, but not least, it’s time to generate Mita code. Therefore, I implemented a new code generator – a Mita code generator. It generates an application.mita file, which represents the execution logic of the statechart’s model. The statechart cycles are triggered every milliseconds, so that the statechart will be executed continuously. Events are stored and handled automatically. Timers are, as mentioned before, completely integrated, so there is no need to implement timer interfaces. The generator model (.sgen) looks like this:
GeneratorModel for yakindu::mita {

    statechart ArduinoYSCT {

   	 feature Outlet {
   		 targetProject = "ArduinYSCT"
   		 targetFolder = "src-gen"
   	 }
    }
}
The generated Mita application code will generate C code on the fly. No execution is needed and it can get compiled and flashed directly on your target platform! This is illustrated on the following GIF:
The statechart can be edited. The Mita and C code will be generated automatically after saving the statechart model. Afterwards the C code can be compiled an flashed. That’s it!
Information: YAKINDU Statechart Tools Is Now itemis CREATE
Comments