
The article describes the solution to possible stumbling blocks in overcoming a transition from Oracle JDK to OpenJDK 11 in PDE development with GEF and JavaFX.
Eclipse development with Java and JavaFX
"Legacy – with concrete feet into the future" I read in an announcement and wondered whether Java 8 will soon be on the way to the technological future with concrete shoes. But before this happens, we prefer to strip them off and migrate to an up-to-date Java version.
We will focus on an eclipse-based application with JavaFX components below. The conversion is to be made to the latest Java-LTE version, i.e. Java 11. The following survey shows that many developers are still cautious about migrating to higher versions of Java:
/Eclipse-Anwendungen%20mit%20e(fx)clipse,%20JavaFX,%20OpenJDK%20mit%20Java%2011%20erfolgreich%20aufsetzen/jaxenter.png)
JavaFX is no longer a JRE component from Java 11
The first hurdle is already apparent when switching to Java 11, because JavaFX is no longer part of the JDK, either at Oracle or in the open source distribution OpenJDK. There are several solutions to this problem. One would be to use a JDK distribution that delivers Java 11 with JavaFX, such as Bellsoft's Liberica JDK. However, this article focuses on using e(fx)clipse and the OpenJFX SDK.
We use JavaFX in our YAKINDU products and have successfully and successfully converted the development of the GEF framework to the following configuration:
- Eclipse IDE for Eclipse-Committers
- OpenJDK (Version 11.0.)
- OpenJFX SDK (Version 11.0.2)
- e(fx)clipse – IDE – PDE (Version 3.6.0)
In the following we on the one hand convert our development environment to OpenJDK 11 with OpenJFX and e(fx)clipse, and then turn to the transition for our development, including compiler and launch configurations.
Transforming the development environment
We download and install a new Eclipse IDE, ideally for Eclipse committers.
We upload OpenJDK 11to any directory.
We download OpenJFX SDKand store it in a directory.
We install e(fx)clipse at least in version 3.6.0 in our Eclipse environment (Update-Site: https://download.eclipse.org/efxclipse/updates-nightly/repository/).
We finish Eclipse and insert the following lines below the "-vmargs" line into the eclipse.ini file ("---add-modules=ALL-SYSTEM" does not need to be re-inserted if already available):
-Dosgi.framework.extensions=org.eclipse.fx.osgi
-Defxclipse.java-modules.dir=C:\Program
Files\Java\javafx-sdk-11.0.2\lib
--add-modules=ALL-SYSTEM
Note: We adjust the path to the OpenJFX libraries according to the operating system and the location in the file system. We don't use quotation marks, even if the path contains spaces. Otherwise, the setting would be tacitly ignored. Furthermore, the path must not be terminated with a slash or backslash. The changes to the eclipse.ini must be made after the installation of e(fx)clipse, otherwise Eclipse will not start again.
If OpenJDK 11 is the only JDK installed, nothing else needs to be changed. If OpenJDK 11 is not installed, but is only unpacked or other Java versions are installed on the computer, then the following lines should also be inserted in the eclipse.ini directly above the "-vmargs" line:
-vm
/path/to/jdk-11.0.5+10/Contents/Home/bin (adapt to your directory)
Now let's start Eclipse again. We then install the end-user tools of GEF DOT via the eclipse release update site (for example, http://download.eclipse.org/releases/2019-06).
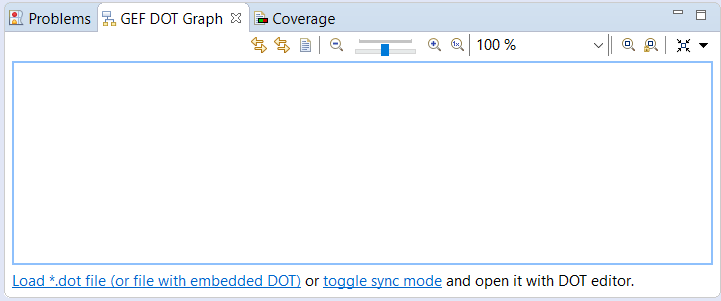
These use JavaFX (and SWT integration) so we can check if our installation worked. If successful, the "DOT Graph" view should look like this:
Possible source of error here are the settings in the eclipse.ini, which we should look again step by step.
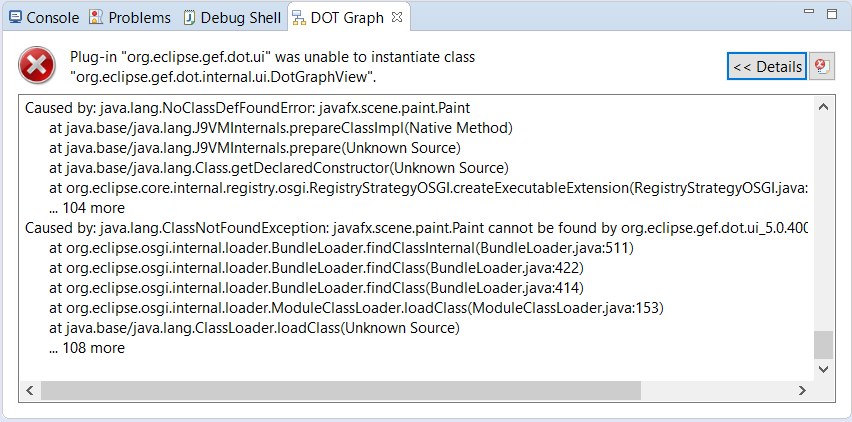
Possible source of error here are the settings in the eclipse.ini, which we should look again step by step.
If the IDE finally runs successfully with OpenJDK 11, OpenJFX 11 and e(fx)clipse, we now take care of the workspace and the runtime.
Transforming the development
In order to change the trend, the following must be done:
- Set OpenJDK as JRE to use
- Ensure that this JRE is used as an execution environment
- Set the openjfx-libs folder in the e(fx)clipse preferences
These changes should compile the workspace. The following section describes these steps in more detail.
We set OpenJDK as a runtime environment in the Eclipse preferences. To do this, we select „Window → Preferences → Java → Installed JREs → Add … and the path to the bin directory of the JDK.

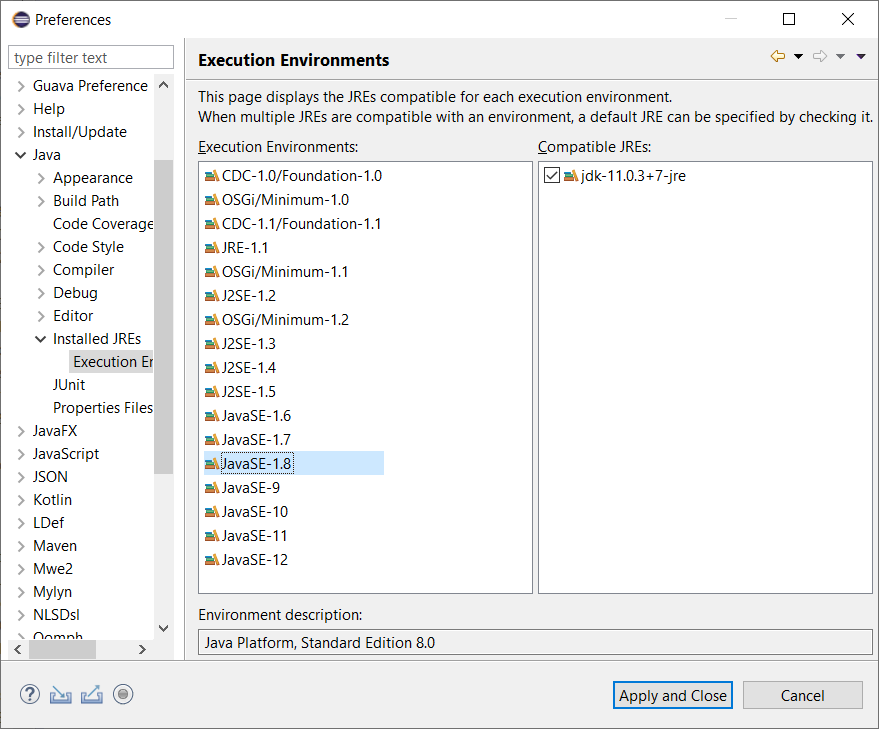
We make sure that this JDK is applied to the execution environment we set. If necessary, we may remove all other JDKs to ensure that the OpenJDK is actually used:
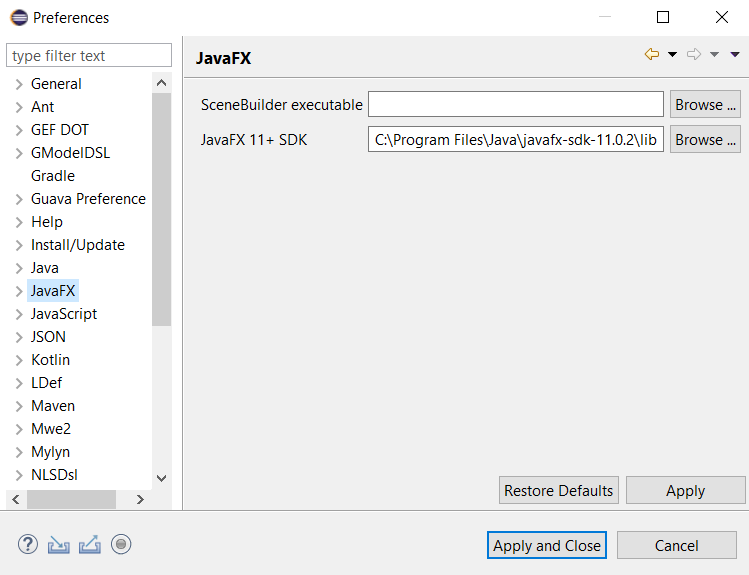
We set the OpenJFX SDK in the preferences for e(fx)clipse. Above, we saved the OpenJFX SDK to a directory. Its lib directory must be in the Eclipse Preferences (Window → Preferences → JavaFX) JavaFX 11 + SDK. This should be the same path as before in the eclipse.ini. This setting makes your Eclipse aware of the JavaFX libraries for development.
Now everything is done to compile the workspace. If we want to start the application in the runtime, there is still a small thing to do.
We'll add the following VM arguments in the launch configuration; they are the same ones that we have previously entered in the eclipse.ini :
-Dosgi.framework.extensions=org.eclipse.fx.osgi
-Defxclipse.java-modules.dir=C:\Program
Files\Java\javafx-sdk-11.0.2\lib

If necessary, you can load the sources (https://github.com/eclipse/gef.git) of the GEF framework into the workspace and try out the above points directly. For more information on GEF development, see the developer documentation page: https://github.com/eclipse/gef/wiki#developer-documentation.
Conclusion
The procedure above should be used to switch existing Eclipse applications to OpenJDK 11 and OpenJFX 11 with e(fx)clipse.
Are there any comments or questions about this approach?
We welcome any kind of feedback.
Comments