
Software development for embedded IoT systems is not an easy task. In most cases, you’ll have to write C or C++ code; both coming with a higher learning curve than modern programming languages like Go and Rust. And in most cases, you’ll have to write a fair amount of lines of code to make an LED blink, the Hello World application of embedded software development.
However, especially when you come from an application development point of view, the real difficulty lies in dealing with the hardware you are developing for. Browsing data sheets and manuals to understand how things are connected on your platform, and how communication works between your platform and peripheral devices can be very time consuming and frustrating. Also, you have to keep an eye on memory and energy consumption as both are usually highly restricted in embedded devices. This often results in hardware specifics being interweaved in your actual application logic. Porting the same application onto another hardware then often requires to rewrite large parts of your code.
![]()
Eclipse Mita is a new programming language for the IoT that aims to mitigate the aforementioned difficulties. It comes with a more concise syntax based on event-driven paradigms and clearly separates between application logic and platform capabilities. Eclipse Mita was initially developed by Bosch Connected Devices and Solutions with the help of itemis. It was first implemented for the XDK Workbench, the IDE for Bosch’s XDK device, where the language is currently called XDK Live. However, from the beginnings the goal was to create a language that is not bound to a specific hardware, but allows to integrate with multiple platforms. As the project is now open source and part of the vivid Eclipse ecosystem, more platforms, like Arduino or Raspberry Pi, are expected to be supported in the near future.
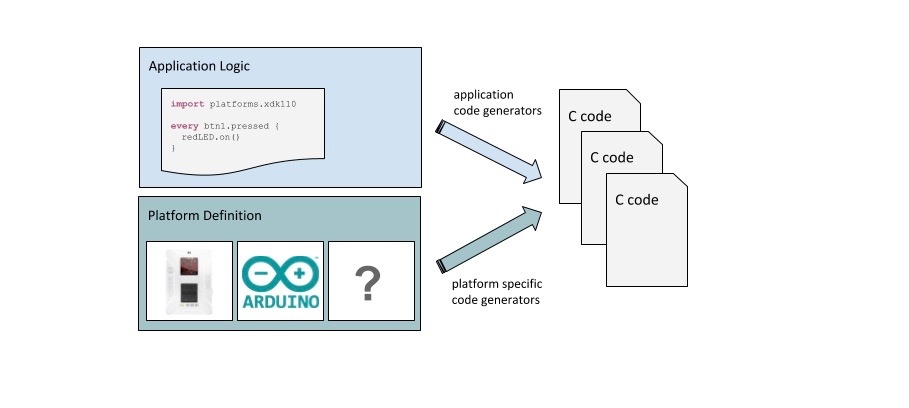
Eclipse Mita is built with the goal in mind to separate application logic from hardware specifics. Therefore, it comprises two layers of abstraction: an application logic layer where functionalities are defined in an event-driven reactive programming style, and a platform definition layer where the hardware capabilities, like sensors, actuators and connectivity channels, are described. Then, on application level, one selects a platform definition to enable all therein defined hardware capabilities and thus making them available in the language to define reactions on a certain event or to read-out specific sensor data.
The code written with Eclipse Mita directly transpiles into C code. This makes Eclipse Mita usable wherever C is the target language which is usually the case for embedded software. The framework comes with two sets of C code generators: application code generators and platform specific code generators. Application code generators know how to transform Mita language constructs like event handlers, for-each loops, or exceptions into valid C code. On the other hand, the platform specific code generators know how to access your hardware’s sensor data or which register values to write to make your LED blink.
The obvious advantage of such a strict separation of concerns in the Mita framework is the possibility to integrate multiple platforms. For this, one needs to supply a platform definition file together with the platform specific code generators. The application language can be used out of the box and all its future advancements do not affect the hardware specific parts. This makes it possible to create an IDE for embedded software development that can be used across different platforms and hardware manufacturers.
package main;

import platforms.xdk110;

setup led : LED {
    var red = light_up(color = Red);
}

every button_one.pressed {
    led.red.write(true);
}

every button_two.pressed {
    led.red.write(false);
}
Here you can see a simple application written in Eclipse Mita. In contrast to the generated C code it is quite self-explanatory. Also note that the import statement is the only hint for which platform the application is written.
In upcoming blog posts we will show how to port this example onto an Arduino Uno, and even how to use YAKINDU Statechart Tools (Information: YAKINDU Statechart Tools Is Now itemis CREATE) in combination with Eclipse Mita. So if you don’t want to miss that, subscribe to our blog!

Comments