
Install? Configure? Isn't that available as a web app? I am afraid, no! Privacy and security do not come for free. But don't panic: I'm going to show you how to easily setup OpenPGP on Windows. Work once, use indefinitely. Sounds nice? Let's go then.
This article is part of our series “OpenPGP On The Job”. Would you like to continue with another article from this series? Here’s an overview.
Download And Instally
We're going to use gpg4win. Of course you should verify the download as described in part two of the series.
Once you've done that, go ahead and start the installer with admin privileges. Although you could also install the tool without admin privileges, it's actually more advantageous to do it as admin. This makes sure, gpg is able to setup important background services and environment variables. Thus:
Right click on the installer --> Run as administrator.
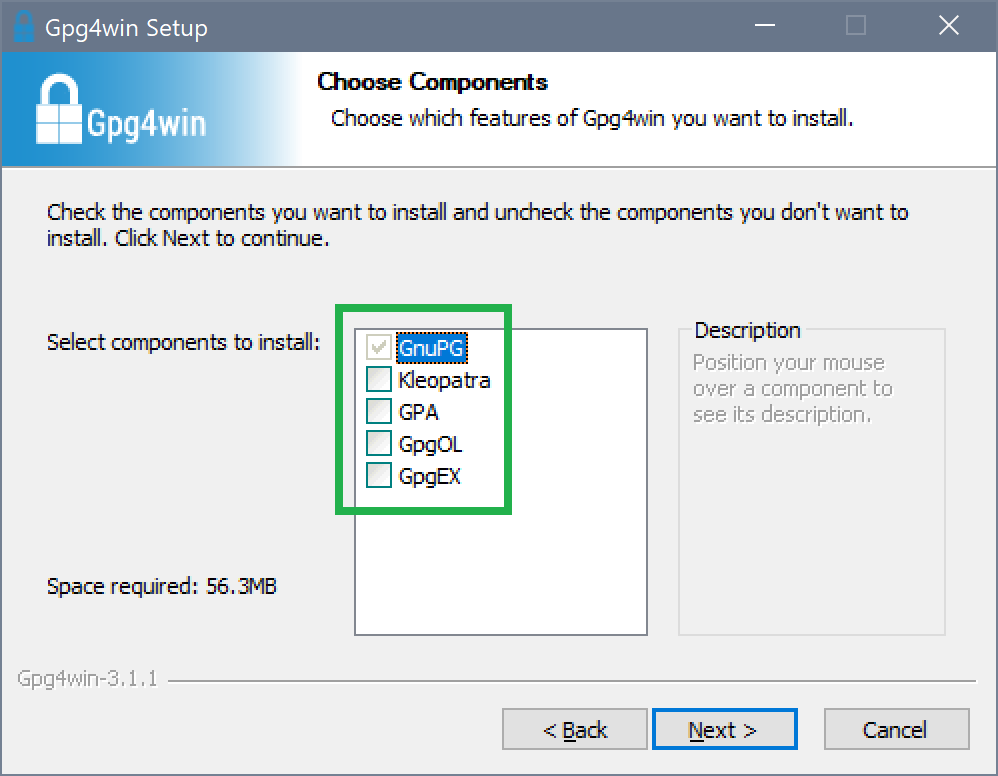
Once the component selection shows up, we select the GnuPG core only. The following components are optional:
- Kleopatra – The
gpgGUI client, not required for working with e-mail. - GpgOL – A plugin for Outlook. Please install if you're planning on using Outlook instead of Thunderbird.
- GpgEX – Context menu entries for the Windows Explorer. We don't need those at the moment.
The suggested installation directory is just fine, so go ahead and start the installation.
That's it. gpg is installed and ready for work. If you now open a console and type in gpg --version, the following overview is returned:
gpg (GnuPG) 2.2.7
libgcrypt 1.8.2
Copyright (C) 2018 Free Software Foundation, Inc.
License GPLv3+: GNU GPL version 3 or later
This is free software: you are free to change and redistribute it.
There is NO WARRANTY, to the extent permitted by law.

Home: C:/Users/mosig_user/AppData/Roaming/gnupg
Supported algorithms:
Pubkey: RSA, ELG, DSA, ECDH, ECDSA, EDDSA
Cipher: IDEA, 3DES, CAST5, BLOWFISH, AES, AES192, AES256, TWOFISH,
        CAMELLIA128, CAMELLIA192, CAMELLIA256
Hash: SHA1, RIPEMD160, SHA256, SHA384, SHA512, SHA224
Compression: Uncompressed, ZIP, ZLIB, BZIP2
In case you're wondering, why the listed versions differ to this of the download: That's normal. The components included in the download each have a custom version respectively which may not match the download's version.
Add gpg to the System's Search Path
In case gpg cannot be found on the console, you'll need to add the directory bin – which is located directly under the install directory – to the system's search path for executables. See part two of the series for details on how this can be done.
Change gpg Home Directory
The output of gpg --version does also show another interesting detail:
Home: C:/Users/mosig_user/AppData/Roaming/gnupg
This is the directory into which gpg stores its configuration and the keyring. Since it's very cumbersome to work with things stored under AppData on Windows, I suggest, you change the folder to something more accessible:
- Create a directory of your choice, e. g.
C:\Users\YourUser\gnupg. - Copy the contents of
C:\Users\YourUser\AppData\Roaming\gnupginto the new directory. - Create a new environment variable named
GNUPGHOMEand give it the directory path as value. - Restart the console and check if the change has been recognized with:
gpg --version.
Change gpg Language
The language of gpg output can easily be changed. It's controled by the environment variable LANG. Accepted values are so called ISO 2 country codes, e. g. de stands for German and en for English. Either you set this up as described in part two of the series, or just for the lifetime of the console ("temporary") via set LANG=en.
Adapt Configuration
Almost there! What's missing is a configuration optimized for security. The file GNUPGHOME\gpg.conf contains many entries that do control the behavior of gpg. I use the following configuration which was inspired by the work of Thierry Thuon and RiseUp's best practices:
# Avoid information leaked when exporting keys
no-emit-version
no-comments
export-options export-minimal

# Displays the long format of the ID of the keys and their fingerprints
keyid-format 0xlong
with-fingerprint

# Show UID validity in key listings
list-options show-uid-validity
verify-options show-uid-validity

# Use the strongest known algorithms if possible
personal-cipher-preferences AES256
personal-digest-preferences SHA512
default-preference-list SHA512 SHA384 SHA256 RIPEMD160 AES256 TWOFISH BLOWFISH ZLIB BZIP2 ZIP Uncompressed

cipher-algo AES256
digest-algo SHA512
cert-digest-algo SHA512
compress-algo ZLIB

# Is considered broken and therefore not used anymore
disable-cipher-algo 3DES

# Since many keys come with SHA1 signatures only,
# we need to disable this in order to being able to import them anymway.
#weak-digest SHA1

s2k-cipher-algo AES256
s2k-digest-algo SHA512
s2k-mode 3
s2k-count 65011712

# Always use the following keyserver
keyserver hkps://hkps.pool.sks-keyservers.net

# Do not use the unencrypted hkp protocol anymore
#keyserver hkp://pool.sks-keyservers.net

# Don't allow keys to specify preferred keyservers
keyserver-options no-honor-keyserver-url

# Include revoked keys in search results
keyserver-options include-revoked
Just copy the contents into GNUPGHOME\gpg.conf and you are done. gpg is now sufficiently set up and may be used at you convenience.
Generate Keys And Setup E-Mail Client
The next step shall be the generation of your private key. A detailed description on how this may be done can be found in the next part of the series. Only then does a setup of an e-mail client + OpenPGP makes sense. If you're of the impatient sort, you may want to have a look at the high quality tutorial over at posteo.de which deals with Thunderbird+Enigmail.
Although the generation of keys with Enigmail is described there I do recommend to do this on the console. This gives you the opportunity to learn something and as always there are some pitfalls to watch out for. More on this in the next part.
In Case Of Problems: gpg Debugging
It is possible to make gpg print error information to the console or into files. You'll need advanced skills in order to make use of this, but I'll describe how it's done nevertheless (and because I do tend to always forget these things).
Verbose Output
First measure to take is to activate verbose output. This can be done with the -v switch:
# Verbose example with verify command
gpg -v --verify gpg4win-3.1.1.exe.sig gpg4win-3.1.1.exe
The switch is available in three flavors. The more v there are, the more verbose the output gets:
# Even more verbose example with verify command
gpg -vv --verify gpg4win-3.1.1.exe.sig gpg4win-3.1.1.exe

# Most verbose example with verify command
gpg -vvv --verify gpg4win-3.1.1.exe.sig gpg4win-3.1.1.exe
But wait, there's more! There's an extra switch for even more verbose output, then called debug output: --debug. The gpg documentation states:
--debug flags
Set debugging flags. All flags are or-ed and flags may be given in C syntax (e.g. 0x0042).

--debug-all
Set all useful debugging flags.
I do always use --debug-all, because I don't know the flags, nor do I want to remember them:
# *Very* detailed output
gpg --debug-all --verify gpg4win-3.1.1.exe.sig gpg4win-3.1.1.exe

# You may also combine with -v to get *ultra* detailed output
gpg -vvv --debug-all --verify gpg4win-3.1.1.exe.sig gpg4win-3.1.1.exe
The kind of output produced by -v and --debug depends on the gpg functionality used. In general it's adviced to start with -v and then slowly tune things up to your desired level of verboseness.
Daemonic Logfiles
gpg uses background services, so called daemons, to provide parts of its functionality:
dirmngr- Takes care of communication with key servers.gpg-agent- Providesgpgfunctionality for other apps, e. g. Enigmail.sc-daemon- Provides access to smartcards, e. g. Yubikey.
Everyone of these services may have its own optional configurationfile located in GNUPGHOME:
dirmngr.confgpg-agent.confscdaemon.conf
You may decide to activate debug output to text files. This can be done by adding this to the configuration file of the respective service:
debug-level guru
debug-all
log-file debug.log
It's recommended to use an absolut path for logfiles so that you may have more control over the location of the file.
Restarting Daemons
Sounds strange but helps more often than you may think: When changing configuration files or when having arbitrary strange problems, first try to restart the daemons on the console like this:
dirmngr: gpgconf --kill dirmngr # Automatic restart on demandgpg-agent: gpg-connect-agent reloadagent /byescdaemon: gpgconf --reload scdaemon
That pretty much makes our little debug excursus complete. We'll continue with key generation in the next part of the series.
Comments