
You don't need to do without OpenPGP support on your tablet or mobile phone. There exists a great many Android apps that provide this. I have chosen K-9 Mail and OpenKeychain, because they have a good feature set and are widely spread. In this article I'm going to show you how to set up and use these, to securely receive and send e-mails on and from your Android device.
This article is part of our series “OpenPGP On The Job”. Would you like to continue with another article from this series? Here’s an overview.
Setup Keys With OpenKeychain
In order to get started, we are going to need an OpenPGP client that is usable on Android. OpenKeychain is quite mature, has a good feature set and is the recommended client for K-9 Mail, so we are going to use this app.
Installation can be easily done via Google Play Store.
Now you must setup your private key pair. In case you already have one on your PC, the question is: How to get the key pair to the mobile device? With OpenKeychain you've got several options:
- In case the pair does exist on another mobile device, it may be copied by using the "Secure Wifi Transfer" functionality.
- Public keys may of course be imported from keyservers. You may also use QR codes generated by OpenKeychain to exchange public keys.
- Going from PC to mobile, the file import is a good and simple way.
You'll need to export your private subkeys into a file, copy themfto the device and import them into OpenKeychain. Due to security reasons, we'll leave the master key alone for now.
Fortunately, we already did create exports in Part Four of the OpenPGP blog series. You may consider to encrypt the exported files symmetrically which will make eavesdropping during the copy process useless and thus increases security. How this works, is described at openkeychain.org.
- Search for the ID of your master key with
gpg -Kand store it for later use, e.g.8AE9426EA8A00B2E.![OpenKeychain Setup – get key id]()
- Export the keys.
# Export private subkeys. gpg --export-secret-subkeys --armor 8AE9426EA8A00B2E > 8AE9426EA8A00B2E.sub_priv.asc - Copy the file onto the mobile device. Try to choose a secure channel, e. g. an USB cable.
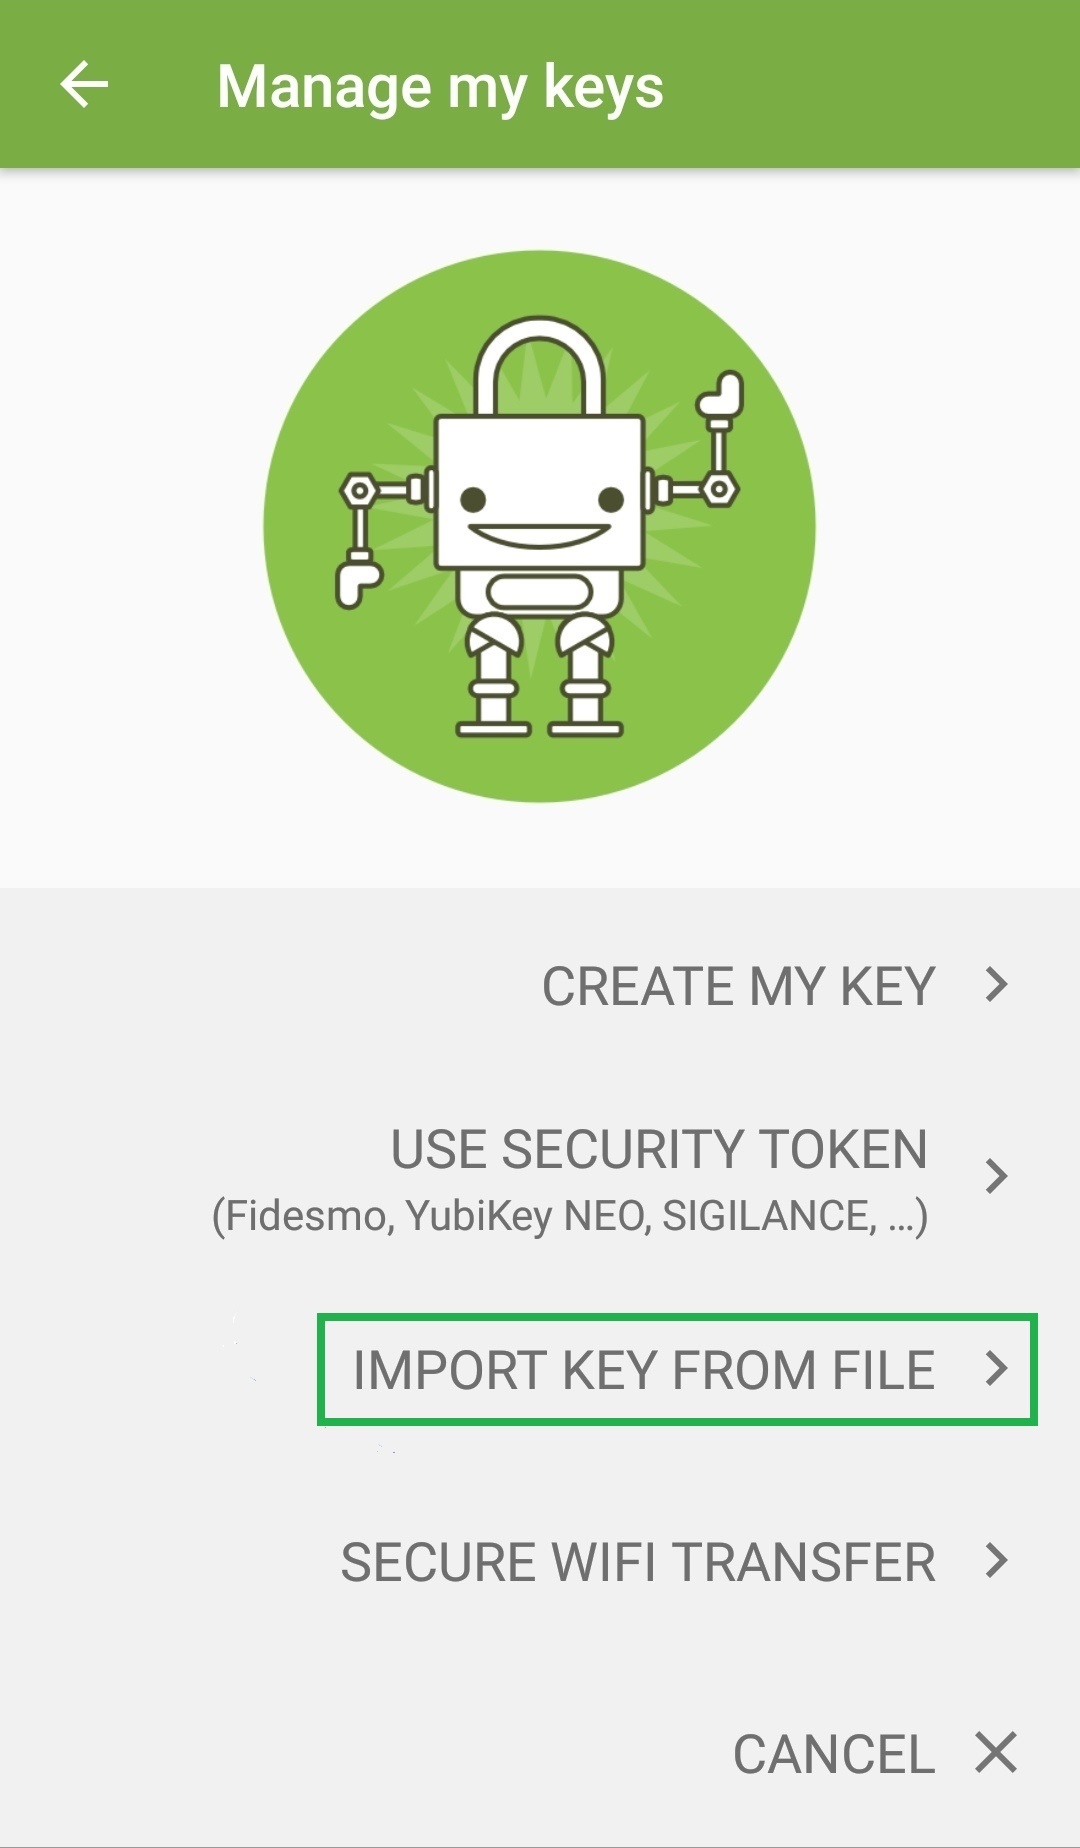
- Open OpenKeychain and choose "Import Key From File".
![OpenKeychain setup – import key from file option]()
- In case this screen is not shown, you'll need to tap on the
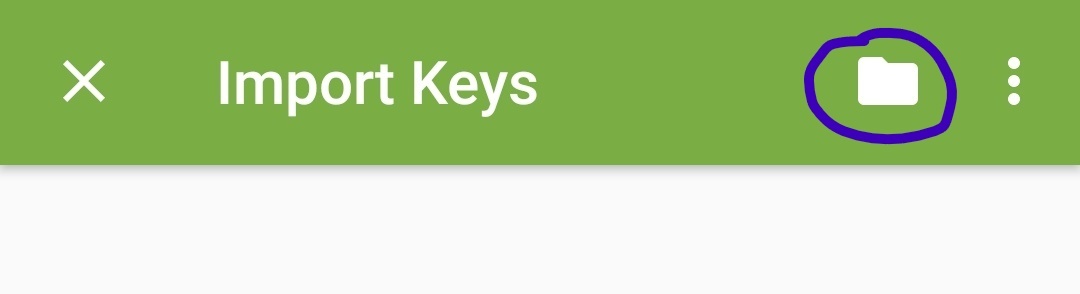
+icon on the lower right and chooseImport from File. - In the next screen, you'll need to select the folder icon on the upper right.
![OpenKeychain setup – select key file from folder]()
- Select the correct file and you'll be presented with this screen:
![OpenKeychain screen after successfully importing your key from file]()

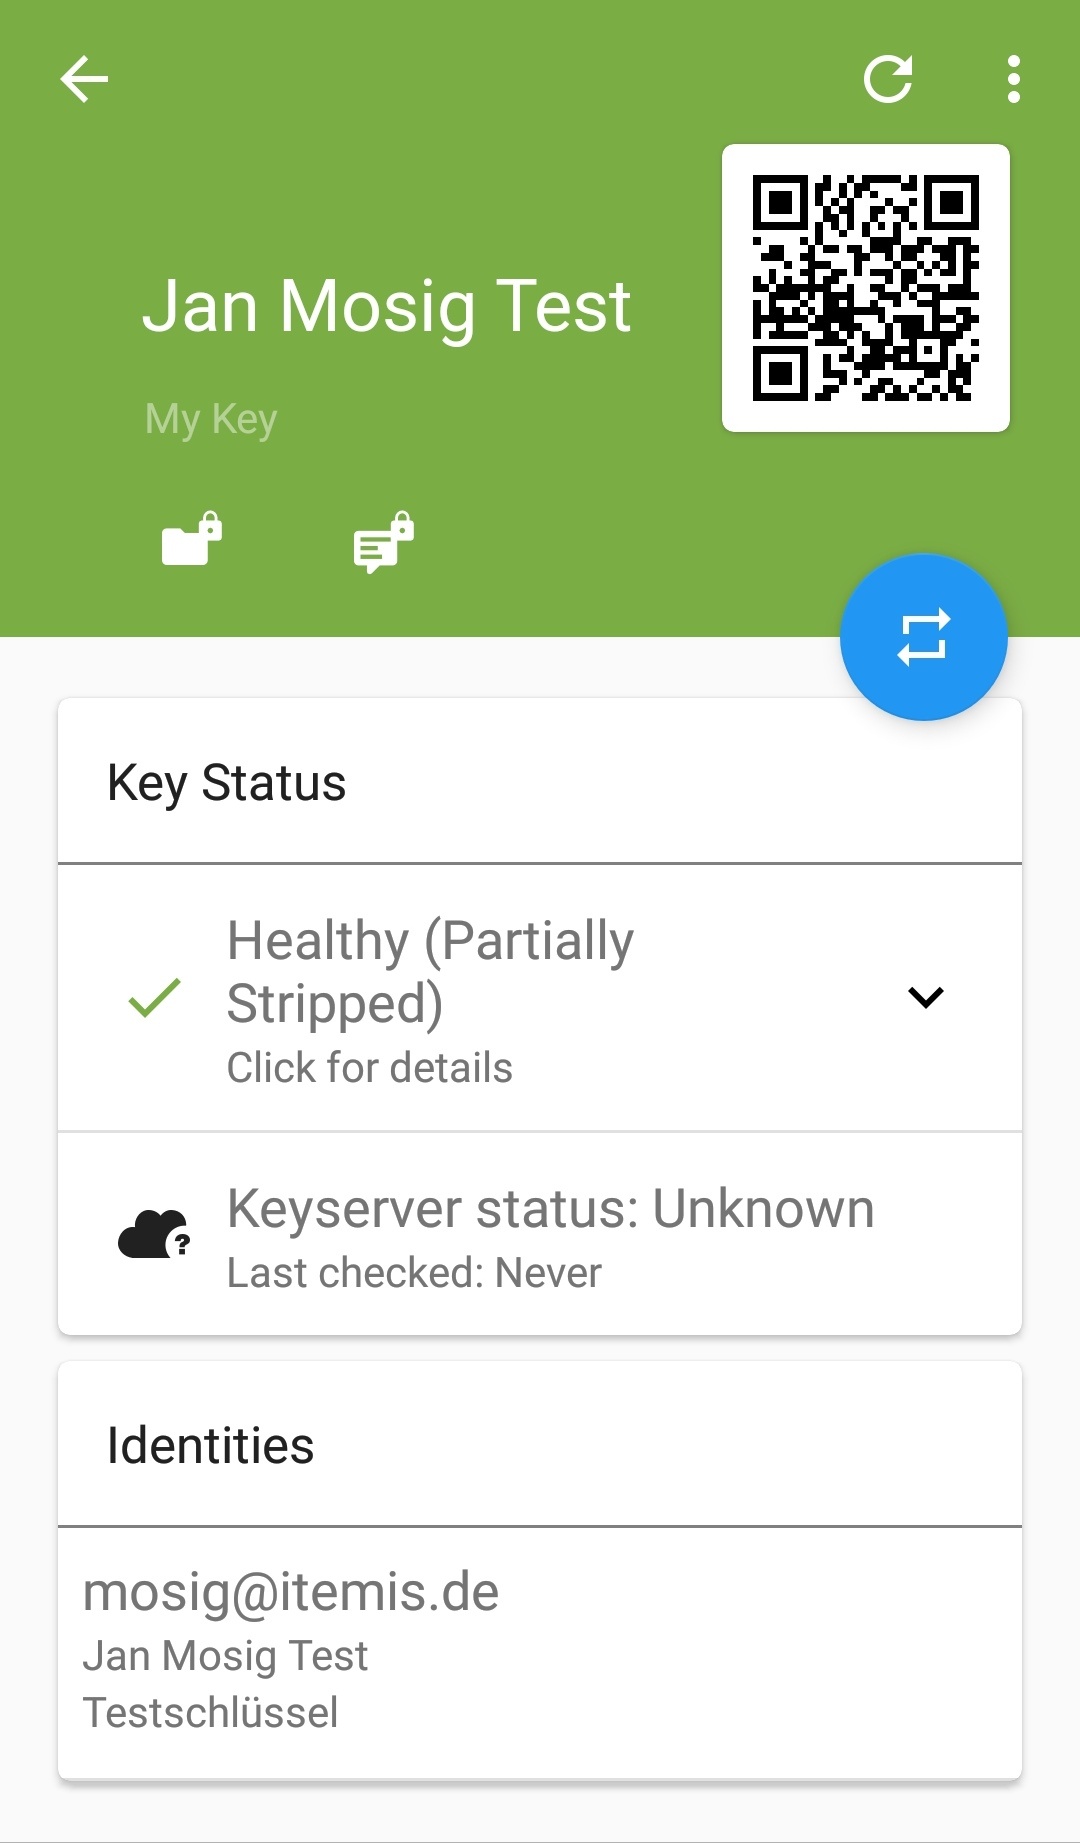
The import is now finished. Notice how the key is mentioned to be "Partially Stripped" which means, the master key is not there.
Be aware: the keys are only as secure as is your mobile device in general. From a security point of view, it is not a good idea to have them stored like this. On the one hand, this doubles maintenance effort, because you do now have 2 copies of the pair. On the other hand, all mobile related security issues do also apply to the keys themselves. This may be mitigated by using security tokens, which will be the topic for the next part of the series.
Link Keys To Contacts
OpenKeychain (as is K-9 Mail) often makes use of your contacts. This may improve usability considerably. Public keys of senders will then be related to one of your contacts.
Because this may pose a security (anonymity) threat, this functionality must be deliberately activated. This can be done under Burger menu upper left → Settings → Synchronization → Link keys to contacts.
Manage Public Keys
You can easily search for public keys via + → Key Search. The search will use the keyservers configured under Burger menu upper left → Settings → Key Search → Manage OpenPGP keyservers. This search may also be initiated from K-9 Mail.
Certify Public Keys
Imported public keys are not trusted per default. If you want to change that, you'll need to "confirm" those keys, which means you must sign them with a key that has the "certify" capability.
With OpenKeychain you must first make sure that the public key really belongs to the person it says it belongs to. For this, you need to compare key fingerprints for which you've got two options to choose from:
- You are going to use the QR code compare mechanism built into OpenKeychain. The fingerprints are embedded into the QR codes. The owner of the key must also use OpenKeychain for this to work.
- You are going to use manual comparison. If you have selected a public key in OpenKeychain, you can find this functionality under
Burger menu upper right → Confirm with fingerprint. Key fingerprints are the same, regardless of which client you use. You may show fingerprints withgpgby usinggpg --fingerprint <KEY ID>.gpg --fingerprint 0xEAFA5E6709F31765 pub rsa4096/0xEAFA5E6709F31765 2018-04-05 [C] [expires: 2019-04-05] Key fingerprint = 76EE 007A A847 7D08 537A 55EF EAFA 5E67 09F3 1765
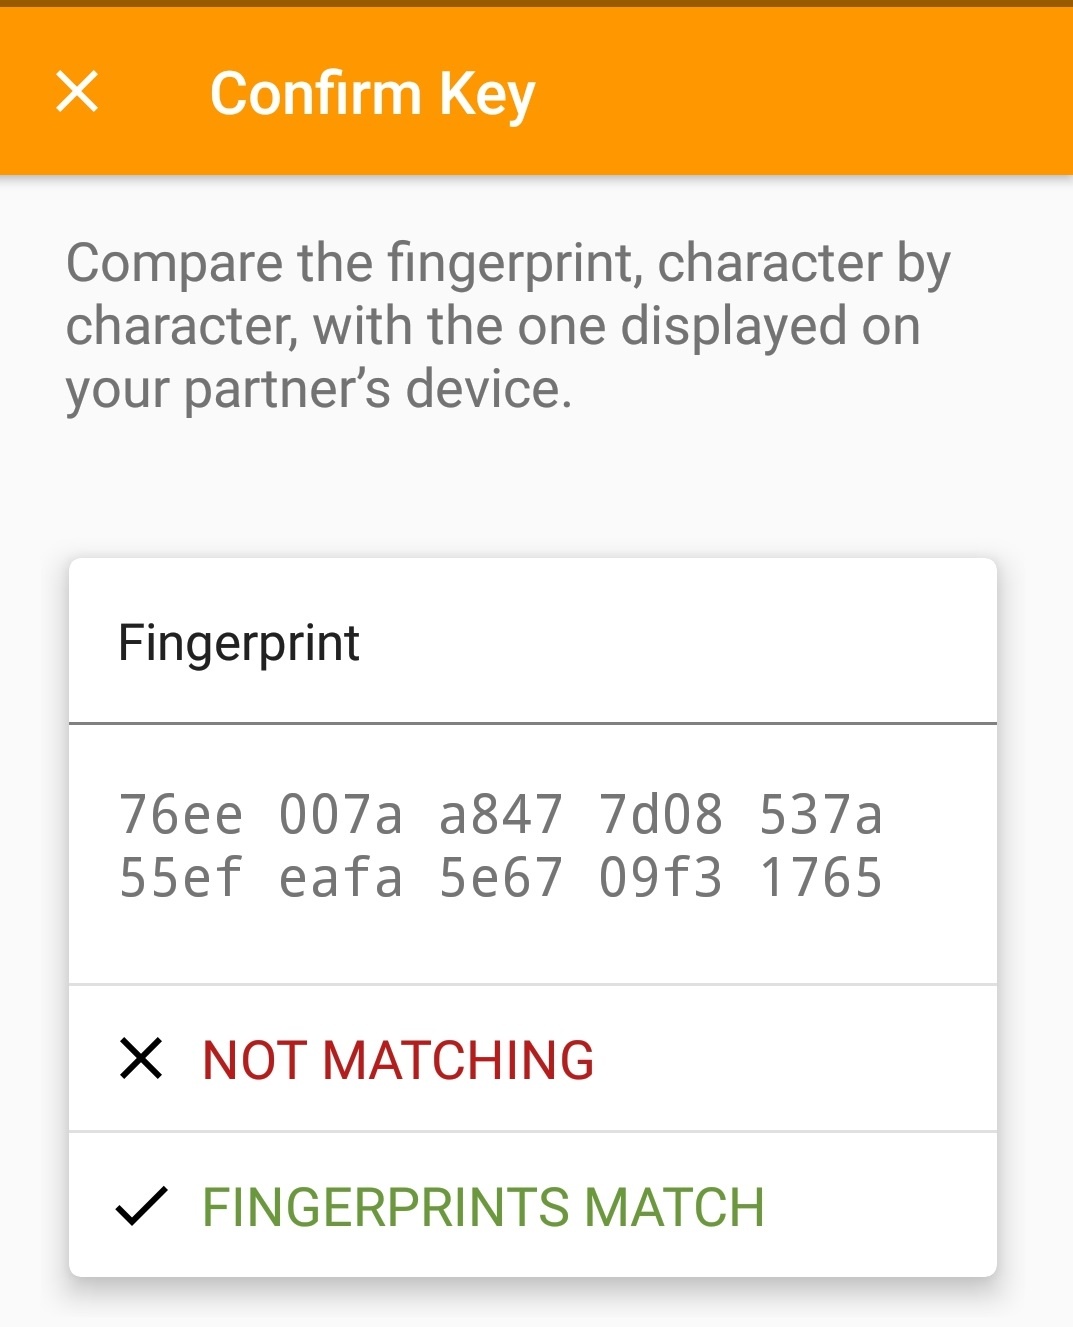
A tap to "Fingerprints match" shows
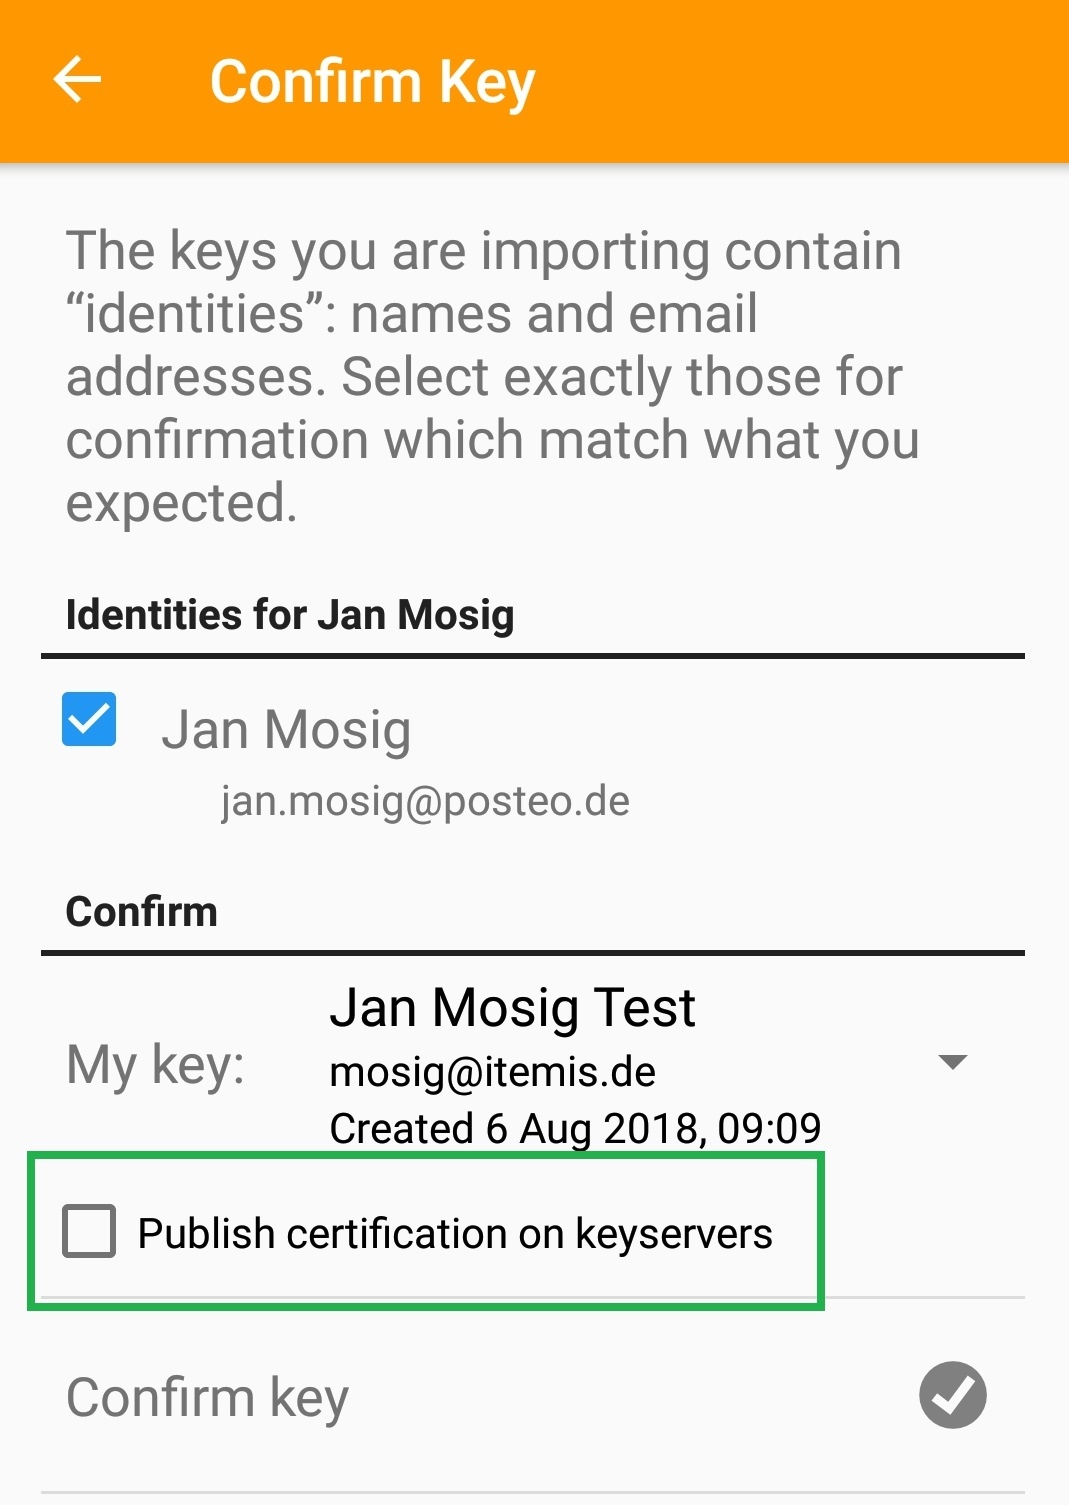
A tap on "Confirm key" creates a certification signature which is only stored locally. In case you want to publish it on a keyserver, you'll need to select the "Publish certification on keyservers" option.
Certification may only be done with a private key that has this capability. However, in OpenPGP on the Job – Part Four we did deliberately remove this key from the keyring due to security reasons. This means, the certification will most likely fail. You would need to export the master key, copy it to the device, import it into OpenKeychain – choose "Refresh Key" on import since you already have subkeys of this key ID imported – perform the certification and remove it afterwards.
I have observed that the import order master key → subkeys may lead to errors. This means, always first import subkeys, then the master key.
Key certification is entirely optional, so you do not need to go through the hassle of importing the master key every time you import a public key. On the other hand, this does hinder the Web Of Trust that the public keys and their certification signatures span from prospering. Keep in mind, that performing a certification does increase security.
Setup K-9 Mail
In case you are curious: K9, pronounced "key nine" as in "canine" (dog like mammals) is a robot dog known from the British long running series Dr. Who. The K-9 Mail app is named after the dog and uses a related icon. A typical nerd joke.
Of course, there are many mail apps for Android. However, only few of them offer the combination open source, good usability and full OpenPGP support via third party app (as is OpenKeychain). I have chosen K-9 Mail out of these few, because it is widely spread, has an active community and just works.
Installation can be easily done via Google Play Store.
On the very first start, you'll need to setup your e-mail account. Unfortunately, there is no such nice provider database as with Thunderbird, so you'll need to make sure, outgoing and incoming mail servers have been configured correctly. The provider's help pages usually do contain this information.
Link To OpenKeychain
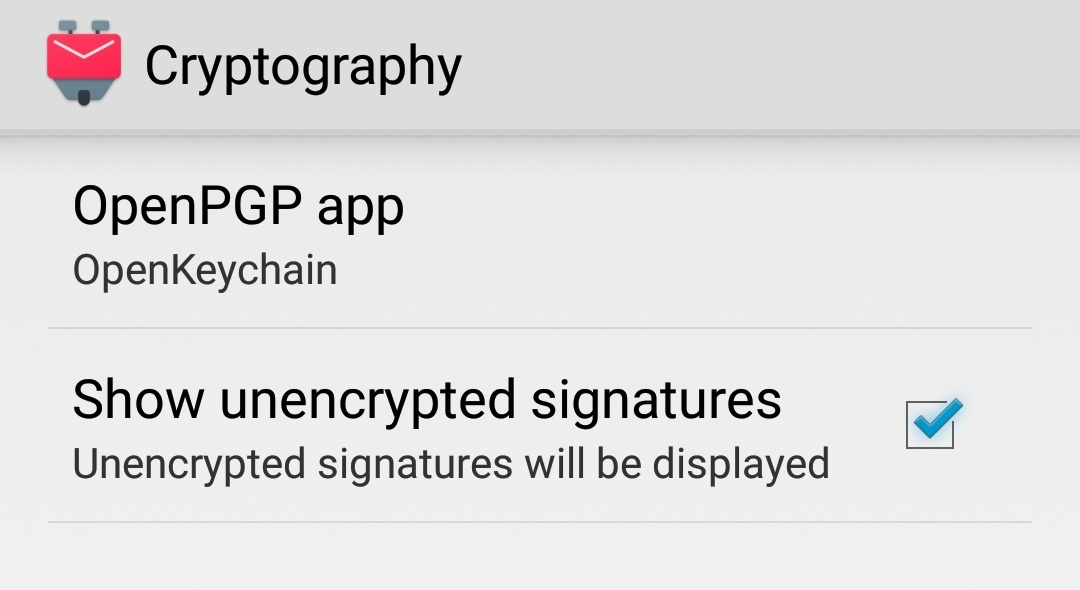
Once everything has been set up and sending and receiving of mails is possible, you need to, sort of, "daisy chain" OpenKeychain. This is possible via Settings → (Global Settings) → Cryptography → OpenPGP-app. The settings menu can be accessed via the burger menu (the three vertical dots) on the lower right.
A list does appear from which OpenKeychain is the only option to choose from. You should also select the option "Show unencrypted signatures". This enables the verification and creation of signatures without encryption.
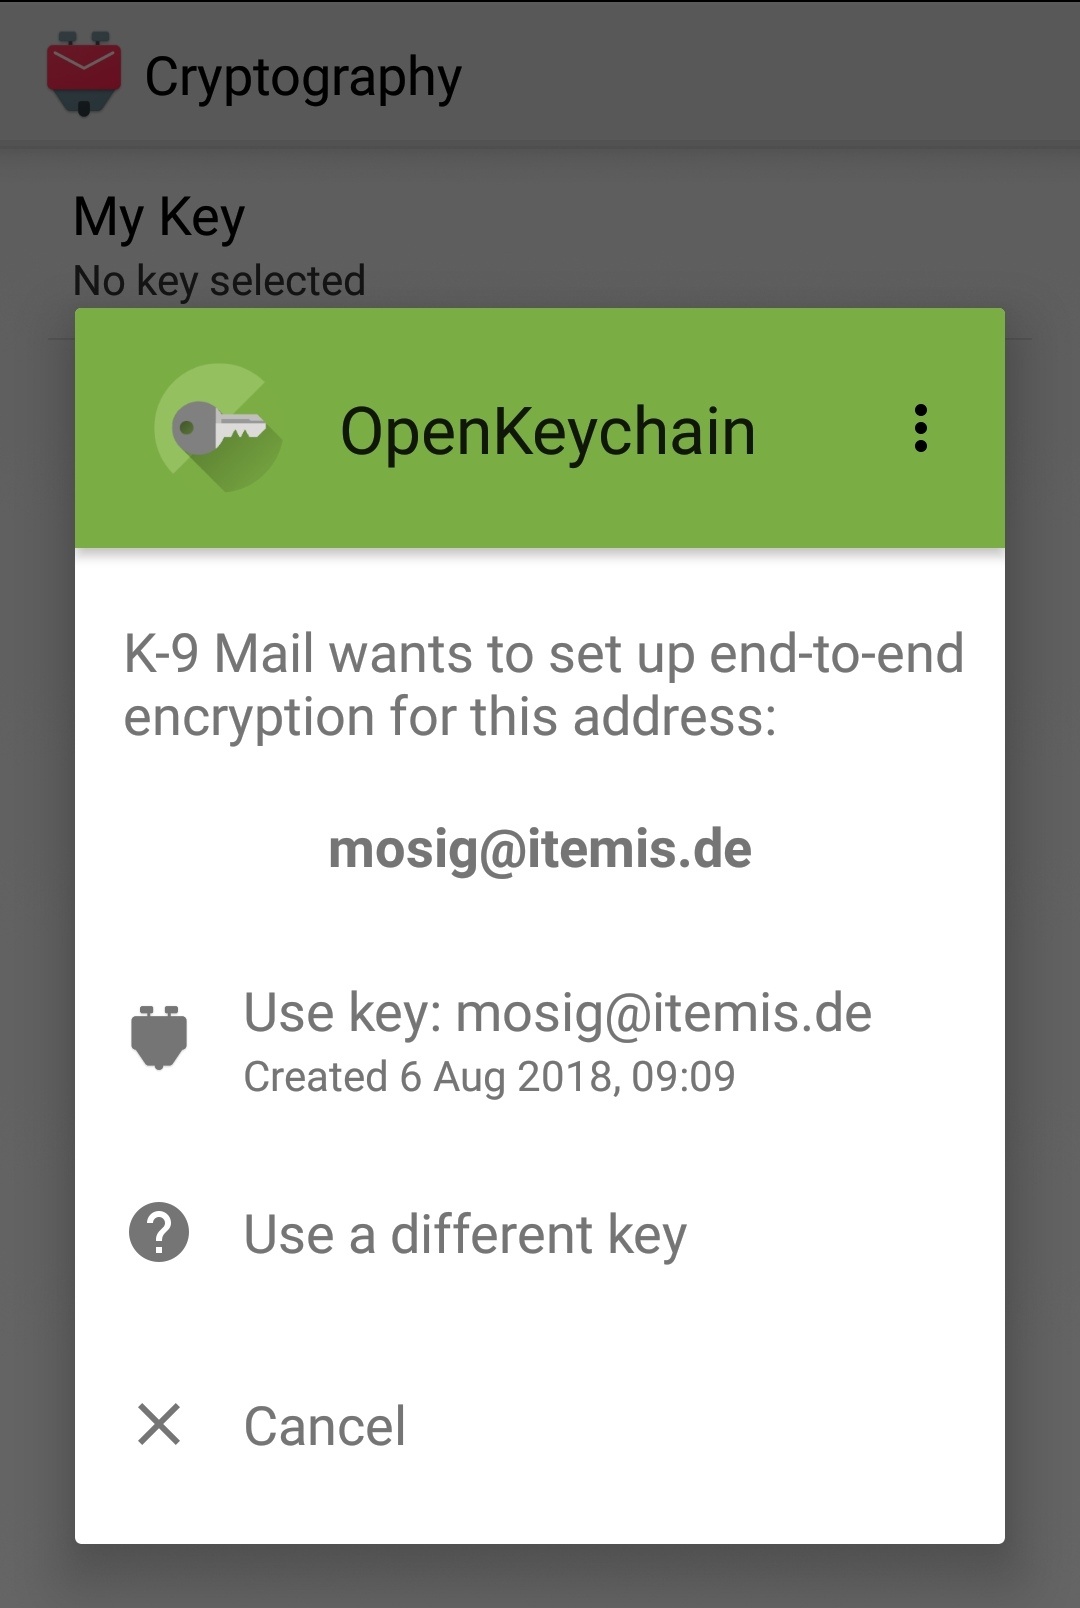
The last thing left to do is to select the private key for this account. In order to do this, just select the account, and then tap Burger menu lower right → Settings → Account settings → Cryptography → My Key → Use key. In case the account's e-mail address does not match the selected key's user id, you'll need to select the correct key from the list of keys.
Sending Mails
So let's try this out, shall we? A tap on the envelope on the lower panel of K-9 opens the screen for new mail creation. First thing to do is to enter the receiver's address. K-9 does make use of your contacts here, so it pays if you take care of your contacts and maintain their e-mail addresses.
Encryption and Sign
If you choose a contact who (or whose e-mail address) is known by OpenKeychain - meaning there exists a public key in the keyring with a matching user id - a new icon will appear on the upper right:

Tapping on it will change the icon to green:

This means: The mail will be encrypted and signed. The rest of the mail creation process is as usual. However, the encryption can only be activated if all receivers are known to OpenKeychain. If one of them is missing, you'll need to add it to OpenKeychain first.
Sign Only
It is also possible to just sign a mail and not encrypt it. In this case the receiver does not need to be known to OpenKeychain, because signing does only require the sender's private key.
As a pre-condition, you must make sure that under (Global) Settings → Cryptography the option "Show unencrypted signatures" has been activated.
Now it is possible to activate sign-only from the new mail screen via Burger menu upper right → Enable PGP Sign-Only. This makes a new icon appear:

The blue check mark means: sign-only mode active. The mail will get signed but not encrypted. The option "encrypt but do not sign" is not available in K-9 Mail. Also, you cannot activate encryption in sign-only mode. You first need to deactivate the mode in order to proceed with encryption.
Receiving Mails
The reception of encrypted or signed mail is a bit more comfortable, because the level of integration with OpenKeychain is a bit stronger here.
K-9 Security Scale And Icons
Depending on if the mail has only been signed or is also encrypted, K-9 is going to show different icons to indicate this: The check mark for signatures and the padlock for encryption (and signature).
In addition, three vertical dots are shown, which are part of a security scale with low security at the bottom and high security at the top. Each level does also correspond to a specific color. The idea here is to enable the user to recognize the security level at once. It does take a little practice though. I have created an overview table to make things easier to remember:
| Signed | Encrypted | Remarks | |
 |
✔ | ✘ | Missing public key of sender. |
 |
? | ✔ | Missing private key of receiver. / Decryption error. |
 |
✔ | ✘ | Invalid signature. |
 |
✔ | ✘ | Valid signature. Sender's key is untrusted. |
 |
✔ | ✔ | Valid signature, successfully decrypted. Sender's key is untrusted. |
 |
✔ | ✘ | Valid signature from trusted key. |
 |
✔ | ✔ | Valid signature from trusted key. Successfully decrypted. |
Usually, you are going to see the orange icons, because public keys are untrusted per default.
A tap on the icon shows the security information of the sender. In case the icon is black, i. e. a public key is missing, K-9 Mail will automatically redirect to a key search of that missing key via keyserver.
Once the key has been found and imported, it will go back to the mail. Occasionally the icon may stay black. In this case, you'll need to go back to the list view and reselect the message, so that its details get reloaded.
Coming Up Next
Especially on mobile devices, you may notice how cumbersome, mediocre and sometimes even dangerous the use of OpenPGP can be. From my personal point of view, the basic problem here is that you just can't take your keys with you like you would do with any "real" key.
Due to this, I am going to present an option on how to achieve this by using a Yubikey NEO as an OpenPGP-SmartCard, which mitigates some of the presented disadvantages.
Comments