
Alright, you've got your PGP basic knowledge, your setup is all shiny and you sign and encrypt e-mails on a daily basis like a pro. However, the keys are neither mobile, nor stored in a secure place. In case you want to use them on other devices, you'll need to copy them, which is cumbersome and may even be insecure. OpenPGP cards provide a solution for this problem. I'm going to show how to use them by using a YubiKey NEO as an example.
This article is part of our series “OpenPGP On The Job”. Would you like to continue with another article from this series? Here’s an overview.
What is a YubiKey?
A YubiKey is a so called security token. It is a small embedded device, in many cases coming with a USB interface. The device provides an assortment of security functions, many of them are used to secure user accounts with two factor authentication (2FA).
There are many different industrial standards around for 2FA and a token may support many of them in order to stay flexible. The manufacturers compete over the best product, not the best standard.
The YubiKey is produced by the Swedish company Yubico. A similar product of a different provider is the Nitrokey.
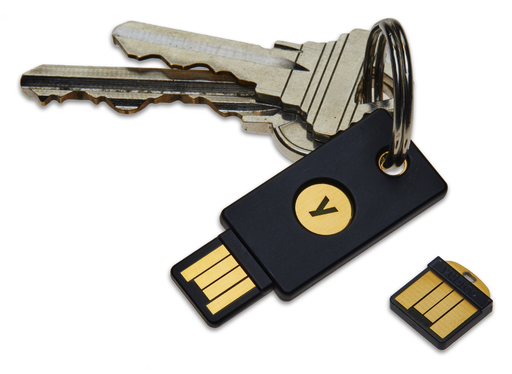
By Yubico [CC BY-SA 4.0 (https://creativecommons.org/licenses/by-sa/4.0)], from Wikimedia Commons
What is an OpenPGP Card?
It is an electronic device that is capable of holding OpenPGP keys and performing all necessary cryptographic operations. There even exists a standard. Despite their 2FA functionality, some YubiKeys do also implement the OpenPGP card standard. We are going to use this, to store our keys in a secure yet mobile place.
Main advantages we are going to achieve by using a YubiKey are:
- Key pair is stored in one place and one place only.
- Key pair can neither be copied nor manipulated.
- Key pair is usable on many different (mobile) devices.
Set up the Yubikey
Since the YubiKey supports the OpenPGP card standard, it should work out of the box without any additional software. It runs on every platform that has a working OpenPGP installation which supports OpenPGP cards. All current gpg flavors for Windows, Mac and Linux should have support included nowadays. Also OpenKeychain (see part six) on Android supports OpenPGP card.
Check key status
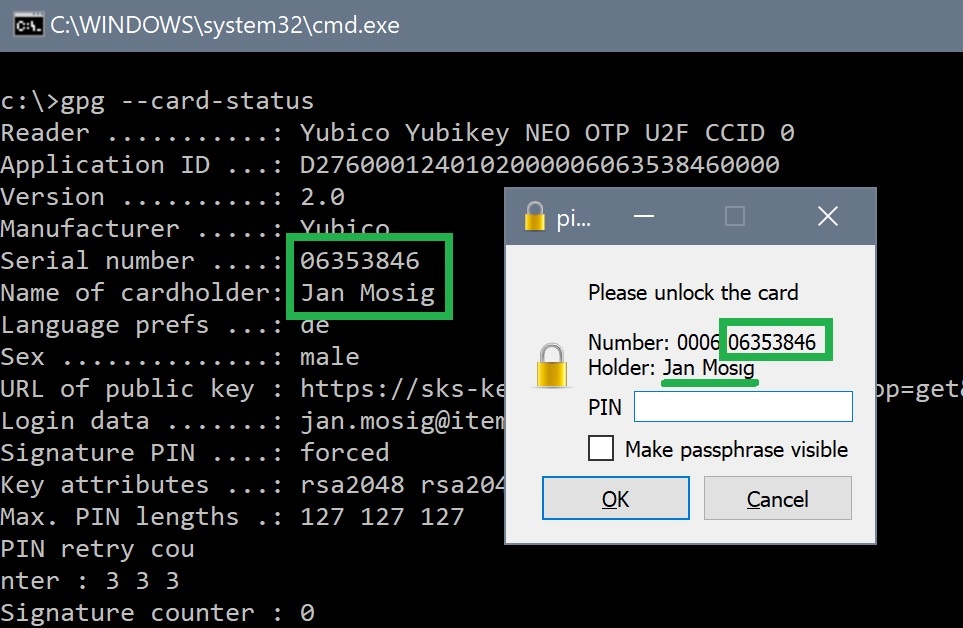
You can check with gpg if the key works and has been detected correctly:
gpg --card-status
Reader ...........: Yubico Yubikey NEO OTP U2F CCID 0
Application ID ...: D2760001240102000006063538460000
Version ..........: 2.0
Manufacturer .....: Yubico
Serial number ....: 06353846
Name of cardholder: [not set]
Language prefs ...: [not set]
Sex ..............: unspecified
URL of public key : [not set]
Login data .......: [not set]
Signature PIN ....: forced
Key attributes ...: rsa2048 rsa2048 rsa2048
Max. PIN lengths .: 127 127 127
PIN retry counter : 3 3 3
Signature counter : 0
Signature key ....: [none]
Encryption key....: [none]
Authentication key: [none]
General key info..: [none]
...
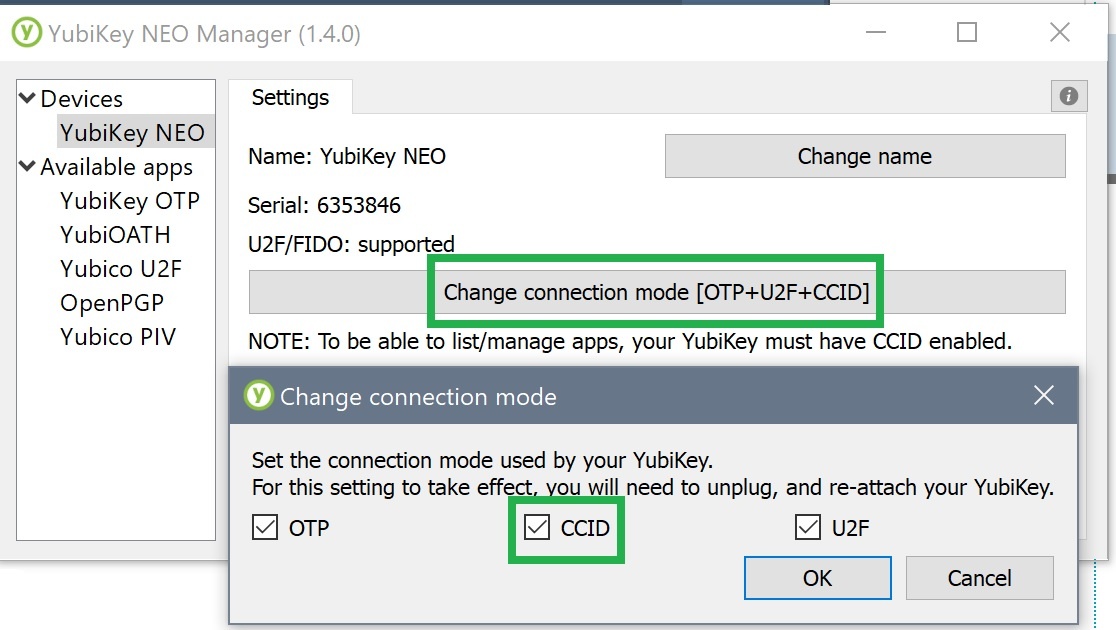
Of course you'll need to insert the key into one of your USB ports. Another prerequisite is that the key uses the CCID connection mode. This should be the factory setting. You may check with the tool NEO Manager. There are also other possibilities, e. g. a Python-Script, or via Echo+Libu2f.
Problem: no such device
In some cases, it may happen that the key is not recognized:
gpg --card-status
gpg: selecting openpgp failed: No such device
gpg: OpenPGP card not available: No such device
The reason may very well be that there is already a so-called SmartCard reader configured within the system. This is often the case on notebooks that have a built-in SD card reader. In this case, you'll need to configure the correct card reader for use with OpenPGP. But which one is that? This is how you can find out:
- Add the following line to
<GPG_HOME>/scdaemon.conf:log-file c:\absolute\path\to\scdaemon.log debug-all
- Stop the
scdaemonwithgpgconf --kill scdaemon - Run
gpg --card-statusagain. - Open the logifle. It contains lines such as these:
2018-08-16 14:48:11 scdaemon[13476] detected reader 'Alcor Micro USB Smart Card Reader 0'
2018-08-16 14:48:11 scdaemon[13476] detected reader 'Yubico Yubikey NEO OTP+U2F+CCID 0' # This is the name of the correct reader.
Open <GPG_HOME>/scdaemon.confagain and set the following contents:card-timeout 30 # This must match the reader's name from the scdaemon.log reader-port "Yubico Yubikey NEO OTP+U2F+CCID"
- Stop
scdaemonwithgpgconf --kill scdaemon - Run
gpg --card-statusagain.
The scdaemon is one of the gpg background services (daemon). It takes care of SmartCard communication (hence scdaemon). It must be restarted in order for it to recognize changes to its configuration file. If it is just stopped, it will be automatically started by gpg on the first use of a SmartCard functionality.
After a restart of the daemon, it may be required to reinsert the key in order for everything to work correctly.
Customizing the YubiKey
You can now go ahead and personalize your key.
"Open" the key (OpenPGP card) in edit mode with gpg command line:
gpg --card-edit
gpg/card> admin
Admin commands are allowed
Set PIN and admin PIN
The key is locked by a PIN (for normal operations) and by an admin pin (for less common, critical operations). The default PIN is 123456 and the default admin PIN is 12345678. The PGP keys on the device will be secured by those PINs, which means they play a very important role when encrypting and signing messages and must therefore be chosen carefully with security in mind.
So, let's set both PINs:
gpg/card> passwd
1 - change PIN
2 - unblock PIN
3 - change Admin PIN
4 - set the Reset Code
Q - quit

Your selection? 3
PIN changed.

1 - change PIN
2 - unblock PIN
3 - change Admin PIN
4 - set the Reset Code
Q - quit

Your selection? 1
PIN changed.

1 - change PIN
2 - unblock PIN
3 - change Admin PIN
4 - set the Reset Code
Q - quit

Your selection? q

gpg/card>
A PIN must be at least 6 characters long, admin PINs 8 characters. Although alphanumerical characters are allowed according to the standard, I encountered problems when using them. Thus, I recommend using only numbers. They tend to be easier to enter on mobile devices anyway.
Be aware: The YubiKey does count failed PIN attempts with a so-called PIN retry counter. You can have a look at it with gpg --card-status (or with the list command in the gpg shell):
PIN retry counter : 3 3 3 # Will be 3 0 3 on a YubiKey 4
The gpg documentation states:
"This field saves how many tries still are left to enter the right PIN. They are decremented whenever a wrong PIN is entered. They are reset whenever a correct AdminPIN is entered. The first and second PIN are for the standard PIN. gpg makes sure that the two numbers are synchronized. The second PIN is only required due to peculiarities of the ISO-7816 standard; gpg tries to keep this PIN in sync with the first PIN. The third PIN represents the retry counter for the AdminPIN."
Unblock YubiKey with a reset
A blocked PIN may be unblocked with the admin PIN. A blocked admin PIN can only be unblocked by resetting the OpenPGP plugin on the YubiKey. In order to do so, you may want to use the following script whose original can be found on GitHub. Be aware: This does also delete the OpenPGP keys from the device.
#!/bin/sh

gpg-connect-agent <<EOF
/hex
scd serialno
scd apdu 00 20 00 81 08 40 40 40 40 40 40 40 40
scd apdu 00 20 00 81 08 40 40 40 40 40 40 40 40
scd apdu 00 20 00 81 08 40 40 40 40 40 40 40 40
scd apdu 00 20 00 81 08 40 40 40 40 40 40 40 40
scd apdu 00 20 00 83 08 40 40 40 40 40 40 40 40
scd apdu 00 20 00 83 08 40 40 40 40 40 40 40 40
scd apdu 00 20 00 83 08 40 40 40 40 40 40 40 40
scd apdu 00 20 00 83 08 40 40 40 40 40 40 40 40
scd apdu 00 e6 00 00
scd apdu 00 44 00 00
/echo Yubikey has been successfully reset.
/echo All OpenPGP keys have been deleted. PINs have been reset to factory defaults.
/echo The factory default PINs are 123456 (user) and 12345678 (admin).
EOF
The script talks with the key in machine language. You can run the script on Windows by the help of the git-bash.
Update June 2019: In the meantime I have ported the script to “Batch” in my GitHub project yubiset, i. e. you can now run the script on Windows cmd instead of git-bash.
Be aware: this script is known to work with YubiKey 4 and YubiKey NEO. For other YubiKey models it may malfunction. Please do a google search to make sure it works. You can also reset the key with the tools from Yubico.
Setting optional fields
All fields, except for the two PIN-related fields and those meant for the PGP keys, are of optional nature. They may later on be used to identify the owner of the device so that multiple YubiKeys may be differentiated easily.
Of course there also exist scenarios where this is unwanted. This is the reason why setting those fields is totally optional. The data only exists on the key, will not be processed any further and is also not required for daily usage.
Thus said, I still recommend to at least set the field url. I'll explain later on why this is important.
The URL that is expected here, must point to your public key, i. e. a remote endpoint that returns your public key in clear text OpenPGP format. You may choose to use the public HTTP interface of a key server here, or you may upload the clear text export on your private server and use this as a download source.
For example with my key, the URL looks like this: https://sks-keyservers.net/pks/lookup?op=get&search=0x37F0780907ABEF78. Simply put your key id behind the last = and you are good to go. If you load this URL via a browser, you'll get:

Now, let's go ahead and set this URL and all the other optional fields:
gpg/card> url
URL to retrieve public key: https://sks-keyservers.net/pks/lookup?op=get&search=0x37F0780907ABEF78
gpg/card> name
Cardholder's surname: Mosig
Cardholder's given name: Jan
gpg/card> lang
Language preferences: de
gpg/card> login # This is the PGP key's primary user ID
Login data (account name): jan.mosig@itemis.de
gpg/card> sex
Sex ((M)ale, (F)emale or space): m
gpg/card>
The YubiKey preparation is now finished:
gpg/card> list
Reader ...........: Yubico Yubikey NEO OTP U2F CCID 0      # Name of the SmartCard reader device.
Application ID ...: D2760001240102000006063538460000       # The manufacture's ID.
Version ..........: 2.0                                    # The used OpenPGP specification.
Manufacturer .....: Yubico                                 # "card" manufacturer.
Serial number ....: 06353846                               # "card's" unique serial number.
Name of cardholder: Jan Mosig                              # Name and family name of owner.
Language prefs ...: de                                     # Owner's native language.
Sex ..............: male                                   # Owner's sex.
URL of public key : https://sks-keyservers.net/pks/lookup  # Where to get pub key from.
?op=get&search=0x37F0780907ABEF78
Login data .......: jan.mosig@itemis.de                    # Owner's user account. Should match the OpenPGP key's primary user id.
Signature PIN ....: forced                                 # Always force a PIN on signature operations.
Key attributes ...: rsa2048 rsa2048 rsa2048                # YubiKey supports three rsa keys of 2048bit each.
Max. PIN lengths .: 127 127 127                            # PIN & AdminPIN may be no longer than 127 characters (ASCII).
PIN retry counter : 3 3 3                                  # PIN, PIN (sync), AdminPIN attempts left.
Signature counter : 0                                      # Nbr. of signatures perforemd with this key.
Signature key ....: [none]                                 # OpenPGP key for sign (S).
Encryption key....: [none]                                 # OpenPGP key for encrypt (E).
Authentication key: [none]                                 # OpenPGP key for auth (A).
General key info..: [none]                                 # Primary user id of OpenPGP key (if available).
gpg/card> quit                                             # Save and return to OS command line.
You can read up on details of each individual field in the GNU PG Dokumentation. If you are sharp-witted you may have already figured out, why I opted for generating keys of "only" 2048 bit length in part four of the series. The YubiKey NEO does not support longer keys. However, the YubiKey 4 is capable of holding keys of up to 4096 bit length. I'll explain why a NEO may be a good choice never the less later on.
Update 2018 Sep.: In the meantime, Yubico has released series 5 of the YubiKey. The NEO is now called YubiKey 5 NFC and supports RSA 4096. If you are planning on using your keys on such a device, you may choose 4096 bit key length for the subkeys. The theoretical disadvantages of a longer key are still valid. However, in practice those disadvantages tend to be small enough to remain unnoticed.
Export keys to token
Now let's get our hands dirty. The secret subkeys (see part four) must be exported onto the YubiKey. For your convenience, I reprint how your secret keyring should look like:
gpg -K
--------------------------------------
sec#  rsa4096/0x37F0780907ABEF78 2018-04-06 [C] [expires: 2019-04-06]       # 4096bit master key
      Key fingerprint = 6AA5 1DE4 2448 71E8 6C62  3672 37F0 7809 07AB EF78  # note the "#" behind "sec" -> key not in keyring
uid                   [ultimate] Jan Mosig <jan.mosig@itemis.de>            # primary user id
uid                   [ultimate] Jan Mosig <mosig@itemis.de>                # secondary user id
ssb   rsa2048/0xD40682450D56A765 2018-06-16 [E] [expires: 2019-04-06]       # 2048bit subkey (E)ncrypt
ssb   rsa2048/0x5B7CC3CB8C21B4BB 2018-06-16 [S] [expires: 2019-04-06]       # 2048bit subkey (S)ign
ssb   rsa2048/0x9476C6C66AC23C1D 2018-06-16 [A] [expires: 2019-04-06]       # 2048bit subkey (A)uth
In order to export the key, we must "edit" it in expert mode. It can be activated by adding the option --expert to the command gpg --edit-key <KEY_ID> hinzu:
gpg --expert --edit-key 0x37F0780907ABEF78
gpg (GnuPG) 2.2.7; Copyright (C) 2018 Free Software Foundation, Inc.
This is free software: you are free to change and redistribute it.
There is NO WARRANTY, to the extent permitted by law.

Secret subkeys are available.

pub  rsa4096/0x37F0780907ABEF78
     created: 2018-04-06  expires: 2019-04-06  usage: C
     trust: ultimate      validity: ultimate
ssb  rsa2048/0xD40682450D56A765
     created: 2018-06-16  expires: 2019-04-06  usage: E
ssb  rsa2048/0x5B7CC3CB8C21B4BB
     created: 2018-06-16  expires: 2019-04-06  usage: S
ssb  rsa2048/0x9476C6C66AC23C1D
     created: 2018-06-16  expires: 2019-04-06  usage: A
[ultimate] (1). Jan Mosig <jan.mosig@itemis.de>
[ultimate] (2)  Jan Mosig <mosig@itemis.de>

gpg>
The export itself works like this:
- Select a subkey with
key n. n stays for the number of the key from 1 - 3. - Call
keytocard. This will export the key automatically to the appropriate slot on the YubiKey.
For example with the first subkey, you would do:
gpg> key 1
pub  rsa4096/0x37F0780907ABEF78
     created: 2018-04-06  expires: 2019-04-06  usage: C
     trust: ultimate      validity: ultimate
ssb* rsa2048/0xD40682450D56A765                         # Note the "*" which indicates "selected".
     created: 2018-06-16  expires: 2019-04-06  usage: E
ssb  rsa2048/0x5B7CC3CB8C21B4BB
     created: 2018-06-16  expires: 2019-04-06  usage: S
ssb  rsa2048/0x9476C6C66AC23C1D
     created: 2018-06-16  expires: 2019-04-06  usage: A
[ultimate] (1). Jan Mosig <jan.mosig@itemis.de>
[ultimate] (2)  Jan Mosig <mosig@itemis.de>

gpg> keytocard
Please select where to store the key:
   (2) Encryption key                                   # Only one slot matches of course.
Your selection? 2
pub  rsa4096/0x37F0780907ABEF78
     created: 2018-04-06  expires: 2019-04-06  usage: C
     trust: ultimate      validity: ultimate
ssb* rsa2048/0xD40682450D56A765                         # Note the "*" which indicates "selected".
     created: 2018-06-16  expires: 2019-04-06  usage: E
ssb  rsa2048/0x5B7CC3CB8C21B4BB
     created: 2018-06-16  expires: 2019-04-06  usage: S
ssb  rsa2048/0x9476C6C66AC23C1D
     created: 2018-06-16  expires: 2019-04-06  usage: A
[ultimate] (1). Jan Mosig <jan.mosig@itemis.de>
[ultimate] (2)  Jan Mosig <mosig@itemis.de>
gpg>
If you happen to have misselected a key, you can toggle the selection by entering the same key n command again.
The operation keytocard requires you to enter the PGP key's passphrase and the YubiKey's admin PIN. If both have been entered correctly, the key will be exported. We are going to repeat these steps for the other two subkeys:
gpg> key 1                              # Deselect key 1.
...
gpg> key 2                              # Select key 2.
...
gpg> keytocard
Please select where to store the key:
   (1) Signature key
   (3) Authentication key
Your selection? 1
# Since key 2 is a signature key (notice "usage: S" behind its details)
# We choose "1" of course.
...
gpg> key 2                              # Deselect key 2.
...
gpg> key 3                              # Select key 3.
...
gpg> keytocard
Please select where to store the key:
   (3) Authentication key
Your selection? 3
...
gpg> key 3                              # Deselect key 3.
...
gpg> save                               # Save and quit.
The keys are now stored on the YubiKey. A look in the local keyring confirms this:
gpg -K
--------------------------------------
sec#  rsa4096/0x37F0780907ABEF78 2018-04-06 [C] [expires: 2019-04-06]       # Master key does not exist in keyring.
      Key fingerprint = 6AA5 1DE4 2448 71E8 6C62  3672 37F0 7809 07AB EF78
uid                   [ultimate] Jan Mosig <jan.mosig@itemis.de>
uid                   [ultimate] Jan Mosig <mosig@itemis.de>
ssb>  rsa2048/0xD40682450D56A765 2018-06-16 [E] [expires: 2019-04-06]       # The ">" indicates that the key has
ssb>  rsa2048/0x5B7CC3CB8C21B4BB 2018-06-16 [S] [expires: 2019-04-06]       # Been replaced by a stub. The stub
ssb>  rsa2048/0x9476C6C66AC23C1D 2018-06-16 [A] [expires: 2019-04-06]       # tells gpg where to find the real key.
The keys have been replaced by placeholders, so called stubs. The stubs tell gpg where to find the real key: On the YubiKey.
Update June 2019: I have created a collection of scripts that aim on making the whole process of generating keys and moving them onto the Yubikey easier. You may have a look at GitHub project yubiset.
What is it good for?
The big advantage is now that the keys are stored in a secure yet mobile place. An OpenPGP card provides no means in hardware or software to read the keys. There just doesn't exist an interface for this. This prevents attackers from stealing the keys.
However, a theft of the YubiKey itself is of course possible. However, even in this scenario, the keys are still secured by a PIN that can only be entered wrong for three times after which the YubiKey becomes blocked.
But how does signing and encrypting data work now? Easy: instead of performing the calculations themselves, gpg just sends appropriate commands to the YubiKey. e. g. "encrypt the following message". The cryptographic operations are then performed on the YubiKey by the YubiKey itself.
It is even possible to generate PGP keys directly on the YubiKey. In this case, they would never have been exposed to the outside world, saving them from any danger by theft or manipulation. Maybe I'll show how to do this in a future article.
A disadvantage is the limited calculation power of such a small device. The longer the key, the more time it needs to perform cryptographic operations. Due to this reason, the choice of key length is not only a matter of security but also a matter of usability.
YubiKey with Thunderbird and Enigmail
In order to use our setup with Thunderbird and Enigmail, you do not need to configure anything. Because Enigmail is essentially a graphical frontend for gpg; it is able to automatically use the YubiKey. What has changed though, is that instead of prompting for a passphrase, the user is now prompted for the YubiKey's PIN.
After entering the PIN, encryption and signature work as described in part five of the series.
Using the keys on other devices (USB)
Please stand in awe for a real feat: instead of having to cumbersomely copy our PGP keys onto different devices, we can now go ahead and setup our keys on every device with support for OpenPGP card - e. g. a simple PC with gpg installed - by the help of one simple command. All this does not require the keys to leave the Yubikey ever, nor does it span multiple copies of the keys.
gpg -K
<GPG_HOME>/pubring.kbx
--------------------------------------
                                                        # Keyring is empty.
gpg --edit-card                                         # Automatically creates necessary stubs.
Reader ...........: Yubico Yubikey NEO OTP U2F CCID 0
Application ID ...: D2760001240102000006063538460000
Version ..........: 2.0
Manufacturer .....: Yubico
Serial number ....: 06353846
Name of cardholder: Jan Mosig
Language prefs ...: de
Sex ..............: männlich
URL of public key : https://sks-keyservers.net/pks/lookup?op=get&search=0x37F0780907ABEF78
Login data .......: jan.mosig@itemis.de
Signature PIN ....: zwingend
Key attributes ...: rsa2048 rsa2048 rsa2048
Max. PIN lengths .: 127 127 127
PIN ret
ry counter : 3 3 3
Signature counter : 0
Signature key ....: D7AB 286D 68AB F9BB 0EA4  E7C7 5B7C C3CB 8C21 B4BB
      created ....: 2018-06-16 20:26:24
Encryption key....: 2A4C 56FF D2E7 45A8 F20C  9D77 D406 8245 0D56 A765
      created ....: 2018-06-16 20:24:02
Authentication key: 1579 B922 68CB EB87 4864  F4C1 9476 C6C6 6AC2 3C1D
      created ....: 2018-06-16 20:27:21
General key info..: sub  rsa2048/0x5B7CC3CB8C21B4BB 2018-06-16 Jan Mosig <jan.mosig@itemis.de>
sec#  rsa4096/0x37F0780907ABEF78  erzeugt: 2018-04-06  verfällt: 2019-04-06
ssb#  rsa4096/0x82AF300A5B9A49F5  erzeugt: 2018-04-06  verfällt: 2019-04-06
ssb#  rsa4096/0xCE17256FB5C98A0F  erzeugt: 2018-04-06  verfällt: 2019-04-06
ssb#  rsa4096/0xF0AA7B5E7B4C6549  erzeugt: 2018-04-06  verfällt: 2019-04-06
ssb>  rsa2048/0xD40682450D56A765  erzeugt: 2018-06-16  verfällt: 2019-04-06
                                  Kartennummer:0006 06353846
ssb>  rsa2048/0x5B7CC3CB8C21B4BB  erzeugt: 2018-06-16  verfällt: 2019-04-06
                                  Kartennummer:0006 06353846
ssb>  rsa2048/0x9476C6C66AC23C1D  erzeugt: 2018-06-16  verfällt: 2019-04-06
                                  Kartennummer:0006 06353846
# Now fetch our public key via the configured url
gpg/card> fetch
gpg: requesting key from 'https://sks-keyservers.net/pks/lookup?op=get&search=0x37F0780907ABEF78'
gpg: key 0x37F0780907ABEF78: 2 signatures not checked due to missing keys
gpg: key 0x37F0780907ABEF78: "Jan Mosig <jan.mosig@itemis.de>" not changed
gpg: Total number processed: 1
gpg:              unchanged: 1

gpg/card> quit
# done
It does only need the command gpg --card-status. That's all it needs to configure the keys on a new system. A big time saver and very handy. The example also reveals the purpose of the url field we set earlier. It serves as a prerequisite for the fetch command of gpg shell. This command downloads our public key from the URL mentioned in that field. No need to juggle around complicated key IDs and keyserver URLs anymore.
Using the keys on mobile devices (NFC)
Ok great! We can now configure our keys easily on other devices. Well, at least if they happen to feature a free USB port. But how to use the YubiKey along with the stored PGP keys on a smartphone?
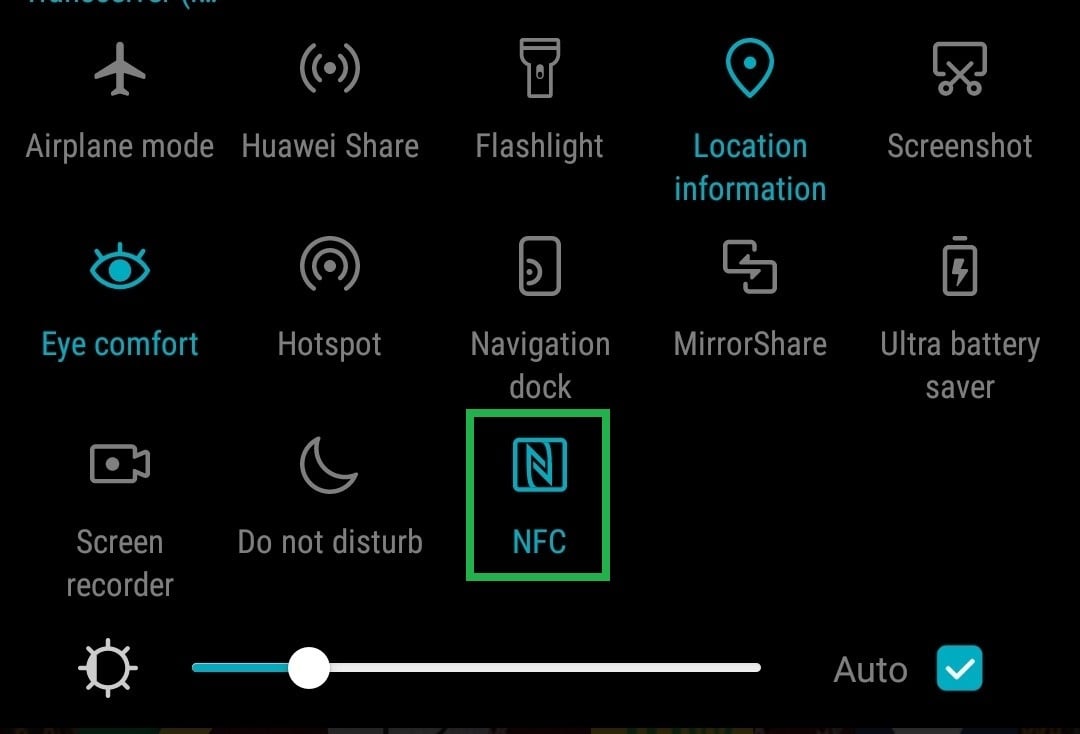
Time for the next miracle. The magic word is Near Field Communication, (NFC). This is a wireless communication protocol which uses RF fields and induction that limit it to short range only. A commonly known use of NFC is contactless payment.
This explains, why I chose the YubiKey NEO over its cheaper and more powerful brother, the YubiKey 4; the NEO supports NFC. This enables me to use the same key on my office workstation as well as on my smartphone. Not only can I use OpenPGP there, I can also use all the NEO's 2FA functionality.
Update September 2018: in the meantime, Yubico has released series 5 of the YubiKey. The NEO is now called YubiKey 5 NFC.
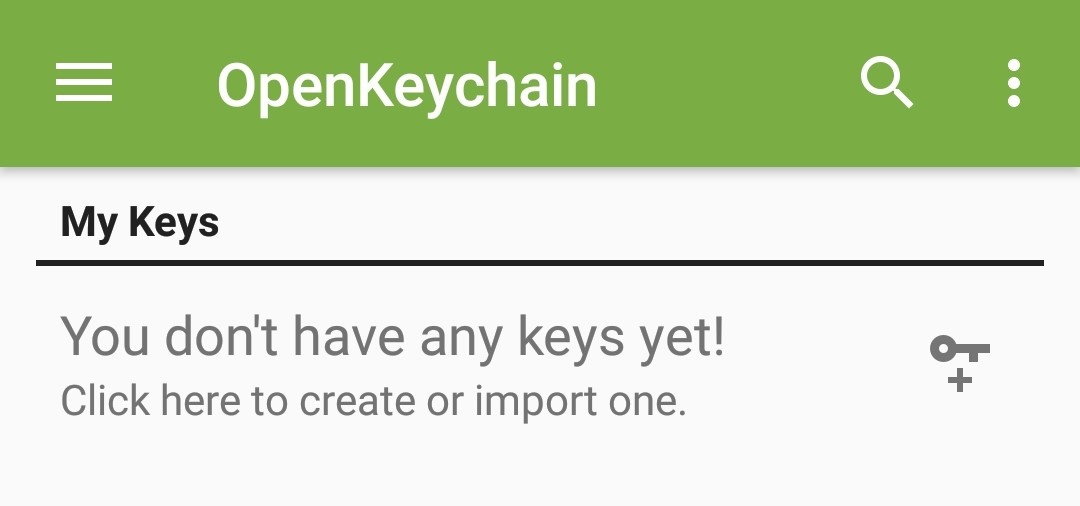
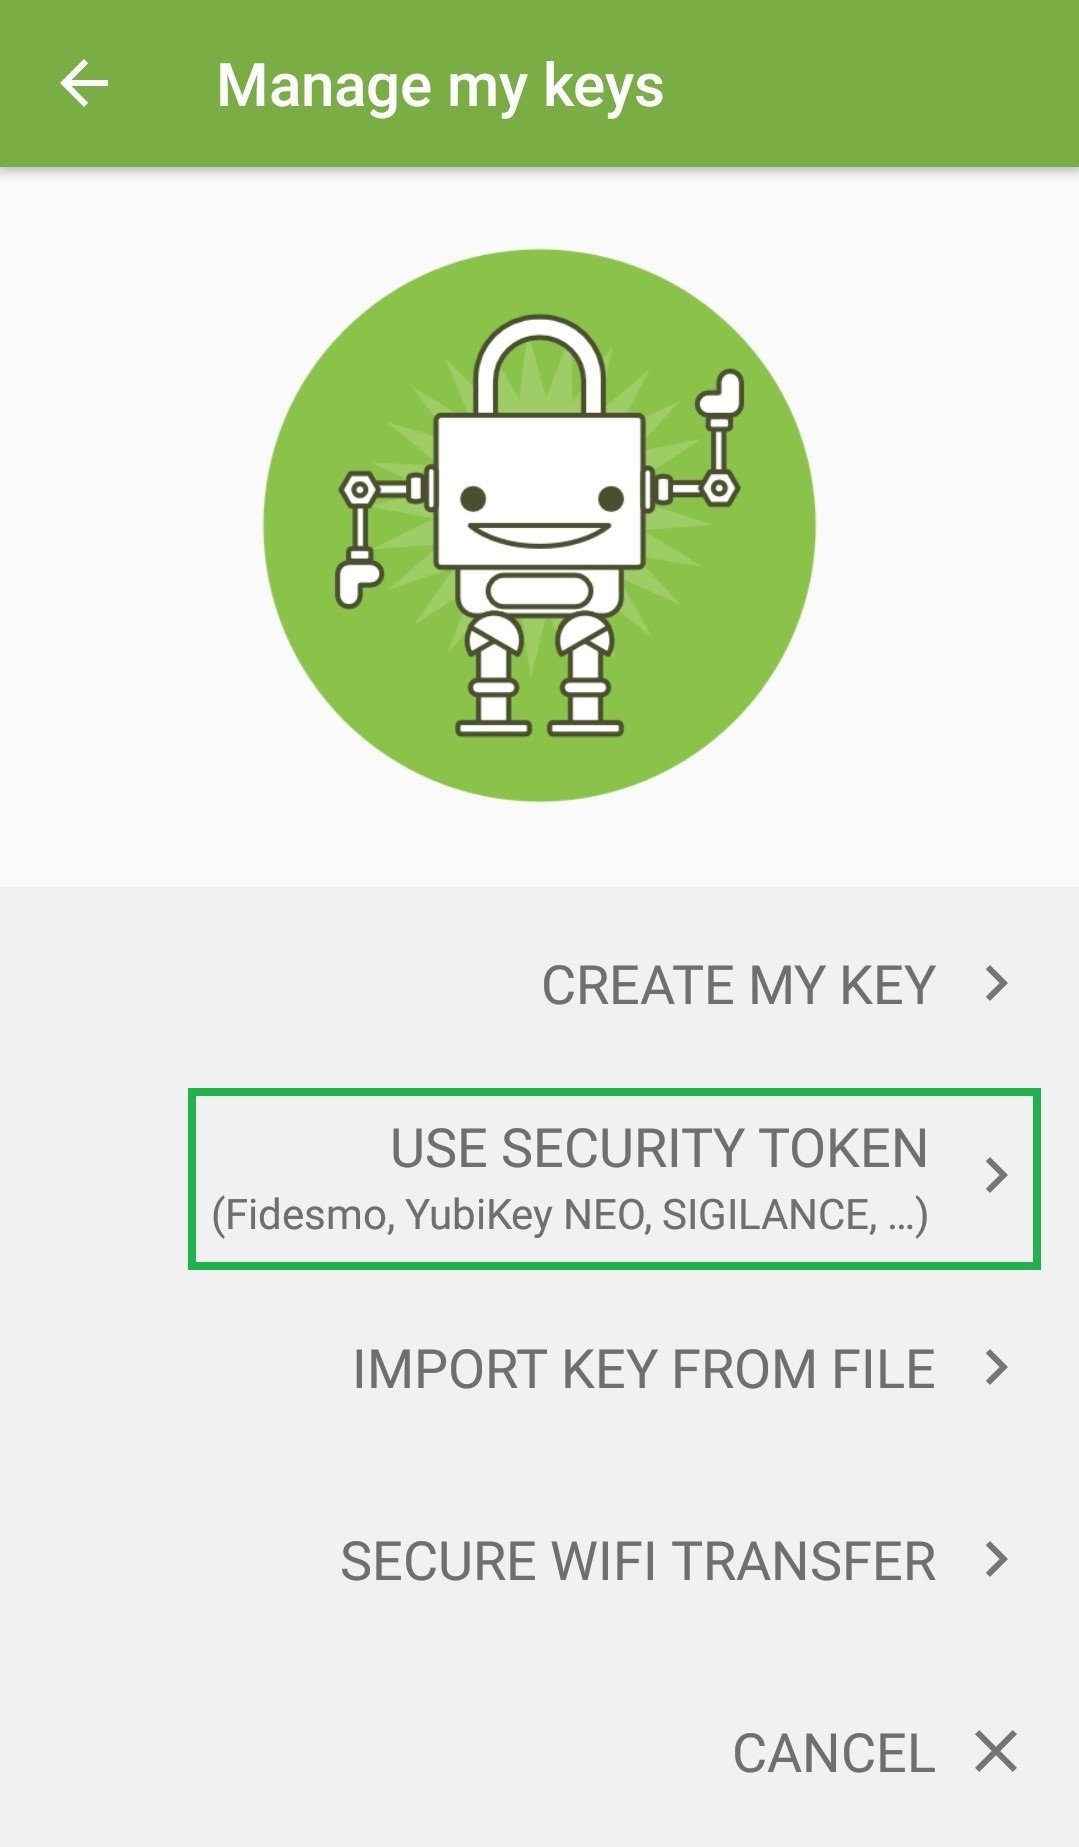
On Android the YubiKey is supported by OpenKeychain (see part six). A precondition is that your smartphone supports NFC. In this case, you just need to follow the instructions on the screen:
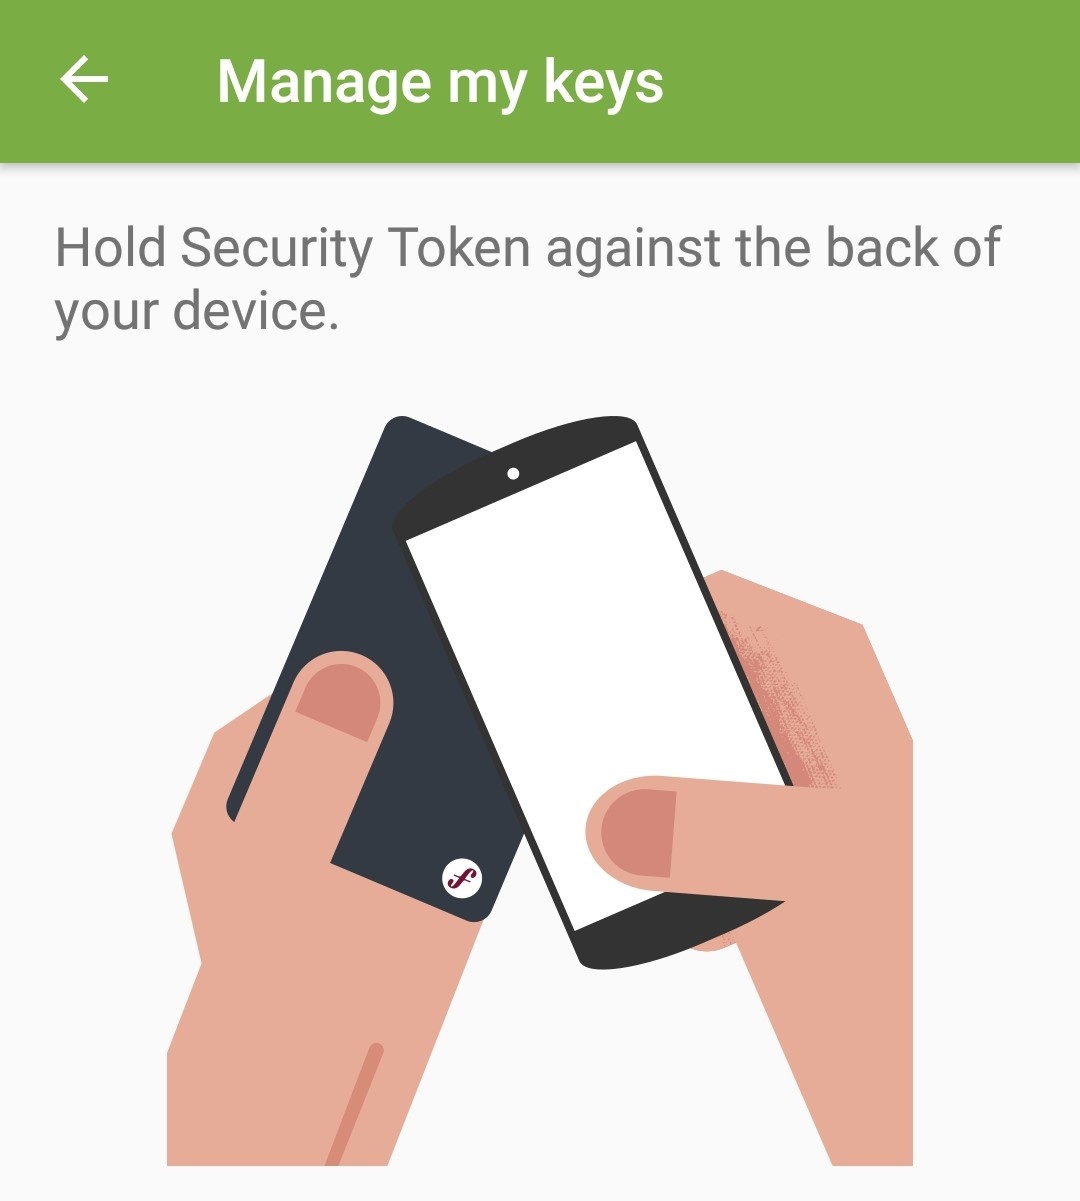
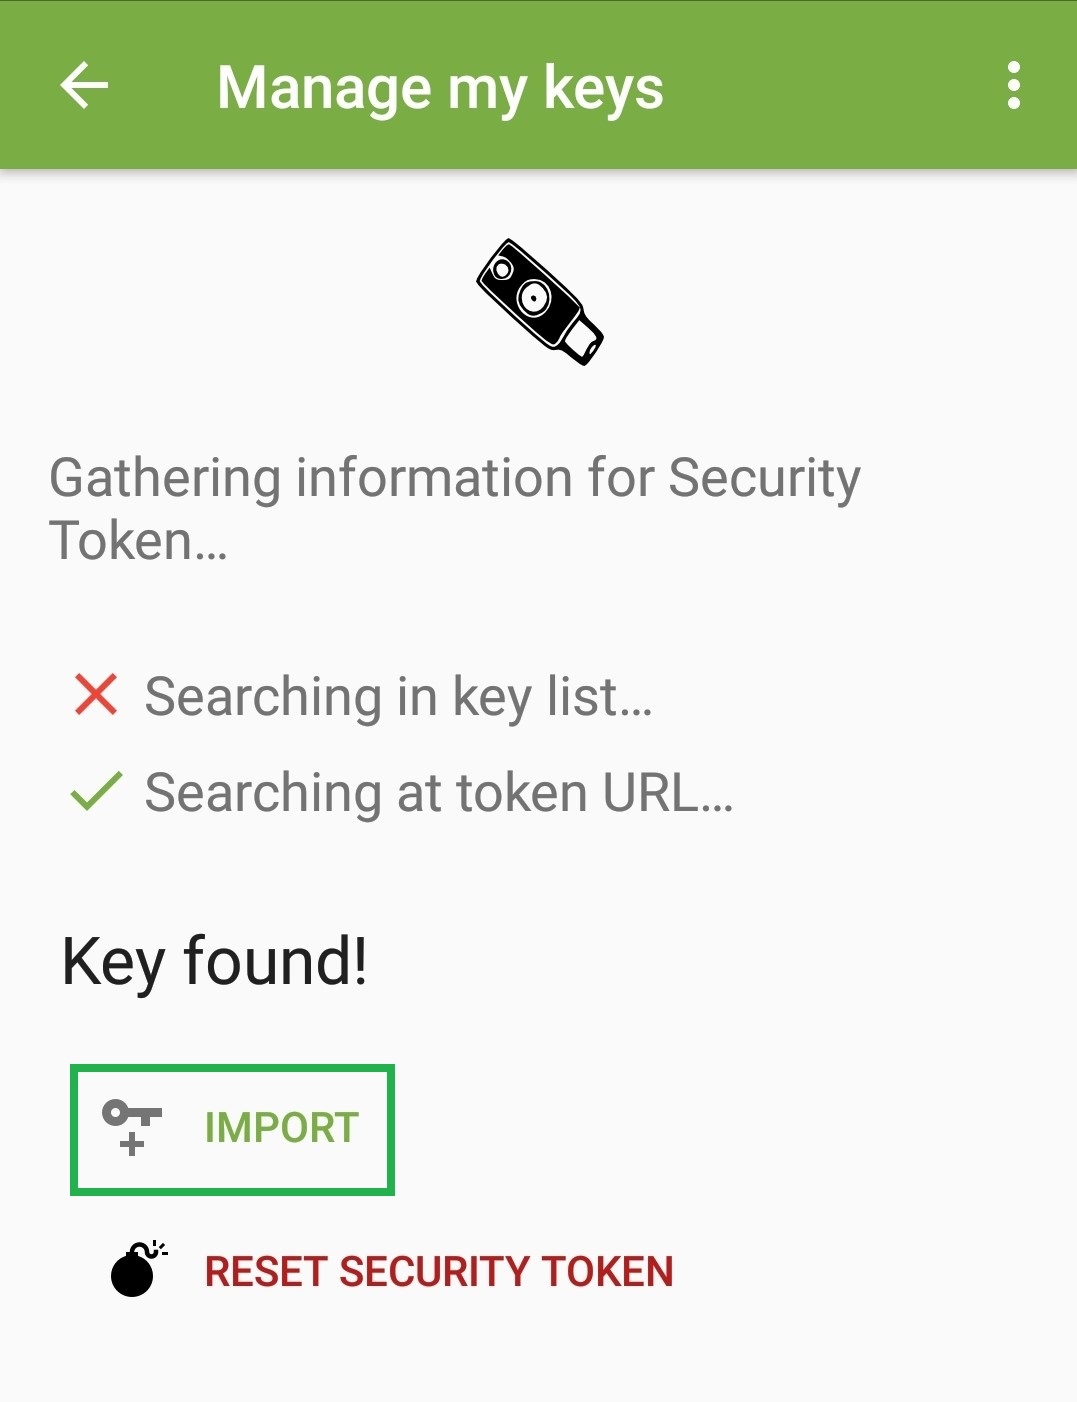

This finishes the configuration. Like on the PC, OpenKeychain just creates stubs. The keys stay on the YubiKey and are not copied. Encryption and signature via K-9 Mail now prompt for the NEO's PIN instead of the PGP key's passphrase. Data transfer is done by placing the YubiKey on the phone. The crypto operations are then performed by the YubiKey. Everything else stays unchanged.
It may be that the exact location where to place the key on your phone must be searched for on the first try (depending on where the NFC antenna has been built in). On my phone, it is located at the upper end of the device.
In the world of Apple, virtually all devices running iOS 11 (iPhone 7 and above) provide NFC support and thus may also support the NEO.
There are also nano flavors of YubiKeys available that come with an USB-C interface. Currently, I cannot tell if and how these may work on a smartphone's USB-C port.
Coming up next
We've achieved quite a lot now. Not only do we have a working OpenPGP setup on our workstation and on our mobile Android device. With the YubiKey, we also have an easy to use yet secure and mobile means of storing our PGP keys.
In the next part of the series, I'm going to show you the crown jewel of the series: setting up SSH authentication on a remote server with an OpenPGP key that is securely stored on a YubiKey. Never again will you have to generate, manage and keep these extra SSH keys around which tend to get lost in one of these important moments anyway. It almost feels like flying!
Comments