
Being an employee in the IT myself, I often need to access remote machines. Most of the time, SSH and public key cryptography is used here. But although I do use OpenPGP for mail and data encryption, I still need an extra SSH key pair for this kind of remote access. This tends to become annoying and cumbersome. In this article I'm going to show you how to use your PGP key with SSH, thus making the SSH key pair obsolete.
This article is part of our series “OpenPGP On The Job”. Would you like to continue with another article from this series? Here’s an overview.

Accessing Remote Machines With SSH
The so-called secure shell is very popular in the world of IT. It provides encrypted access to a remote machine. Most of the time a command line is used in context with remote SSH access, but it is also possible to tunnel services not available in your network or copy data.
To authenticate yourself to the remote machine, nowadays public key cryptography is used instead of the old-fashioned user / password combination. This is very similar to the cryptography algorithms used in OpenPGP, e. g. SSH access and OpenPGP encryption may both be implemented by using RSA.
Problem: Twice the Work
Despite the fact that both technologies use the same kind of algorithm in theory, in praxis the generated key pairs are not compatible to each other, because they are stored with incompatible formats. Thus, SSH cannot read OpenPGP key pairs and vice versa.
This is the reason why it is required to keep a a dedicated SSH key pair around right next to your OpenPGP key pair. The SSH key pair resides in its own key ring and adheres to the SSH security functions and limitations.
This means you do not only need to learn two technologies, you are also going to have twice the work with key management. Especially when usage on other devices is required, you need to carry around or copy your SSH keys.
My SSH keys are often related to a project, so over the years I have collected quite a few of them. They also tend to become invisible right then when I happen to need them. In this case, I need to generate new ones and also need to provision them to the remote machines. This costs precious time and is very annoying. I even noticed that I do not care as much about passphrase and key security as I do for my OpenPGP keys, i. e. security could be compromised by those annoyances.
Solution: Convert PGP Keys
Wouldn't it be nice, if we used our precious PGP keys to authenticate with SSH enabled remote machines? This would make the extra SSH keys obsolete. A natural solution would be to convert the PGP keys to SSH keys.
What a nice surprise that gpg is capable of doing this since version 2.2., meaning all recent versions (including gpg4win) should have this capability.
But wait: just keeping an SSH variant of your PGP key pair around does not really solve the problem. If you followed part seven of the series, your keys will reside on an OpenPGP-card, making it hard to convert them in the first place. In addition, you would still end up having to manage two key pairs, where the SSH one cannot be used without hassle on other devices.
The solution for this situation is the so called "on the fly" conversion of secret keys. gpg may be configured in such a way, so that during a SSH request, the secret PGP keys are temporarily converted, so that ssh may be able to use them. I'm going to show you how to set this up on Windows.
Setting up "SSH over OpenPGP"
There are multiple ways to achieve this. I'll show you one that is based on the usage of gpg4win and git bash. We are going to use the SSH client of git bash which in turn is based on MSYS. This carries the advantage of being able to use ssh, git (commit signing) and Unix tools in one shell. The other widely known SSH client on Windows - PuTTY - is too cumbersome in my opinion. You can also exchange ssh commands more easily between Windows and Unix by using git bash.
I use OpenPGP key pairs based on RSA – whether my solution also works with key pairs based on ECC, I cannot say.
You will need to meet the following requirements:
- The remote machine's
sshmust support authentication via public key encryption. - A working gpg4win installation (see part three).
- A working git for Windows installation.
- An OpenPGP key with property Authenticate. We created one of these as a subkey in part four.
We are going to use the ssh client that comes with the git bash installation. You may also optionally decide to install winpty (choose the MSYS variant), which would be very beneficial (see below).
You need to be aware of two things when working with git bash on Windows:
- Native Windows console applications (e. g.
gpgclient ortelnet) may have problems when printing or reading characters to / from the git bash. In this situation you may consider using winpty which emulates a fitting Windows terminal. Usage is fairly simple:winpty <command>, e. g.:winpty telnet - git bash brings along its own
gpgclient. We are not going to use this one, because we already have gpg4win. In addition, some gpg4win commands do have problems with character visualisation in git bash. In order to combine gpg4win, git bash and winpty in an easy to use way, you may want to set up a so-called alias in the fileC:\Users\<USER>\.bashrc. Mine looks like this:
export LC_ALL="de_DE.UTF-8"
alias gp='git fetch -p && git pull'
alias gpgw='winpty /c/devtools/gnupg/bin/gpg' #Absolute path to gpg4win executable.
alias gpg2='gpgw'
By entering gpgw, you can now start the correct gpg client and an appropriate terminal emulation.
Upload Your Public Key to the Remote Machine
As a first step, you need to upload your public key to the machine you want to connect to. This is required in order for SSH to be able to execute the public key authentication. For this to work, we need to export our public PGP key in SSH format. This can be done like this:
# The key ID of my public key is 0x37f0780907abef78.
gpg --export-ssh-key 0x37f0780907abef78 > 37f0780907abef78.pub.ssh
The contents of this file must be entered into the server's SSH setup. Usually the key is added into the file ~/.ssh/authorized_keys. If you don't have appropriate permissions to do this, you may ask a server admin to do this. This step must only be done once.
Make GPG Agent Speak SSH
In order to use the "on the fly" functionality of OpenPGP, you need to reconfigure gpg-agent. Just add the line enable-putty-support into the file <GNUPGHOME>\gpg-agent.conf.
Even though we are not going to use PuTTY, we do actually configure the agent so that it talks to other programs via the so-called PuTTY protocol. Just think of it as a kind of language for public key enabled agents. In the next step, we are going to teach SSH to speak the same protocol. With this trick, we can create a connection between the SSH world and the OpenPGP world.
Right now we need to restart the gpg-agent daemon so that it may notice the configuration changes. On the Windows command prompt this looks like this:
C:\>gpg-connect-agent killagent /bye
OK closing connection

C:\>gpg-connect-agent /bye
gpg-connect-agent: no running gpg-agent - starting 'C:\devtools\gnupg\bin\gpg-agent.exe'
gpg-connect-agent: waiting for the agent to come up ... (5s)
gpg-connect-agent: connection to agent established
Connect git bash SSH Client With gpg4win
The ssh client must ask the gpg-agent for keys via the PuTTY protocol. We will use the tool ssh-pageant to accomplish this. This tool is coming with git bash and can replace the original ssh-agent. The task of the ssh-agent is to provide the ssh client with easy yet secure access to the keyring without the need for ssh to know anything about how keys are actually accessed.
The ssh-pageant provides the same kind of functionality to ssh but, as opposed to ssh-agent, does speak the PuTTY protocol. This enables ssh to speak with the gpg-agent via the ssh-pageant.
In order to set this up, you need to start ssh-pageant with some environment variables being set. You can set up variables and start ssh-pagent with this command:
$ eval $(/usr/bin/ssh-pageant -r -a "/tmp/ssh-pageant-$USERNAME")
ssh-pageant pid 16804 # Command output
For non-console heroes, it is not very easy to understand what is going on here. Thus, I have written it down for you and me:
eval(short for evaluate) is a bash command that runs all its arguments as separate bash commands.$( ... )the command in between the braces is executed beforeevalgets executed. The complete output of this command is going to become arguments foreval./usr/bin/ssh-pageant -r -a <FILE> –Use the fileFILEfor data exchange withgpg. Create it, if it does not exist./tmpis per default "resolved" by git bash toC:\Users\<USERNAME>\AppData\Local\Temp. This is the default temporary directory of a local Windows account.ssh-pageant-$USERNAME –The file name of the file via which data is exchanged.$USERNAMEis resolved to the currently logged in user's name right before thessh-pageantcommand is executed. The file's name would bessh-pageant-mosig_useron my machine.ssh-pageant pid 16804is the output of theevalcommand.ssh-pageantis now a background service (daemon) with process id (PID) 16804 (may be different on your machine).- If you happen to start
ssh-pageantwithouteval, it will print some commands for setting environment variables to the console:
$ /usr/bin/ssh-pageant -r -a "/tmp/.ssh-pageant-$USERNAME"
SSH_AUTH_SOCK='/tmp/.ssh-pageant-mosig_user'; export SSH_AUTH_SOCK;
SSH_PAGEANT_PID=16804; export SSH_PAGEANT_PID;
echo ssh-pageant pid 16804;
eval, the shell will set these variables and start ssh-pageant. Because the variables get lost when the shell is restarted, this command needs to be executed every time you want to use PGP via SSH.
Start ssh-pageant Automatically
In order to not having to lookup and run the eval command every time, you may want to add it into C:\Users\<USER>\.bashrc. It will then be executed every time you run a new git bash. In case ssh-pageant is already running, it also takes care of not starting another one if requested. My .bashrc now looks like this:
export LC_ALL="de_DE.UTF-8"
alias gp='git fetch -p && git pull'
alias gpgw='winpty /c/devtools/gnupg/bin/gpg'
alias gpg2='gpgw'
eval $(/usr/bin/ssh-pageant -r -a "/tmp/.ssh-pageant-$USERNAME")
export SSH_PAGEANT_PID=$(ps | grep $(which ssh-pageant) | head -n 1 | awk '{print $1}')
The last line is a trick for being able to stop ssh-pageant every time I want to. Usually you would do this with ssh-pageant -k. Butt you are going to need the current process id (PID) stored into the environment variable SSH_PAGEANT_PID for this to work. Otherwise this will happen:
$ ssh-pageant -k
ssh-pageant: SSH_PAGEANT_PID not set, cannot kill agent
The command in the last line of my .bashrc takes care of setting up this variable. The eval command from above will only set this variable in case ssh-pageant is not already running.
# No instance running yet.
$ /usr/bin/ssh-pageant -r -a "/tmp/.ssh-pageant-mosig_user"
SSH_AUTH_SOCK='/tmp/.ssh-pageant-mosig_user'; export SSH_AUTH_SOCK;
SSH_PAGEANT_PID=4772; export SSH_PAGEANT_PID;
echo ssh-pageant pid 4772;

# One instance running. SSH_PAGEANT_PID is not set.
$ /usr/bin/ssh-pageant -r -a "/tmp/.ssh-pageant-mosig_user"
SSH_AUTH_SOCK='/tmp/.ssh-pageant-mosig_user'; export SSH_AUTH_SOCK;
This is not enough when opening multiple git bash windows (i. e. multiple git bash instances). You'll need this additional export to make sure, the environment variable is always set in every git bash instance. I took some help from superuser.com in order to find out, how to acquire the PID of a running process with git bash.
Be Careful With pageant.exe
PuTTY does also bring along its own agent pageant.exe. You should only run one of the two but not both, because they do not seem to come along well.
This completes our setup. Time to try it out!
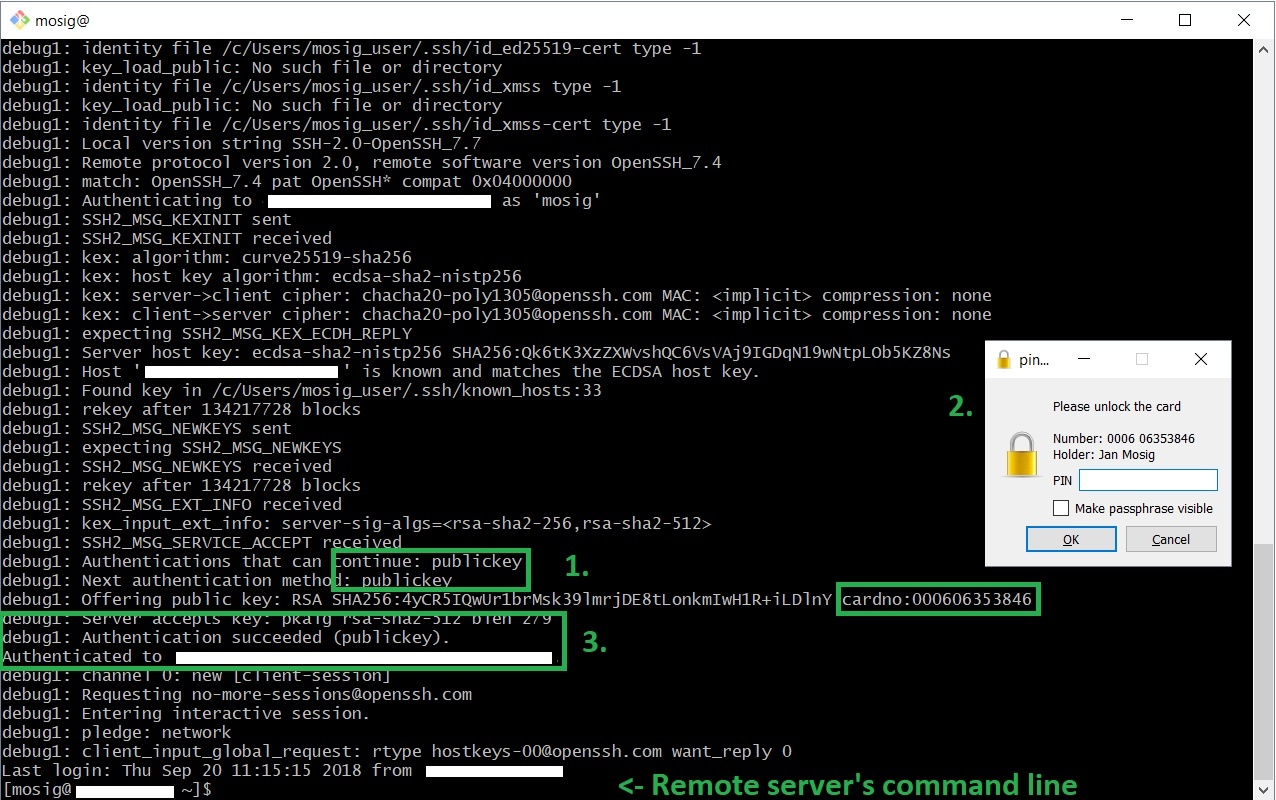
Connecting via SSH With PGP keys
The actual ssh command stays the same. Because ssh-pageant decouples ssh from key access details, ssh is not aware of any of our setup and does not need to be. This does also mean that ssh does not care about whether your keys are stored on your machine or on an OpenPGP-card, e. g. a YubiKey. As soon as gpg has access to the keys, ssh does also have access to them. That is the beauty of this concept.
Thus, you log in as usual. In the example below, I activated debug output with -v in order for you to see what is going on:
$ ssh mosig@server_url -v
ssh will now execute a handshake with the server. In the process it will be asked to proof that it has access to the private key matching the public key we recently uploaded to the server. In my case, this key is stored on my YubiKey. This is the reason why I am asked for my YubiKey's PIN upon ssh login. This process of accessing keys and performing the proof is completely controlled by gpg4win. After successfully entering the PIN, the connection will be successfully created.
Outlook
If you have followed all parts of the series, you are now the owner of a full-fledged OpenPGP setup that can even be used for SSH. This eradicates many common hassles during daily work.
But be aware: using the same key for several resources means that every one of these is going to be compromised as soon as your key gets compromised. You may want to give it some thought in order to find a good trade-off between usability and security.
A good approach to counter these effects may be to generate and store multiple OpenPGP keys on different YubiKeys which can then be used to access critical resources. This would literally give you a ring of keys - both virtual and physical - for your various accounts.
Comments