
 Information: YAKINDU Statechart Tools Is Now itemis CREATE
In the first part, we have integrated Java functionality into a YAKINDU statechart. In our particular case, it is a Java method that delivers a random value allowing the statechart to behave like a dice. Watching that dice may be nice, but now we want to move on to our second major scenario and control the dice statechart from an external application, in our case a Java program. Within that program, we can create, start and terminate the statechart, read statechart variables as it executes, raise events, pass values into the statechart, receive outgoing events, etc.
YAKINDU Statechart Tools (now itemis CREATE) can turn a graphically-modeled statechart into Java source code, and that’s the way to integrate it into your own Java application. Alternatively, you could use C or C++. YAKINDU Statechart Tools (now itemis CREATE) comes with source code generators for Java, C, and C++ out of the box. Support for additional languages is available, too, and you could even write your own generator for your own language, if you want.
Creating a generator model for the statechart
For generating a statechart as Java source code, we need a so-called generator model. It controls the details of how code generation is done.
In the main menu, select New → Other … → YAKINDU SCT → Code generator model. In the wizard, change the name of the generator model file from default.sgen to dice.sgen. Make sure that YAKINDU SCT Java Code Generator is selected as the generator, and check dice.sct as the statechart to generate as source code.
Clicking on Finish creates the dice.sgen generator model file and opens it in an editor. You should add the configuration features highlighted below:
GeneratorModel for yakindu::java {

    statechart Dice_rolling {

        feature Naming {
   	    basePackage = "de.itemis.examples.dice"
   	}

    	feature GeneralFeatures {
   	    TimerService = true
   	}

   	feature Outlet {
   	    targetProject = "dice"
   	    targetFolder = "src-gen"
   	    libraryTargetFolder = "src"
   	}
    }
}
The generator model controls the Java code generation, and indeed the Java code has already been generated. You can find it in the src and src-gen folders. Actually (and unfortunately), it has even been generated twice: first into the dice package and then, due to our modifications, into the de.itemis.examples.dice package, too. You should remove the former one. By the way, you can remove any generated files anytime. Recreating them is always possible by right-clicking on dice.sgen and then selecting Generate Code Artifacts.
What’s more important: The source code is recreated each time you modify the statechart model. Thus, once you have set up the generator model properly, you usually won’t have to worry about it anymore. The generated code is always in sync with your statechart.
Oh, you also have to let the Java builder know that it should look into the src-gen folder for Java source files: Right-click on that folder, then select Build Path → Use as Source Folder. The src-gen folder contains those sources that will change when you modify your statechart, while the Java sources generated in src are agnostic to model changes.
Writing the Java application
The first version of our Java application should do the following:
- Create and initialize the statechart.
- Enter the statechart.
- Throw the dice a number of times. Each time, print the face value and the accumulated counters.
- Exit the statechart.
So here’s the code, which I created as the Java source file StatechartController.java. Some aspects of it I am going to explain in a second.
package de.itemis.examples.dice;

import java.util.concurrent.ThreadLocalRandom;

import de.itemis.examples.dice.dice_rolling.Dice_rollingStatemachine;
import de.itemis.examples.dice.dice_rolling.Dice_rollingStatemachine.State;
import de.itemis.examples.dice.dice_rolling.IDice_rollingStatemachine.SCInterfaceOperationCallback;

public class StatechartController {

    class MyOperationsImplementation implements SCInterfaceOperationCallback {

        public long dice() {
            final int MIN = 1;
            final int MAX = 6;
            return ThreadLocalRandom.current().nextInt(MIN, MAX + 1);
        }
    }

    private Dice_rollingStatemachine statemachine;

    private void setUp() {
        statemachine = new Dice_rollingStatemachine();
        statemachine.getSCInterface().setSCInterfaceOperationCallback(new MyOperationsImplementation());
        statemachine.init();
    }

    private void run() {
        setUp();
        statemachine.enter();
        assertTrue(statemachine.isStateActive(State.main_region_Rolling_the_dice));

        for (int i = 1; i <= 1000; i++) {
            long fv = statemachine.getFaceValue();
            assertTrue(fv >= 1 && fv <= 6, "Face value is not between 1 and 6.");

            statemachine.runCycle();
            assertTrue(statemachine.isStateActive(State.main_region_Results));

            System.out.print("cycle: " + i + ", ");
            System.out.print("faceValue: " + fv + ", ");
            System.out.print("count1: " + statemachine.getCount1() + ", ");
            System.out.print("count2: " + statemachine.getCount2() + ", ");
            System.out.print("count3: " + statemachine.getCount3() + ", ");
            System.out.print("count4: " + statemachine.getCount4() + ", ");
            System.out.print("count5: " + statemachine.getCount5() + ", ");
            System.out.print("count6: " + statemachine.getCount6());
            System.out.println();

            statemachine.runCycle();
            assertTrue(statemachine.isStateActive(State.main_region_Rolling_the_dice));
        }

        statemachine.exit();
    }

    private void assertTrue(boolean assertion) {
        assertTrue(assertion, "");
    }

    private void assertTrue(boolean assertion, String message) {
        if (!assertion)
            throw new RuntimeException("Assertion failed! " + message);
    }

    public static void main(String[] args) {
        StatechartController statechartController = new StatechartController();
        statechartController.run();
    }

}
The run() method [line 28] does the bulk of the work. After calling the setUp() method [line 29] to perform some initial actions – we’ll look at them later –, the statechart is available as an object in the statechart variable.
Here’s the statechart from part 1 again:

Figure 1: Repeatedly throwing the dice in a loop
Calling the statechart’s enter() method starts the state machine [line 30]. The execution flow traverses from the initial state to the Roll_the_dice state. We can verify that we are really at that state using the following statement in [line 31]:
assertTrue(statemachine.isStateActive(State.main_region_Rolling_the_dice));
Rolling the dice a thousand times is done in the for loop [line 33]. When the loop is entered, the execution flow is at the Roll_the_dice state. That means, the dice() operation has already been executed and the statechart variable faceValue should have a valid value between 1 and 6. We can retrieve that value from the state machine via statemachine.getFaceValue() [line 34] and then check whether it is in the required range or not [line 35].
Now statemachine.runCycle() is called [line 37]. This statement instructs the state machine to execute a single run-to-completion step. In our case, that means the state machine evaluates the guard conditions of the transitions and proceeds to one of the D… states. Since they are contained in the Results composite state, it is sufficient to verify that the latter is active [line 38].
The following statements again demonstrate how to read statechart variables [lines 42–47]. By the way, the statechart also provides corresponding setter methods, allowing to change variables.
Another call to statemachine.runCycle() is made [line 50]. It causes the state machine to transition back to the Roll_the_dice state.
Finally, after having performed the predefined number of loop cycles, statemachine.exit() is called to terminate the state machine [line 54]. All statechart variables become undefined.
Setting up the state machine
We have so far skipped looking at how to set up the state machine. This is done in the setUp() method [line 22] and consists of the following steps:
- The statement statemachine = new Dice_rollingStatemachine() creates the state machine instance [line 23]. It is an object of the generated Dice_rollingStatemachine class. Look at the IDice_rollingStatemachine interface to learn which methods etc. this particular state machine supports.
- If a statechart uses operations – and our’s does so –, the Java application has to make them available to the state machine. For this purpose, they have to be implemented as methods of a class that implements the SCInterfaceOperationCallback interface. The MyOperationsImplementation is such a class [line 11], implementing the required dice() method [line 13].
- The statement statemachine.getSCInterface().setSCInterfaceOperationCallback(new MyOperationsImplementation()) makes the MyOperationsImplementation instance available to the state machine [line 24], so that the latter can execute the operations defined therein.
- If a state machine uses timed events – and our's does not –, the application must provide it with a timer implementation. YAKINDU Statechart Tools (now itemis CREATE) comes with a default timer service. If you want to use it, include this statement: statemachine.setTimer(new TimerService()).
- As a last set-up step, statemachine.init() is invoked to initialize the state machine’s internals and those variables that have default values [line 25].
Executing the Java program
In the project explorer view, right-click on StatechartController.java and select Run As → Java Application.
Passing parameters to the state machine
Now let’s go a step further. Instead of having the state machine actively call the dice() method, we want to pass the faceValue from the outside into the state machine and then let it work on it. That’s actually quite easy.
The first step is to remove the dice() operation from the statechart and the entry action from the Rolling_the_dice state. Saving the statechart now leads to an error in our StatechartController Java class, because the SCInterfaceOperationCallback interface is no longer defined. The code generator has created the modified statechart as Java source code, and since that statechart does without any operations, the SCInterfaceOperationCallback interface is no longer needed and thus removed.
Consequently, we have to adapt our Java class to that circumstance. We remove the now erroneous import statement and the local class MyOperationsImplementation. However, we still need the dice() method, so we’ll keep it. In the setUp() method, we remove the long line setting the operations callback.
The second step is to retrieve the random value in the Java application and pass it to the state machine. We have to do this each time the for loop executes:
for (int i = 1; i <= 1000; i++) {
    long fv = dice();
    statemachine.setFaceValue(fv);
After having set the state machine’s faceValue variable, suspicious souls might want to retrieve it again to make sure it has actually been set correctly:
assertTrue(fv == statemachine.getFaceValue(),
    "Face value is expected to be " + fv + ", but is " +
    statemachine.getFaceValue() + " instead.");
After that, we call statemachine.runCycle() and continue as before.
Raising an event programmatically
Another important means of controlling a state machine is raising events in the state machine and receiving events the state machine has raised. If the statechart defines an incoming event named foobar, the generated code contains a method named raiseFoobar(). Calling this method raises that event in the state machine.
An event can also carry a value of a primitive type, for example an integer. We can take advantage of this feature by raising an event in the state machine with the dice’s face value as the event’s value.
But let’s have a look at the modified statechart first:
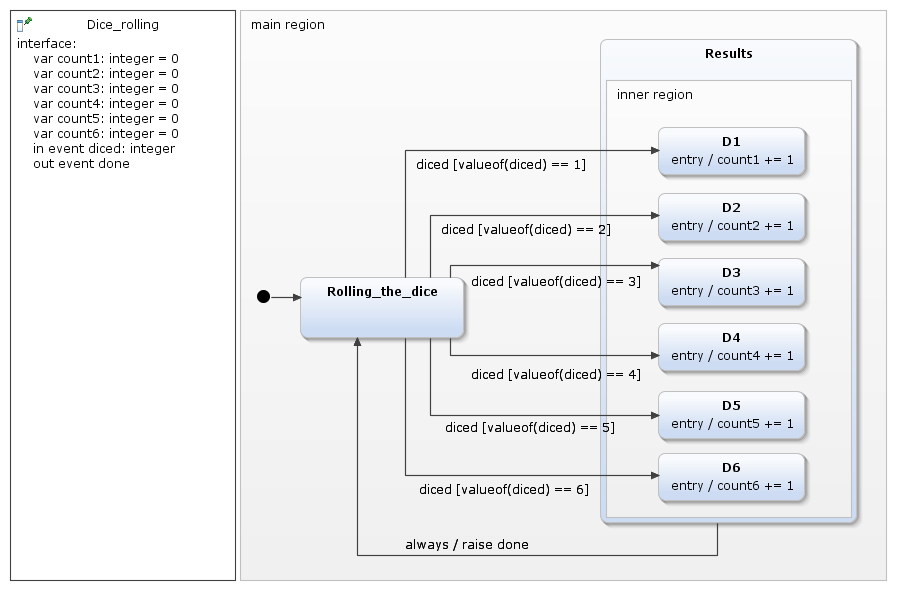
Figure 2: Submitting the dice’s face value as an event
The faceValue variable is completely gone. There are two new elements: the incoming event diced of type integer and the outgoing event done. Instead of checking the faceValue variable, the transitions’ guards now check the value of the diced event.
Another addition is the outgoing done event. The state machine raises it after processing the face value has been completed, and the event signals that fact to the “outer world”. Admittedly, it does not make much sense in this context. However, I included it here to show you the mechanics.
How does the corresponding Java code look like? Here’s the for loop (output statements omitted for brevity):
for (int i = 1; i <= 1000; i++) {
    long fv = dice();
    statemachine.raiseDiced(fv);

    statemachine.runCycle();
    assertTrue(statemachine.isStateActive(State.main_region_Results));
    assertTrue(!statemachine.isRaisedDone(), "Event \"done\" is expected not to be raised here.");

    statemachine.runCycle();
    assertTrue(statemachine.isStateActive(State.main_region_Rolling_the_dice));
    assertTrue(statemachine.isRaisedDone(), "Event \"done\" is expected to be raised here.");
}
The statemachine.raiseDiced(fv) statement raises the state machine’s diced event and submits the fv variable’s value as the event’s value. However, raising an event does not mean to also process it, at least not in cycle-based mode. This happens only when statemachine.runCycle() is called. Please note that the raised event together with its value is available only during the subsequent run cycle! Thus, if you need the event value at any later point in time, make it more permanent and copy it into a variable!
The drawback of submitting a parameter to the state machine as an event’s value is that you can only submit a single, primitive value. Often this is insufficient. A suitable approach for passing multiple values to a statechart is to combine variables with an event: First set the statechart variables that should serve as parameters one by one, then raise a corresponding event to notify the state machine that it can operate on the variables now.
As the source code shows, you can check the outgoing done event using the statemachine.isRaisedDone() method. It returns true if the event has been raised, else it returns false. Please note that a raised event is cleared right at the beginning of the next run cycle. That’s the reason why statemachine.isRaisedDone() returns true after the state machine transitioned from Results to Rolling_the_dice and false after transitioning from Rolling_the_dice to one of the D… states.
Event-driven mode
I’d like to conclude this topic with a few words on YAKINDU Statechart Tools (now itemis CREATE)’ event-driven mode. You can activate it by the @EventDriven annotation at the top of your statechart’s definition section.
If a state machine executes in this mode and an event is raised, the state machine immediately processes it. It does not wait for runCycle() to be called, but continues operating as long as there are any events to be processed, which includes internally-raised events. This also means that the state machine won’t return control to the outer Java application when each run cycle, but only when all events have been processed.
In our case, when the control flow reaches the Results state, the state machine is out of events and returns to the caller. Even if the next transition is marked with always, the state machine will need a trigger to execute it. This could be calling the runCycle() method or raising any event. That even will be ignored in this particular case, but execution will continue.
Here’s our for loop, again with the output statements omitted:
for (int i = 1; i <= 1000; i++) {
    long fv = dice();
    statemachine.raiseDiced(fv);
    assertTrue(statemachine.isStateActive(State.main_region_Results));
    statemachine.runCycle();
    assertTrue(statemachine.isStateActive(State.main_region_Rolling_the_dice));
    assertTrue(statemachine.isRaisedDone(), "Event \"done\" is expected to be raised here.");
}
May the source be with you!
The present article illustrates the basic mechanisms of how to integrate custom Java code with statecharts. Now it’s up to you to apply this knowledge to your own application and your own state machine, which is no doubt much more complex and challenging than my little example.
More information on general concepts of state machine code, code generation, and properties of the generated code you can find in chapter “Generating state machine code” of the YAKINDU Statechart Tools (now itemis CREATE) user guide. For details on Java in particular, please see subsection “Java code generator”.
We are currently thinking about establishing an even stronger Java integration in a future version of YAKINDU Statechart Tools (now itemis CREATE), similar to what we have done with the C and C++ integration (“Deep C/C++ Integration”). Thus, a Java application and a statechart could not only communicate by means of simple types, but they could use any Java types. For example, an application could raise an event with a complex object and pass it to the statechart.
Have fun, and may the (generated) source be with you!
Information: YAKINDU Statechart Tools Is Now itemis CREATE
Comments