
Anyone who implements DSLs with Eclipse Xtext benefits from the fact that the necessary infrastructure is generated automatically from the grammar. This gives you an environment in which everything is provided for developing your own DSL with minimum effort. A mere grammar and two buttons later, you can start Eclipse, full of anticipation. It first asks what kind of project you want to create. Xtext has not answered this question yet, so you have a choice.
Once you have created a project, many questions arise as to how your brand-new DSL can be used… What is the file name extension? Is it a text file? Is there a wizard? An example would help, but where can I find one? Who isn’t familiar with this sort of situation?
Previously, creating a wizard involved tedious and repetitive manual work. The requirements for wizards are not rocket science, nor is their implementation. What you want is a wizard that clearly shows how to create a special project for your DSL, ideally already containing examples. Can this be generated? Certainly it can: in Xtext 2.14 we can do exactly this.
Although this version will not be released until June 2018, together with Eclipse Photon, here is a preview.
Generating the wizard
Immediately after creating a new Xtext project, the project contains a mwe2 file that defines what is generated. This contains the following section of code:
language = StandardLanguage {
    name = "org.xtext.example.mydsl.MyDsl"
    fileExtensions = "mydsl"
    serializer = {
        generateStub = false
    }
    validator = {
        // composedCheck = "org.eclipse.xtext.validation.NamesAreUniqueValidator"
    }
 }
To generate the wizard, this is expanded to include a TemplateProjectWizard fragment for the wizard.
language = StandardLanguage {
    name = "org.xtext.example.mydsl.MyDsl"
    fileExtensions = "mydsl"
    serializer = {
        generateStub = false
    }
    validator = {
        // composedCheck = "org.eclipse.xtext.validation.NamesAreUniqueValidator"
    }
    projectWizard = {
        generate = true
    }
}
If the generation is triggered as normal, using a Run As -> MWE2 workflow, then not only are the editor, the auto-completion and so on generated, but also all the necessary extensions for the wizard.
A wizard package is generated in the UI project for the language, which mainly contains a file MyDslProjectTemplateProvider.xtend, where the name of the file depends on the name of the language. This file defines the content of the wizard: other configurations are usually not necessary.
If you open the runtime workspace directly after generation, it is possible to create new projects by opening the new wizard, for example via the main menu command File -> New -> Project. There will be a category MyDsl with a MyDsl project, again dependent on the name of the language. If the generated names are inappropriate you can of course change them using standard Eclipse means via the plugin.xml plug-in. If you want to incorporate the wizard in an existing language and are short of new entries in plugin.xml, here is a tip. Xtext normally generates content in the file plugin.xml, which can be edited manually. However, Xtext does not overwrite this file for further generations, but instead generates another file, plugin.xml_gen. You can then manually merge the contents of the plugin.xml_gen file into the existing plugin.xml.

As usual, you can define a project name and location on the first page.

The second page offers you a selection from the defined templates. By default only a "Hello World" template is provided.

The following optional page offers options to configure the template. The "Hello World" application is only an example for parameterization; it does not make much sense to parameterize it.

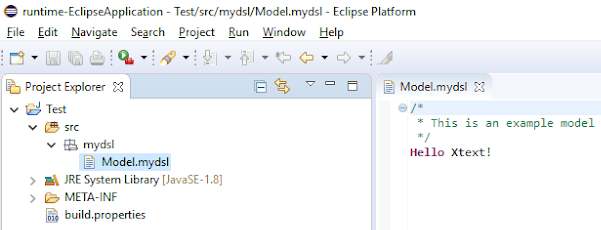
If the wizard ends with ‘Finish’, a project is created, to which the Xtext-Nature has already been assigned that contains a "Hello World" of the generated DSL.
Defining your own templates
To adapt the "Hello World" example for your own language, or to add further templates, you must adapt the TemplateProvider, the class that implements IProjectTemplateProvider. This returns a list of all available templates for the language with the method getProjectTemplates. By default the implementation looks like this:
class MyDslProjectTemplateProvider implements IProjectTemplateProvider {
    override getProjectTemplates() {
        #[new HelloWorldProject]
    }
}
Adding another template therefore consists of adding a new instance to this list.
class MyDslProjectTemplateProvider implements IProjectTemplateProvider {
    override getProjectTemplates() {
        #[new HelloWorldProject, new TestProject]
    }
}
The new project must be a subclass of AbstractProjectTemplate. The easiest way to do this is to use the active annotation provided by ProjectTemplate. This annotation allows you to specify a name, an icon and a descriptive text for the template. These control the presentation of the template in the list of available templates provided by the wizard.
@ProjectTemplate(label="Test", icon="project_template.png",
    description="<p><b>Test</b></p><p>This is a test project.</p>")
final class HelloWorldProject {
}
As a minimum, you must implement the generateProjects (IProjectGenerator) method. The transferred IProjectGenerator contains a single method, generate (ProjectFactory) that you can call any number of times to create projects when exiting the Eclipse wizard. Xtext already provides various implementations of ProjectFactory to create Java, plug-in or feature projects: you can of course add your own implementations here.
A call to create a simple plug-in project with a file might therefore look like this:
 generator.generate(new PluginProjectFactory => [
    projectName = projectInfo.projectName
    location = projectInfo.locationPath
    projectNatures += #[JavaCore.NATURE_ID,
                        "org.eclipse.pde.PluginNature",
                        XtextProjectHelper.NATURE_ID]
    builderIds += JavaCore.BUILDER_ID
    folders += "src"
    addFile('''src/Model.mydsl''', '''
        Hello World!
    ''')
])
Additional calls to generate create additional projects, while additional calls to addFile create additional files in the projects.
UI parameterization
To avoid merely static templates you can also use the API to define a simple UI. This will then be presented to users to allow them to provide parameters for the template.
By default the API allows you to define checkboxes, text fields and combo boxes. You can group these using group elements to provide an overview. The AbstractProjectTemplate class provides corresponding methods for defining the interface. A checkbox is generated by calling check. When assigned to an instance variable it can be used in the generateProjects method to determine a user-selected value. For example, you could generate a checkbox with the following code, which suppresses the generation of a project after the user’s selection:
@ProjectTemplate(label="Test", icon="project_template.png",
    description="<p><b>Test</b></p><p>This is a test project.</p>")
final class TestProject {
    val generateHello = check("Generate Hello", true)

    override generateProjects(IProjectGenerator generator) {
        if (generateHello.value) {
            generator.generate(new PluginProjectFactory => [
                projectName = projectInfo.projectName
                location = projectInfo.locationPath
                projectNatures += #[JavaCore.NATURE_ID,
                                    "org.eclipse.pde.PluginNature",
                                    XtextProjectHelper.NATURE_ID]
                builderIds += JavaCore.BUILDER_ID
                folders += "src"
                addFile('''src/Model.mydsl''', '''
                    Hello World!
                ''')
            ])
        }
    }
}
You can create text fields and combo boxes and use them analogously with the text and combo methods. If you need a more sophisticated wizard, you can overwrite the updateVariables and validate methods, as in the "Hello World" example. These are called after every user interaction with the UI.
updateVariables can be used to manipulate widgets, for example to enable or disable specific items when the user changes a value in the wizard. validate can return a status value to allow reporting of user input errors in the wizard as error messages.
Contribute templates via the plug-in
Project templates are registered via an extension point. You do not get much benefit from this as a DSL developer: things only become interesting when your plug-in is extended by a third party, who can easily contribute further implementations of IProjectTemplateProvider.
It is necessary to reference the implementing class and specify the name of the grammar to which you want to contribute. This name is used to decide in which wizard the templates are displayed. The example generated by Xtext looks like this in plugin.xml.
<extension point="org.eclipse.xtext.ui.projectTemplate">
    <projectTemplateProvider
            class="org.xtext.example.mydsl.ui.wizard.MyDslProjectTemplateProvider"
            grammarName="org.xtext.example.mydsl.MyDsl">
    </projectTemplateProvider>
</extension>
For anyone who cannot wait for Eclipse Photon, check out the nightly updates at http://download.eclipse.org/modeling/tmf/xtext/updates/composite/latest/. Just install the latest and hottest Xtext to get started.
Comments